Creating VPC and EC2 on AWS for Free Tier With Terraform

Overview
In this post, you will learn how to deploy resources to AWS without exceeding the free limits with Terraform.
Once you follow this tutorial, you will have:
- A VPC with
10.10.0.0/16CIDR, - A public subnet with
10.10.20.0/24CIDR oneu-central-1aAZ,- A public subnet with
10.10.40.0/24CIDR oneu-central-1bAZ, - A private subnet with
10.10.21.0/24CIDR oneu-central-1aAZ, - A private subnet with
10.10.41.0/24CIDR oneu-central-1bAZ, - Security groups for SSH, HTTP(S) for ingress and all for egress,
- A public subnet with
- A Public Elastic IP,
- An Ec2 Instance,
- Ubuntu Linux
t2.microtype,- 25GB storage,
All these resources are free if you are on AWS free tier!
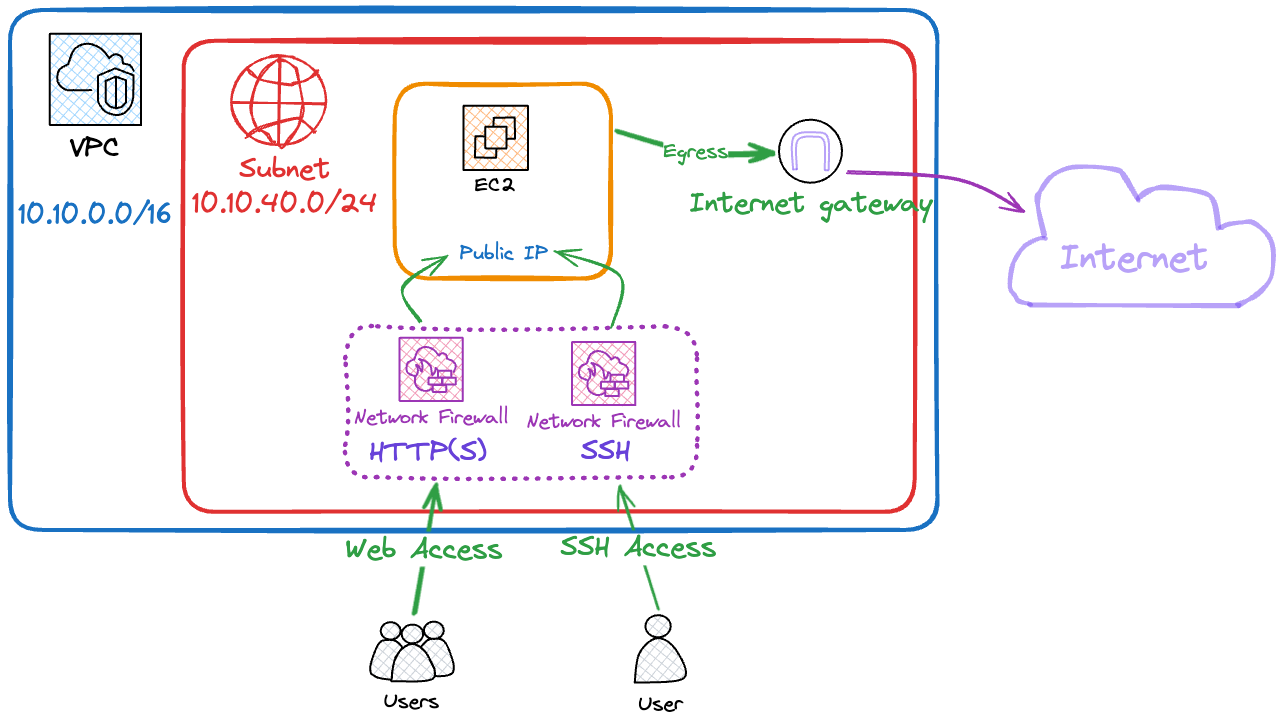
You can see an example diagram of the resources.

Pre-Requirements
- An AWS account.
- A Linux or macOS computer to run Terraform.
- Git
Install Terraform
You can skip this section if you already have Terraform installed on your computer.
If you are reading this tutorial, you know what Terraform is. Terraform is an open-source Infrastructure as Code (IaC) tool that enables users to define and provision infrastructure efficiently across various cloud providers.
Installation on MacOS
If you have Homebrew installed on your computer, you can use brew to install Terraform.
Open a terminal and run these commands:
brew tap hashicorp/tap && \
brew install hashicorp/tap/terraform
Once the installation is finished, you can check the Terraform version and verify the installation.
terraform --version
Installation on Windows
You can head to the official Terraform installation document and download the latest Terraform version.
But my recommendation is to use Linux with WSL.
Installation on Linux
You can head to the official Terraform installation document and click on the tab for your distro.
If you are using Arch Linux and have yay tool installed , you can simply install Terraform with the commands below.
yay -S terraform
Create an AWS Service Account for Terraform
If you have a service account for the terraform, you can skip this step.
To create a service account, you can follow the tutorial below step by step.

Create an SSH Key For Linux Server Authentication
You can skip this section if you already have an SSH key to use on a Linux server.
To enhance Linux server security, generate an SSH key pair using the ssh-keygen command, enabling secure authentication by pairing a private key on the client with the server's authorized public key.
A SSH key pair consists of 2 files, public and private. You should keep the private one safe and secure. You can think that a private file opens the locks. You should use the public one to lock something like a Linux server.
In summer, we will use a public key to lock our server SSH on our Terraform configuration. After the server is up and running, we will use the private one to connect to the server.
To create a SSH key pair, you can use this command on your macOS or Linux computer.
-f ~/.ssh/aws-ec2: The file path and name where you want to create the key pair.-C "[email protected]": The comment can be anything.- Once you run the command below, it will ask you to enter a passphrase. This is password protection for the private file. You should use a secure and strong password.
ssh-keygen -t ed25519 -f ~/.ssh/aws-ec2 -C "[email protected]"
To view the private file that we will use to connect to the server, you can run:
cat ~/.ssh/aws-ec2
To view the public file that we will use on Terraform, you can run:
cat ~/.ssh/aws-ec2.pub
Create AWS Credentials Environment Variables
Since Terraform must be authenticated to your AWS account, we will use the access keys we created earlier.
There are multiple ways to use those keys. But in this tutorial, I will use the environment variables method, which is unsafe for the long term.
For more details about AWS authentication, you can read the AWS Terraform documentation.
We could run the export command below directly, but this will save the secret access keys in the shell history, which is very unsafe. So we will create a file and put the keys into it.
Create a file named terraform-aws.sh with vim
vim terraform-aws.sh
Copy this template and paste it into the file.
#!/bin/bash
export AWS_ACCESS_KEY_ID=YourAccessKeyId
export AWS_SECRET_ACCESS_KEY=YourSecretAccessKey
Press the i button, move the cursor with the arrow buttons on your keyboard, and edit the AWS_ACCESS_KEY_ID and AWS_SECRET_ACCESS_KEY variables with yours.
Press esc, colon (:) and write wq! and hit enter on your keyboard to save the changes and exit the editor.
❗Keep this file safe and secure. Whoever gets access to the file controls all resources on your AWS account.
Now you can use this file to use your keys.
source terraform-aws.sh
📚Note: If you close your terminal or open a new one, you should run the source command each time before running terraform commands.
If your AWS variables get lost and you run terraform commands, you will get an error, like in the example below:
Planning failed. Terraform encountered an error while generating this plan.

Error: configuring Terraform AWS Provider: no valid credential sources for Terraform AWS Provider found.
Download the Sample Terraform Files From Github
You should create a couple of files. Instead of creating them manually, you can just download them from the Github repository.
Open a terminal and change the directory to the home directory. You can choose anywhere you want.
cd $HOME
Then you can download the Terraform files from the Github repository.
git clone --depth 1 --branch blog-tutorial https://github.com/burakberkkeskin/personal_infra.git && \
cd personal_infra/main
Once the download is finished and you are in the Terraform configuration directory, you can run terraform init to see if Terraform configuration is ready to be used.
❗Be aware that you are in the personal_infra/main directory. The terraform commands below should also run in this directory too.
terraform init
Configure and Customize Terraform Variables
Add the SSH Key
Print the public key you created earlier and copy it.
cat ~/.ssh/aws-ec2.pub
Open the variables.auto.tfvars file with a file editor.
vim variables.auto.tfvars
Press the i button, move to a new line with the arrow buttons on your keyboard, and create a new variable named ec2_public_key like in the example below:
// general variables
 project_name = "main"
 aws_region = "eu-central-1"
 aws_zone = "eu-central-1a"

 ec2_public_key = "ssh-ed25519 SuperSecretKeylZDI1NTE5AAAAINa3hu5qHgD3cS7dxMlO6I3dTTx/AFU5HqhNZnM6rnEJ [email protected]"

 ...
Press esc, colon (:) and write wq! and hit enter on your keyboard to save the changes and exit the editor.
You can also configure other variables as you wish, like the aws_region, project_name.
Terraform Plan
To see if everything is ready to use, you can run terraform plan command to see the resources that will be created.
terraform plan
If you see that there are resources that will be created as a plan, it means you have configured terraform correctly ✅
Terraform Apply
Once you are ready to create the resources you saw in the terraform plan output, you can run terraform apply command.
terraform apply
It will ask you to be sure.
Do you want to perform these actions?
  Terraform will perform the actions described above.
  Only 'yes' will be accepted to approve.

  Enter a value:
Write yes and hit enter. Within a few minutes, your resources will be ready to use.
Apply complete! Resources: 23 added, 0 changed, 0 destroyed.

Outputs:
ec2_instance_private_ip = "10.10.20.136"
ec2_instance_public_ip = "35.158.26.83"
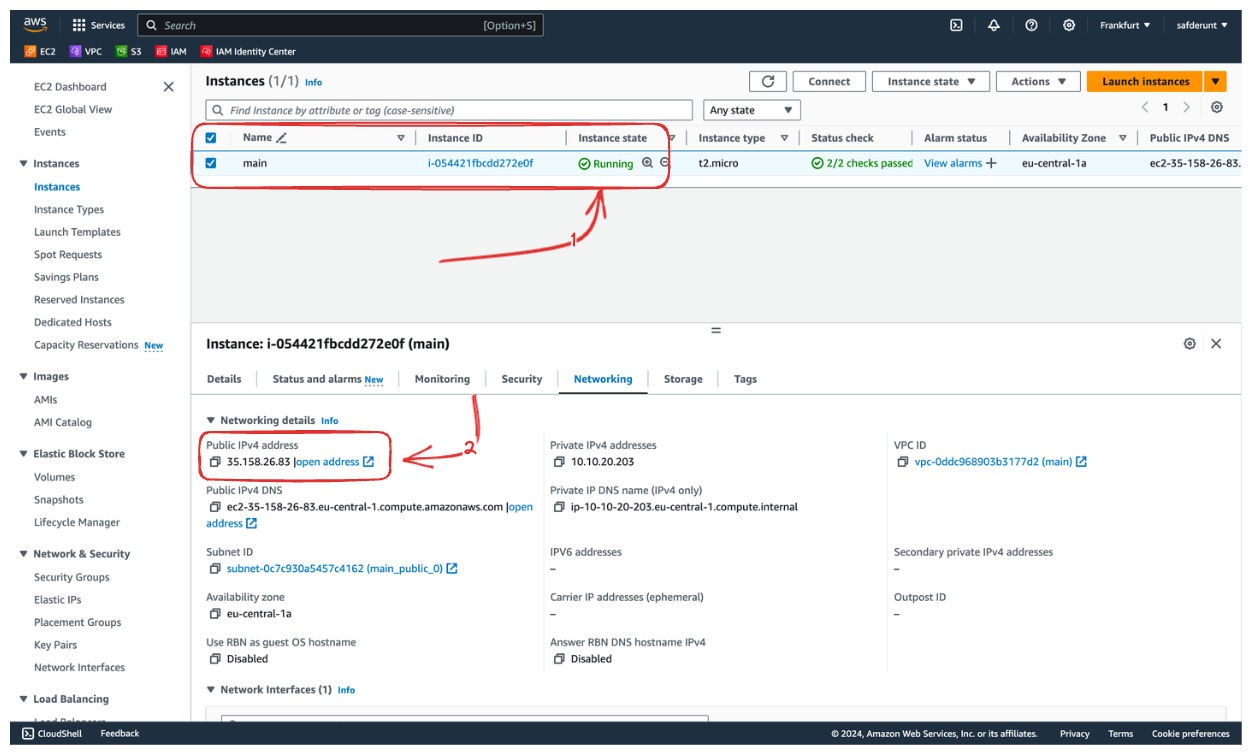
To check from the AWS Console, you can head to the EC2 instance. You can also see the IP address of the instance.

Ta da 🥳 Your Ubuntu Linux server is ready to use.
SSH Into the Server For Testing
You have already seen the IP address of the instance. To connect, you can open a terminal and run ssh command:
-i ~/.ssh/safaws: The path to the private SSH key.ubuntu: Default username of the Ubuntu AMI on the AWS.35.158.26.83: Public IPv4 address.
ssh -i ~/.ssh/safaws [email protected]
If it is the first time that you are connecting to a server, it will ask if you are sure to connect. Write yes enter hit Enter.
Are you sure you want to continue connecting (yes/no/[fingerprint])? yes
If you have followed the tutorial until now, congratulations, You are on the Linux server!
You can use this server however you like. For example, you can host a website, make it a VPN server, a database server, or anything else you want.
Example Nginx Container
In this step, you will see how to deploy a nginx container. The docker should be already installed in the instance. All you need to do is run the docker run command.
Let's run a Nginx container.
sudo docker run --name "website" --rm -d -p "80:80" nginx
To test if everything works, you can simple open a browser and head to the public IPv4 address like:
http://35.158.26.83
Destroying the All Resources
If you want to destroy all the resources for some reason, like the end of the free tier, you can destroy all resources easily.
First, you should change the directory to the Terraform you downloaded earlier.
cd ~/personal_infra/main
You should activate the AWS keys again for authentication.
source terraform-aws.sh
Now, it is time to destroy all resources.
terraform destroy
It will ask you to be sure. Write yes and hit Enter.
Do you really want to destroy all resources?
  Terraform will destroy all your managed infrastructure, as shown above.
  There is no undo. Only 'yes' will be accepted to confirm.

  Enter a value: yes
Once all resources are destroyed, you will see an output like below.
Destroy complete! Resources: 23 destroyed.
Re-Use on Another Account
If you want to use the exact same configuration, you can just change the AWS access keys in the terraform-aws.sh. file and apply the same configuration. With that, you can change AWS accounts under 10 minutes!

