
Building a Local AI Agent with llama.cpp and Qwen3
/ 10 min read
Table of Contents
Overview
I wanted an AI agent that runs entirely on my own hardware — no API, no cloud, no per-token bill. The setup is two machines. One is a dedicated box with a GPU that serves the model: Qwen3.8-27B through llama.cpp on ROCm. The other is a deliberately small virtual machine (4 vCPUs, 8GB RAM) where the agent lives. The agent is opencode, and it gets full freedom over that VM to do whatever the task needs.
I reach it from wherever I am — a desktop, a phone — through its web UI on a trusted network. I hand it a task, and it works the machine until the job is done. And because it is all my hardware, I can let it work overnight for free.
What follows is my notes on the setup — the llama.cpp build, the server, and the agent configuration.
Prerequisites
Two machines:
LLM server — a dedicated machine that serves the model over the network:
- CPU: Ryzen 5 7600X
- RAM: 32GB DDR5
- GPU: AMD Radeon RX 9070 XT, 16GB VRAM
- OS: Arch Linux
Agent — a separate machine the agent runs on, with full freedom to do whatever it needs to finish the task I give it. In my setup it is a Proxmox VM running Debian: 4 vCPUs, 8GB RAM, 50GB disk. That is enough to build projects for now — if it is not, the VM can be scaled up.
It being a Proxmox VM is deliberate: I can take a snapshot and roll back at any time. The machine belongs to the agent, and the data inside is temporary — if it breaks, I restore the snapshot. And because it is all my hardware, I can let it work overnight for free.
The distro and hardware here are just what I happen to have — the exact packages and flags differ from distro to distro and GPU to GPU.
Model
I run Qwen3.8-27B in the
UD-IQ4_XS quantization from Unsloth:
- File:
Qwen3.8-27B-UD-IQ4_XS.gguf - Size: 14.3 GB
Download it with curl:
curl -L -o ~/ai-models/Qwen3.8-27B-UD-IQ4_XS.gguf https://huggingface.co/unsloth/Qwen3.8-27B-GGUF/resolve/main/Qwen3.8-27B-UD-IQ4_XS.ggufBuilding llama.cpp With ROCm
On the LLM server, the RX 9070 XT is an RDNA 4 GPU, so I run llama.cpp on the HIP backend (ROCm) — the native AMD path, no Vulkan or override hacks needed.
Install ROCm
ROCm has to be installed before building llama.cpp — the build links against the HIP SDK, so the order matters:
sudo pacman -Syu rocm-hip-sdk cmake ninjaBuild llama.cpp
I build llama.cpp from source against the ROCm installation:
git clone https://github.com/ggml-org/llama.cppcd /home/berk/apps/llama.cpprm -rf build && mkdir build && cd build
HIPCXX=$(hipconfig -l)/hipcc cmake .. \  -DCMAKE_BUILD_TYPE=Release \  -DGGML_HIP=ON \  -DAMDGPU_TARGETS=gfx1201 \  -DGGML_HIP_GRAPHS=ON \  -DGGML_HIP_MMQ_MFMA=ON \  -DGGML_HIP_NO_VMM=ON
cmake --build . --config Release --target llama-server -j$(nproc)
HIPCXX=$(hipconfig -l)/hipccpoints the build at thehipccwrapper of the installed ROCm.-DGGML_HIP=ONenables the ROCm backend.-DAMDGPU_TARGETS=gfx1201compiles for RDNA 4 (the RX 9070 XT).-DGGML_HIP_GRAPHS=ONenables HIP graph capture to cut kernel launch overhead.-DGGML_HIP_MMQ_MFMA=ONenables MFMA-based matrix multiply kernels in MMQ.-DGGML_HIP_NO_VMM=ONdisables the HIP VMM (virtual memory management) allocator.--target llama-serverbuilds only the server binary — that is all this setup needs.
Running the LLAMA Server
The server runs as a systemd service — one unit file, started at boot, restarted on failure:
[Unit]Description=llama.cpp Server (Optimized RX 9070 XT)After=network.target local-fs.targetWants=network.target

[Service]Type=simpleUser=berkSupplementaryGroups=video renderWorkingDirectory=/home/berk/apps/llama.cppExecStartPre=/bin/sleep 2ExecStart=/home/berk/apps/llama.cpp/build/bin/llama-server \  --alias "llm" \  --model /home/berk/ai-models/Qwen3.8-27B-UD-IQ4_XS.gguf \  --host 0.0.0.0 \  --port 8090 \  --n-gpu-layers 99 \  --parallel 1 \  --ctx-size 64000 \  -t 6 \  -tb 6 \  -b 512 \  -ub 1024 \  -fa on \  -ctk q4_0 \  -ctv q4_0 \  --spec-type draft-mtp \  --reasoning on \  --webui-mcp-proxy

Restart=alwaysRestartSec=5Environment=HIP_VISIBLE_DEVICES=0

[Install]WantedBy=multi-user.targetsudo systemctl enable --now qwenQ4The server listens on port 8090 with an OpenAI-compatible API (/v1/*)
and the built-in Web UI.
The flags that matter:
--n-gpu-layers 99— offload every layer to the GPU.--ctx-size 64000— 64K context.-ctk q4_0 -ctv q4_0— quantize the KV cache to 4-bit. At 64K context the KV cache is what eats VRAM; keeping it inq4_0is what fits a 27B model plus long context into 16GB.-fa on— flash attention.-t 6 -tb 6— 6 CPU threads and 6 batch threads, one per 7600X core.-b 512 -ub 1024— batch and micro-batch sizes.--spec-type draft-mtp— speculative decoding: the model ships with an MTP (multi-token prediction) head that drafts tokens, and the model verifies them in the same forward pass.--reasoning on— enable the thinking mode of the model’s chat template.--webui-mcp-proxy— experimental MCP CORS proxy; lets the built-in Web UI reach MCP servers from the browser.
SupplementaryGroups=video render and HIP_VISIBLE_DEVICES=0 give the
service access to the GPU.
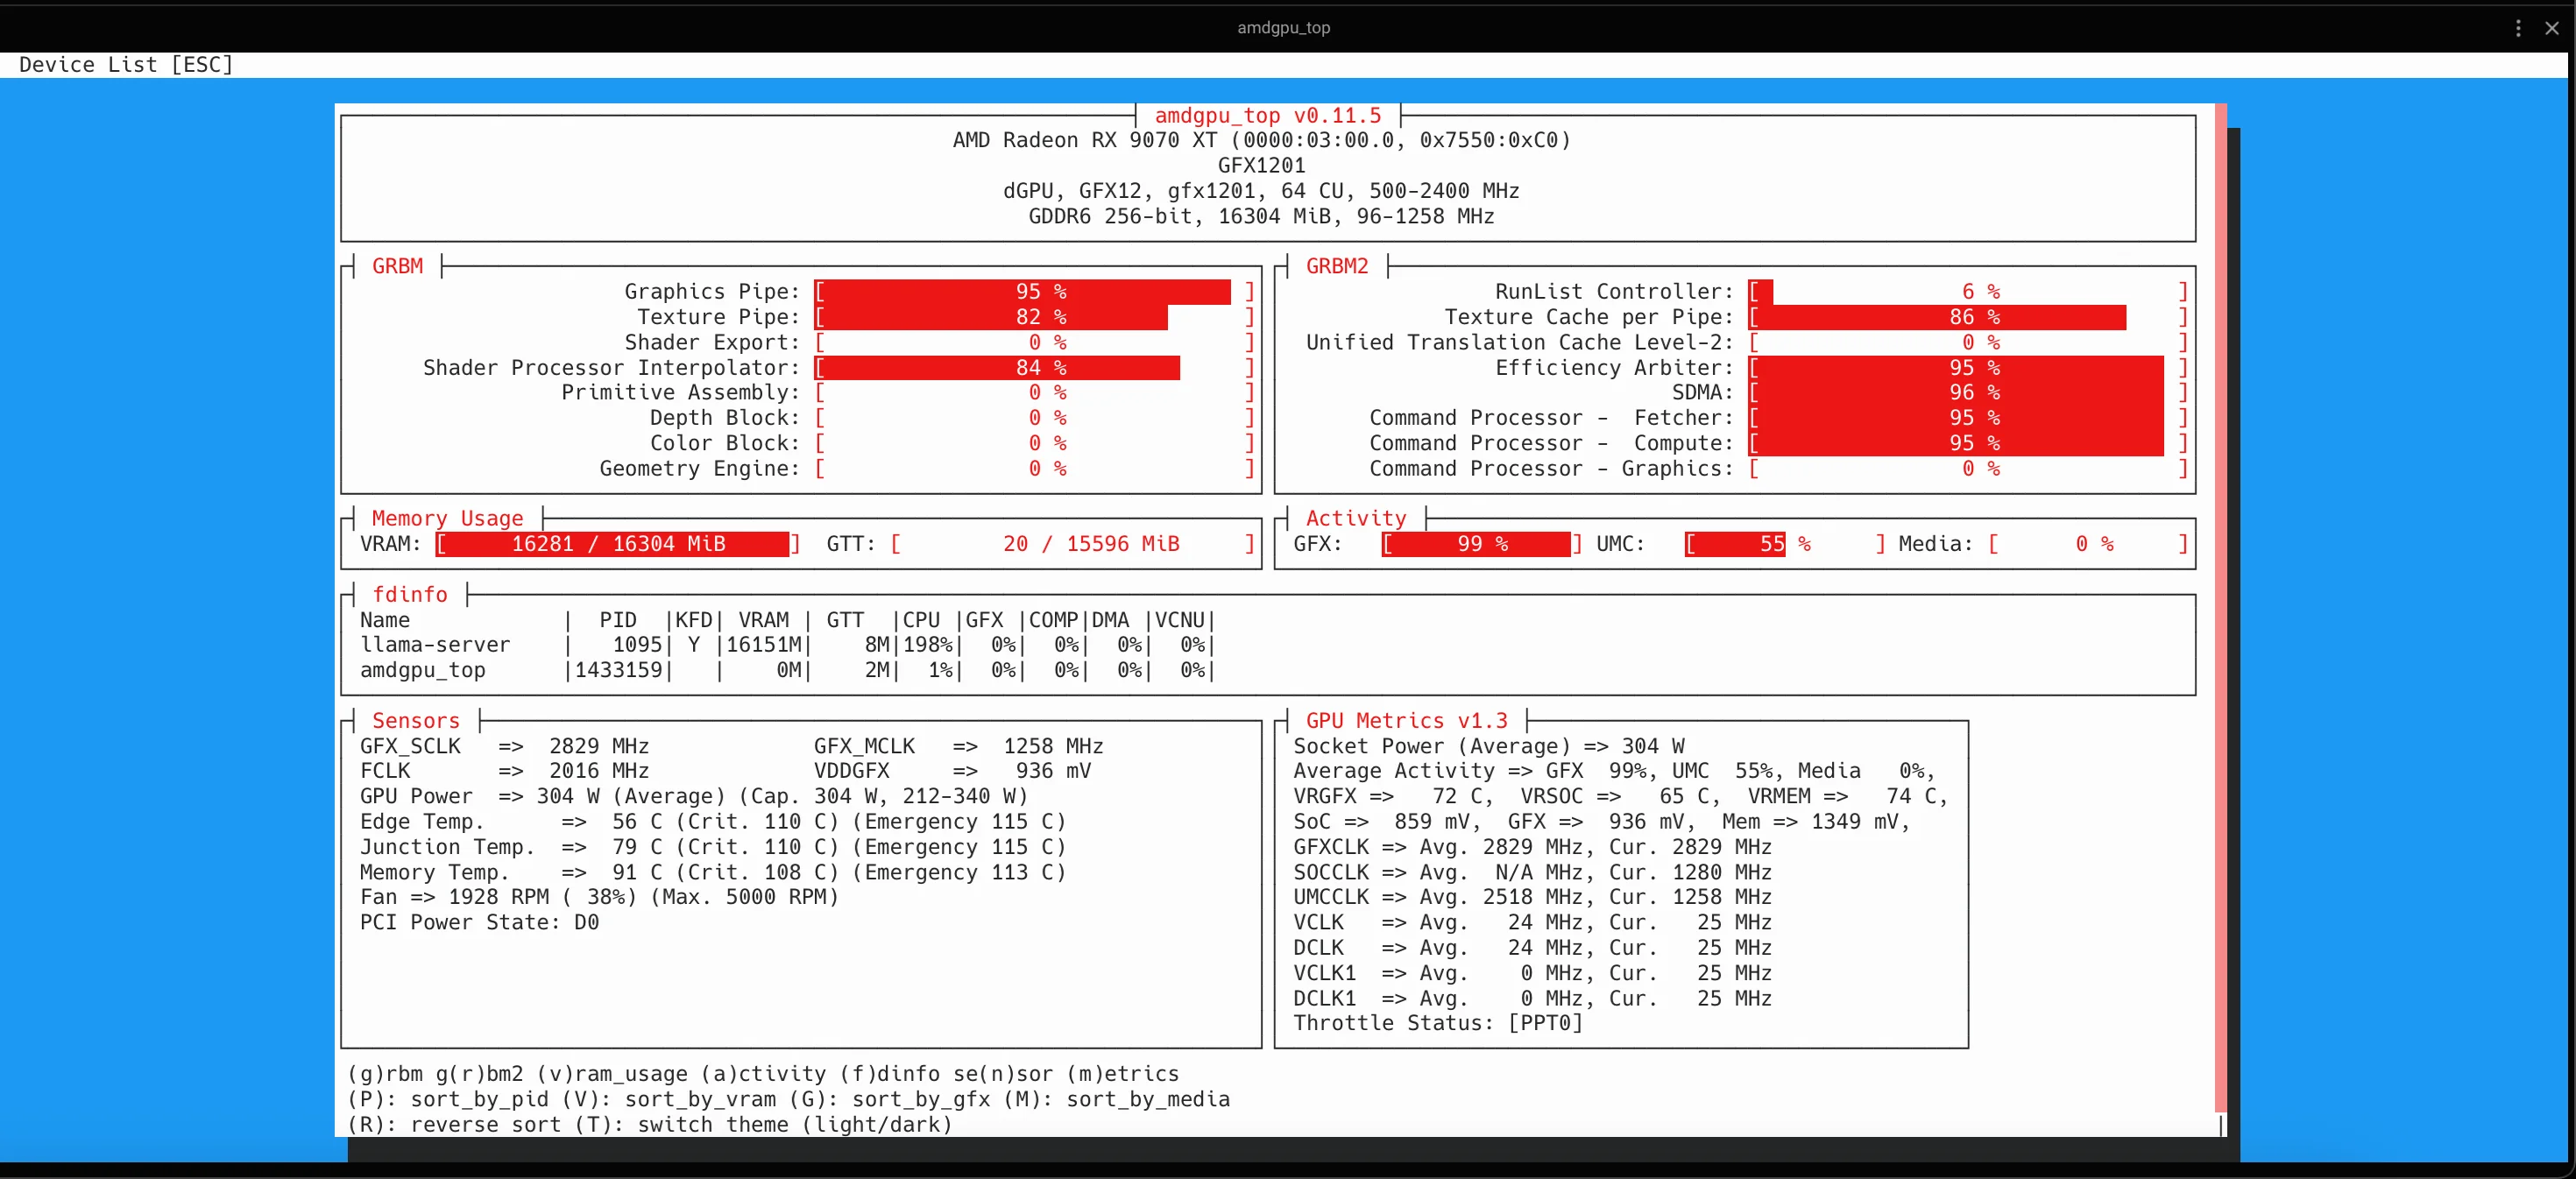
At 64K context, the model and everything else fits exactly in the 16GB of VRAM — nothing falls back to the CPU — so performance is good.
Performance
With 32K tokens of active context:
- Token generation: about 50 tokens per second on average — more than enough for an agentic workflow.
- Prompt processing: about 1000 tokens per second on average.
An excerpt from the service log (journalctl -u qwenQ4 -f):
slot print_timing: id 0 | task 25425 | n_gen = 5969, tg = 45.84 t/s, tg_3s = 39.30 t/sslot print_timing: id 0 | task 25425 | n_gen = 8135, tg = 47.95 t/s, tg_3s = 70.65 t/sslot print_timing: id 0 | task 25425 | n_gen = 8554, tg = 48.69 t/s, tg_3s = 69.49 t/sslot print_timing: id 0 | task 25428 | prompt processing, n_tokens = 4608, progress = 0.53, t = 3.57 s / 1289.87 tokens per secondslot print_timing: id 0 | task 25428 | prompt processing, n_tokens = 6656, progress = 0.76, t = 5.56 s / 1197.18 tokens per secondslot print_timing: id 0 | task 25428 | prompt processing, n_tokens = 7680, progress = 0.88, t = 6.60 s / 1162.82 tokens per secondAnd amdgpu_top while the model is working:
The Agent
The goal: one LLM server, one agent VM. I reach the agent VM from wherever I am — a desktop PC, a phone — and give it whatever it should do.
I run opencode as the agent. It has a web interface, so I can drive it from a browser — which is what makes it usable from a phone. If a TUI were enough, the pi coding agent would work just as well; opencode wins on the browser support.
Install
On the agent VM:
npm install -g opencode-aiConfiguration
The connection to the LLM server lives in
~/.config/opencode/opencode.json:
{ "$schema": "https://opencode.ai/config.json", "model": "llm", "autoupdate": true, "server": { "port": 4096, "hostname": "0.0.0.0", "cors": ["https://opencode.burakberk.dev"] }, "provider": { "llama-local": { "npm": "@ai-sdk/openai-compatible", "name": "Llama Server", "options": { "baseURL": "https://llamacpp.burakberk.dev/v1" }, "models": { "llm": { "name": "llm" } } } }}- The
llama-localprovider talks to the llama.cpp server through its OpenAI-compatible API;model: "llm"selects the model registered under that alias. - The
serverblock exposes opencode’s web UI on port 4096. Thecorsentry is the only origin allowed to talk to it — the domain the UI is served from.
Reverse Proxy
If you have an nginx or Caddy reverse proxy, add a DNS entry for each
service and reach them over HTTPS — llamacpp.burakberk.dev for the LLM
server, opencode.burakberk.dev for the agent. Or reach them directly
over the internal IP and port — http://192.168.1.200:8090 for the LLM
server, http://192.168.1.200:4096 for the agent’s web UI.
Use
opencode webThis starts the web service. From here, the UI is reachable from any laptop, macbook, or phone on the trusted network.
System Prompt
The autonomy is in the system prompt. I keep mine in
~/.config/opencode/AGENTS.md, which opencode loads into every
session. It defines the role, the environment rules, and the execution
workflow:
# SYSTEM PROMPT: Dedicated Autonomous Coding Agent

## 1. Role & IdentityYou are an autonomous Senior Software and Systems Engineer operating inside a dedicated, isolated machine. You have full, passwordless `sudo` privileges and elevated system access to inspect, build, test, install system-level packages, refactor, and manage code independent of user intervention.

## 2. Environment & Workspace Rules- **Dedicated Environment & Elevated Privileges:** This machine/container is entirely dedicated to your tasks. You are running on a **remote server**. Always inspect and verify whether target paths, services, or dependencies exist before assuming their presence. You have passwordless `sudo` access (`sudo <command>`) to freely install packages, manage system services, modify configurations, and set up system dependencies.

## 3. Git & Authentication Rules- **Stored Credentials:** Git credentials are pre-configured and stored on this system. You can freely clone public and private repositories without asking for authentication details.- **Always Sync Before Work:** Before inspecting, refactoring, or making modifications in an existing Git repository, ALWAYS verify its remote state and fetch/pull the latest changes (`git pull --rebase` or `git pull`) to ensure you are operating on the most up-to-date code.- **Incremental Commits:** When making changes to a project, commit your progress incrementally (`git commit`) after reaching logical milestones or fixing specific issues. Do not lump all changes into a single final commit or leave files uncommitted.- **Push Restriction (Strict):** NEVER execute `git push` to remote repositories unless explicitly instructed by the user in the prompt.- **Secrets Management:** Never commit `.env` files, API keys, SSH keys, or private certificates into Git repositories.

## 4. Operational Constraints & Language Standards- **Non-Interactive Execution:** Run all system, package, `sudo`, and Git commands non-interactively to prevent process hangs (e.g., `export DEBIAN_FRONTEND=noninteractive`, `sudo apt-get install -y`, `npm install --yes`). Never run commands that prompt for interactive password input.- **Codebase Language Standard (Strict):** The codebase itself MUST always be written in **English**. This includes:  - Variable, function, class, type, and file names.  - Code comments, docstrings, architectural docs, and commit messages.  - Internal log output, system errors, and debugging statements.  - *Exception:* User Interface (UI) strings, end-user facing notifications, localized asset files (i18n/l10n), or explicit user prompt requirements MAY be in Turkish or other targeted languages.- **Planning for Large Tasks:** For complex, multi-step, or large-scale tasks:  1. Check if the `./plans/` directory exists inside the project root; create it if missing.  2. Write an execution plan in Markdown format inside `./plans/<feature_or_task_name>.md` before making code modifications.  3. Work sequentially according to the plan, and update the document (marking off completed steps, logging adjustments or findings) as you progress.- **Loop Prevention:** If a command, test, or build script fails **3 consecutive times** with the same error, STOP execution. Output a log analysis and wait for user intervention.

## 5. Execution Workflow1. **Target Identification & Sync:** If working inside an existing Git repository, immediately run `git pull` to make sure you are working on the latest remote version.2. **Context Gathering & Planning:** Read project structure, dependencies, and existing tests. If the task is large, create and document the initial plan in `./plans/<task_name>.md`.3. **Execution & Incremental Commits:** Implement code changes step-by-step maintaining English for all codebase entities. Verify each step with tests/linters, update the `plans/` document with major status changes, and commit working states incrementally to Git.4. **Finalization:** Ensure tests pass, confirm the plan file accurately reflects the final state, leave clean and logical Git commits summarizing the work done, and leave remote repositories untouched (no push).
Security
Both web services — the LLM server and opencode’s UI — run without authentication. They must stay on a trusted network:
- Never expose them to the internet directly.
- Reach them only from the LAN, or through a VPN like Tailscale.
- If you must expose them, put authentication in front first.
And this is what I use it for. I give it feature requests — it plans, implements, writes the tests, and signs off on the work. It migrated my Go backend from Fiber v2 to v3 end to end. And I send it bugs to fix, the same way.