Configuring NUT for an İmelsan C1KS Serial UPS on Proxmox VE
/ 8 min read
Table of Contents
Context
My homelab runs on an İmelsan C1KS online double-conversion UPS (1000VA / 700W) backed by an external 36V 8Ah AGM battery bank. The online topology gives continuous 220V pure sine-wave output with true 0 ms transfer time, shielding my Proxmox VE hosts and ZFS storage pools against brownouts and momentary grid dips.
However, the unit was completely offline. Manufactured on an OEM platform (Santak Castle C1KS) common in commercial and industrial settings, it lacks modern USB ports or network management cards, exposing only an RS-232 DB9 female serial port running the legacy Megatec Q1 protocol. Running an unmonitored ~100W load meant any utility outage exceeding ~1.5 hours would eventually end in a hard power cutoff (“dirty shutdown”), endangering open SQLite and PostgreSQL databases as well as ZFS metadata.
What follows is my notes on wiring the serial adapter, resolving Proxmox USB ID collisions, overcoming the optocoupler power trap in Network UPS Tools (NUT), calibrating non-linear battery discharge, and coordinating clean shutdowns across multiple nodes.
The Hardware Collision
To connect the UPS to my primary Proxmox VE node (pve2), I picked up an inexpensive Alfais 4891 USB-to-RS232 DB9 male converter powered by the ubiquitous QinHeng Electronics CH340 chipset (1a86:7523).
The Linux kernel attached the device immediately as /dev/ttyUSB0. However, this exposed an immediate architectural hazard:
In my homelab, pve2 also hosts Home Assistant OS in a dedicated virtual machine. That VM accesses a physical Sonoff Zigbee USB coordinator, which also uses the CH340 serial chip. Because Proxmox had the Home Assistant virtual machine configured with USB passthrough matching VendorID:ProductID (1a86:7523), a host reboot would trigger an unpredictable race condition: Proxmox could assign the UPS cable to the VM instead of the Zigbee coordinator, breaking both the Zigbee smart home mesh and host telemetry.
I pinned the Home Assistant virtual machine passthrough to its physical motherboard socket (1-6):
qm set <vmid> -usb0 host=1-6On the Proxmox host, I referenced the UPS adapter strictly through its persistent device ID path rather than transient /dev/ttyUSB0:
/dev/serial/by-id/usb-1a86_USB2.0-Ser_-if00-port0The Optocoupler Power Trap
With the adapter secured, I installed Network UPS Tools (apt install nut nut-server nut-client) and granted the daemon access to serial ports (usermod -aG dialout nut).
The standard NUT driver for the Megatec Q1 serial protocol is blazer_ser. I started with a minimal /etc/nut/ups.conf:
[imelsan] driver = blazer_ser port = /dev/serial/by-id/usb-1a86_USB2.0-Ser_-if00-port0 desc = "Imelsan C1KS 1kVA Online UPS"Running upsdrvctl start failed outright:
Network UPS Tools - Megatec/Q1 protocol serial driver 1.63 (2.8.0)No supported UPS detectedThe cabling and baud rate (2400 baud, 8N1) were correct, and the serial adapter loopback passed.
The issue lies in how industrial UPS serial ports are designed. To protect sensitive server electronics from ground loops and high-voltage inverter transients, the RS-232 interface inside the UPS is optoisolated. Crucially, these internal optocouplers draw no operating power from the UPS mainboard; they rely on parasitic line power driven by the computer’s RS-232 control lines—specifically DTR (Data Terminal Ready) and RTS (Request to Send).
Modern low-cost USB-to-serial adapters leave DTR and RTS floating or low by default. Because the optocouplers remained completely unpowered, ASCII query pulses sent by blazer_ser hit a dark diode and never triggered the UPS microcontroller.
The fix was adding cablepower = both to /etc/nut/ups.conf:
[imelsan] driver = blazer_ser port = /dev/serial/by-id/usb-1a86_USB2.0-Ser_-if00-port0 desc = "Imelsan C1KS 1kVA Online UPS" cablepower = both synchronous = yes pollinterval = 5This directive tells NUT to drive both DTR and RTS high (+5V / +12V) before transmitting queries. The optocouplers energized immediately, and upsc imelsan@localhost began returning live telemetry:
battery.voltage: 41.58input.voltage: 236.0output.voltage: 221.0ups.load: 11ups.status: OLI also set synchronous = yes alongside a 5-second polling interval (pollinterval = 5) to prevent unthrottled driver polling loops from eating host CPU cycles.
Overcoming the Linear Voltage Trap
While telemetry was flowing, NUT’s default state-of-charge calculation presented a major operational headache.
By default, blazer_ser estimates battery percentage using an open-circuit linear formula between high and low voltage thresholds:
$$\text{Charge %} = \frac{V_{\text{terminal}} - V_{\text{low}}}{V_{\text{high}} - V_{\text{low}}} \times 100$$
In practice on an active load, this naive math causes two severe illusions:
- The Instant Outage Drop: A fully charged 36V lead-acid string floats around 41.4V. Within 40 seconds of a power cut under ~100W load, the surface charge settles to the 37.0V discharge plateau. The linear formula interprets this natural drop as a collapse from 100% to 61%, triggering false panic.
- The Instant Recharge Jump: When grid power returns, the charging stage immediately applies ~39.8V bulk potential across the terminals. The naive formula jumps from 0% to 90% in under three minutes, despite the battery chemistry having absorbed negligible energy.
- Hardware Cutoff Mismatch: Default NUT configurations assume a theoretical low cutoff around 31.5V (10.5V per 12V block). During a controlled live discharge test on my homelab, the UPS internal firmware sounded a continuous alarm and initiated hardware shutdown at 34.74V. If NUT had waited for 31.5V to trigger automated shutdown, the servers would have lost power before the command was ever sent.
To fix this, I calibrated /etc/nut/ups.conf against empirical measurements:
[imelsan]    driver = blazer_ser    port = /dev/serial/by-id/usb-1a86_USB2.0-Ser_-if00-port0    desc = "Imelsan C1KS 1kVA Online UPS"    cablepower = both    synchronous = yes    pollinterval = 5
    # Hardware Cutoff Calibration    default.battery.voltage.high = 40.5    default.battery.voltage.low = 34.7
    # Load-weighted runtime and absorption curve    runtimecal = 720,100,1800,50    chargetime = 18000    idleload = 8    offdelay = 180
default.battery.voltage.low = 34.7: Aligns NUT’s empty threshold with the physical hardware inverter cutoff.runtimecal = 720,100,1800,50: Establishes runtime calibration points (720 seconds at 100% rated load, 1800 seconds at 50% load), allowing NUT to derive remaining runtime via Peukert-weighted power integration rather than raw terminal voltage.chargetime = 18000: Enforces a realistic 5-hour chemical absorption curve upon AC return, eliminating fake instant-recharge jumps.offdelay = 180: Gives the system a 3-minute grace window between initiating shutdown and the inverter cutting power to the outlets.
Observability and Dashboards
With the daemon stabilized, I opened port 3493 in the Proxmox cluster firewall (/etc/pve/firewall/cluster.fw) under a [group nut] rule, allowing internal LAN clients to query upsd.
Prometheus & Grafana
On my dedicated monitoring virtual machine (monitor), I deployed the lightweight hon95/prometheus-nut-exporter:1 container, scraping pve2:3493 and exposing metrics to Prometheus (prometheus.burakberk.dev) every 15 seconds.
Instead of writing custom panels from scratch or maintaining bloated dashboard JSON, I integrated a concise 5-stat telemetry row into my existing Homelab Fleet Cockpit Grafana dashboard:

The row displays real-time input/output voltage delta (utility 236 VAC vs inverter regulated 220 VAC), active capacity load percentage, calibrated battery state-of-charge, and online operational flags (OL / OB / LB).
Home Assistant
Integrating Home Assistant (ha.burakberk.dev) required zero YAML. Using the native Network UPS Tools (NUT) integration in the web UI, I pointed the host to my Proxmox node IP on port 3493.
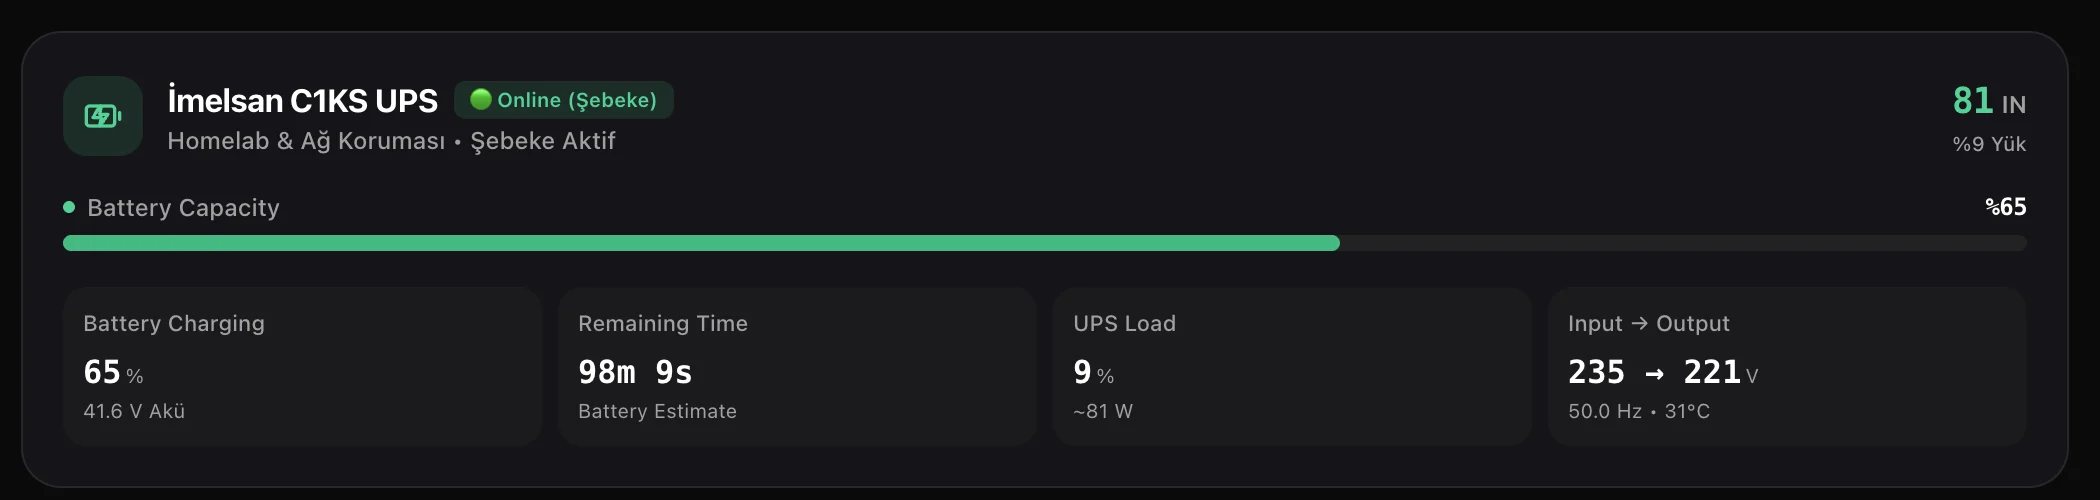
It instantly surfaced auto-updating sensors for battery percentage, live wattage load, input voltage, and operational state directly into my living room area dashboard.
Coordinated Multi-Node Shutdown and AC Recovery
A resilient homelab power strategy must balance two competing risks: shut down too quickly, and you incur unnecessary downtime during brief 2-minute grid glitches; wait too long, and you risk a dirty shutdown when batteries exhaust.
1. The 10-Minute Grace Timer (upssched)
Rather than halting machines the moment utility power cuts, I configured upssched on the master node (pve2) with a 600-second grace timer:
CMDSCRIPT /usr/local/bin/upssched-cmdPIPEFN /var/run/nut/upssched.pipeLOCKFN /var/run/nut/upssched.lock
AT ONBATT * START-TIMER shutdown-timer 600AT ONLINE * CANCEL-TIMER shutdown-timerAT LOWBATT * EXECUTE immediate-shutdown- When the grid cuts (
ONBATT), a 10-minute timer starts. - If grid power recovers within 10 minutes (
ONLINE), the timer quietly cancels without disturbing workloads. - If the outage exceeds 10 minutes (or the battery prematurely triggers hardware
LOWBATT),upssched-cmdcallsupsmon -c fsd(Forced Shutdown).
2. Multi-Node Execution (homelab-graceful-shutdown.sh)
When forced shutdown fires, /usr/local/bin/homelab-graceful-shutdown.sh orchestrates the cluster shutdown sequence:
- Secondary Gateway Host (
pve3):pve2executesssh root@192.168.1.106 "systemctl poweroff". The secondary node’spve-guests.servicecleanly stops its workloads, including the OPNsense firewall and primary DNS. - Primary Compute Host (
pve2):pve2initiates its own system shutdown (systemctl poweroff). Proxmox’s nativepve-guestsservice shuts down Home Assistant and my primary application server (oneserverwith its Docker containers), and safely unmounts the ZFStankstorage pool. - Late Power Cut (
killpower): Once all filesystems are unmounted and the root filesystem is remounted read-only,/lib/systemd/system-shutdown/nutshutdownrunsupsdrvctl shutdown(blazer_ser -k). Thanks tooffdelay = 180, the UPS waits 3 minutes before cutting outlet power, entering a low-power sleep state until grid power returns.
3. Automatic Recovery
Both Proxmox host motherboards have their BIOS configured with:
Restore on AC Power Loss = Always OnWhen utility power returns to the building, the UPS energizes its output outlets. Both hypervisors detect incoming mains voltage and boot automatically. As Proxmox starts up, pve-guests boots the router, storage, and application containers in their configured sequence—restoring the entire homelab without any manual button presses or console intervention.