Sonatype Nexus Usage 101 | Best Practices & Example Use Cases
/ 9 min read
Table of Contents
Overview
In my previous blog post, we embarked on a journey to set up Sonatype Nexus with an Nginx reverse proxy. We covered everything from the initial server preparation to accessing the Nexus Web UI securely via HTTPS. Now that you’ve got Nexus up and running, it’s time to roll up our sleeves and dive into the nitty-gritty of using this powerful tool effectively.
Nexus Dashboard
Upon logging into the Nexus web UI, you’ll be greeted by a dashboard showcasing several pre-defined repositories.
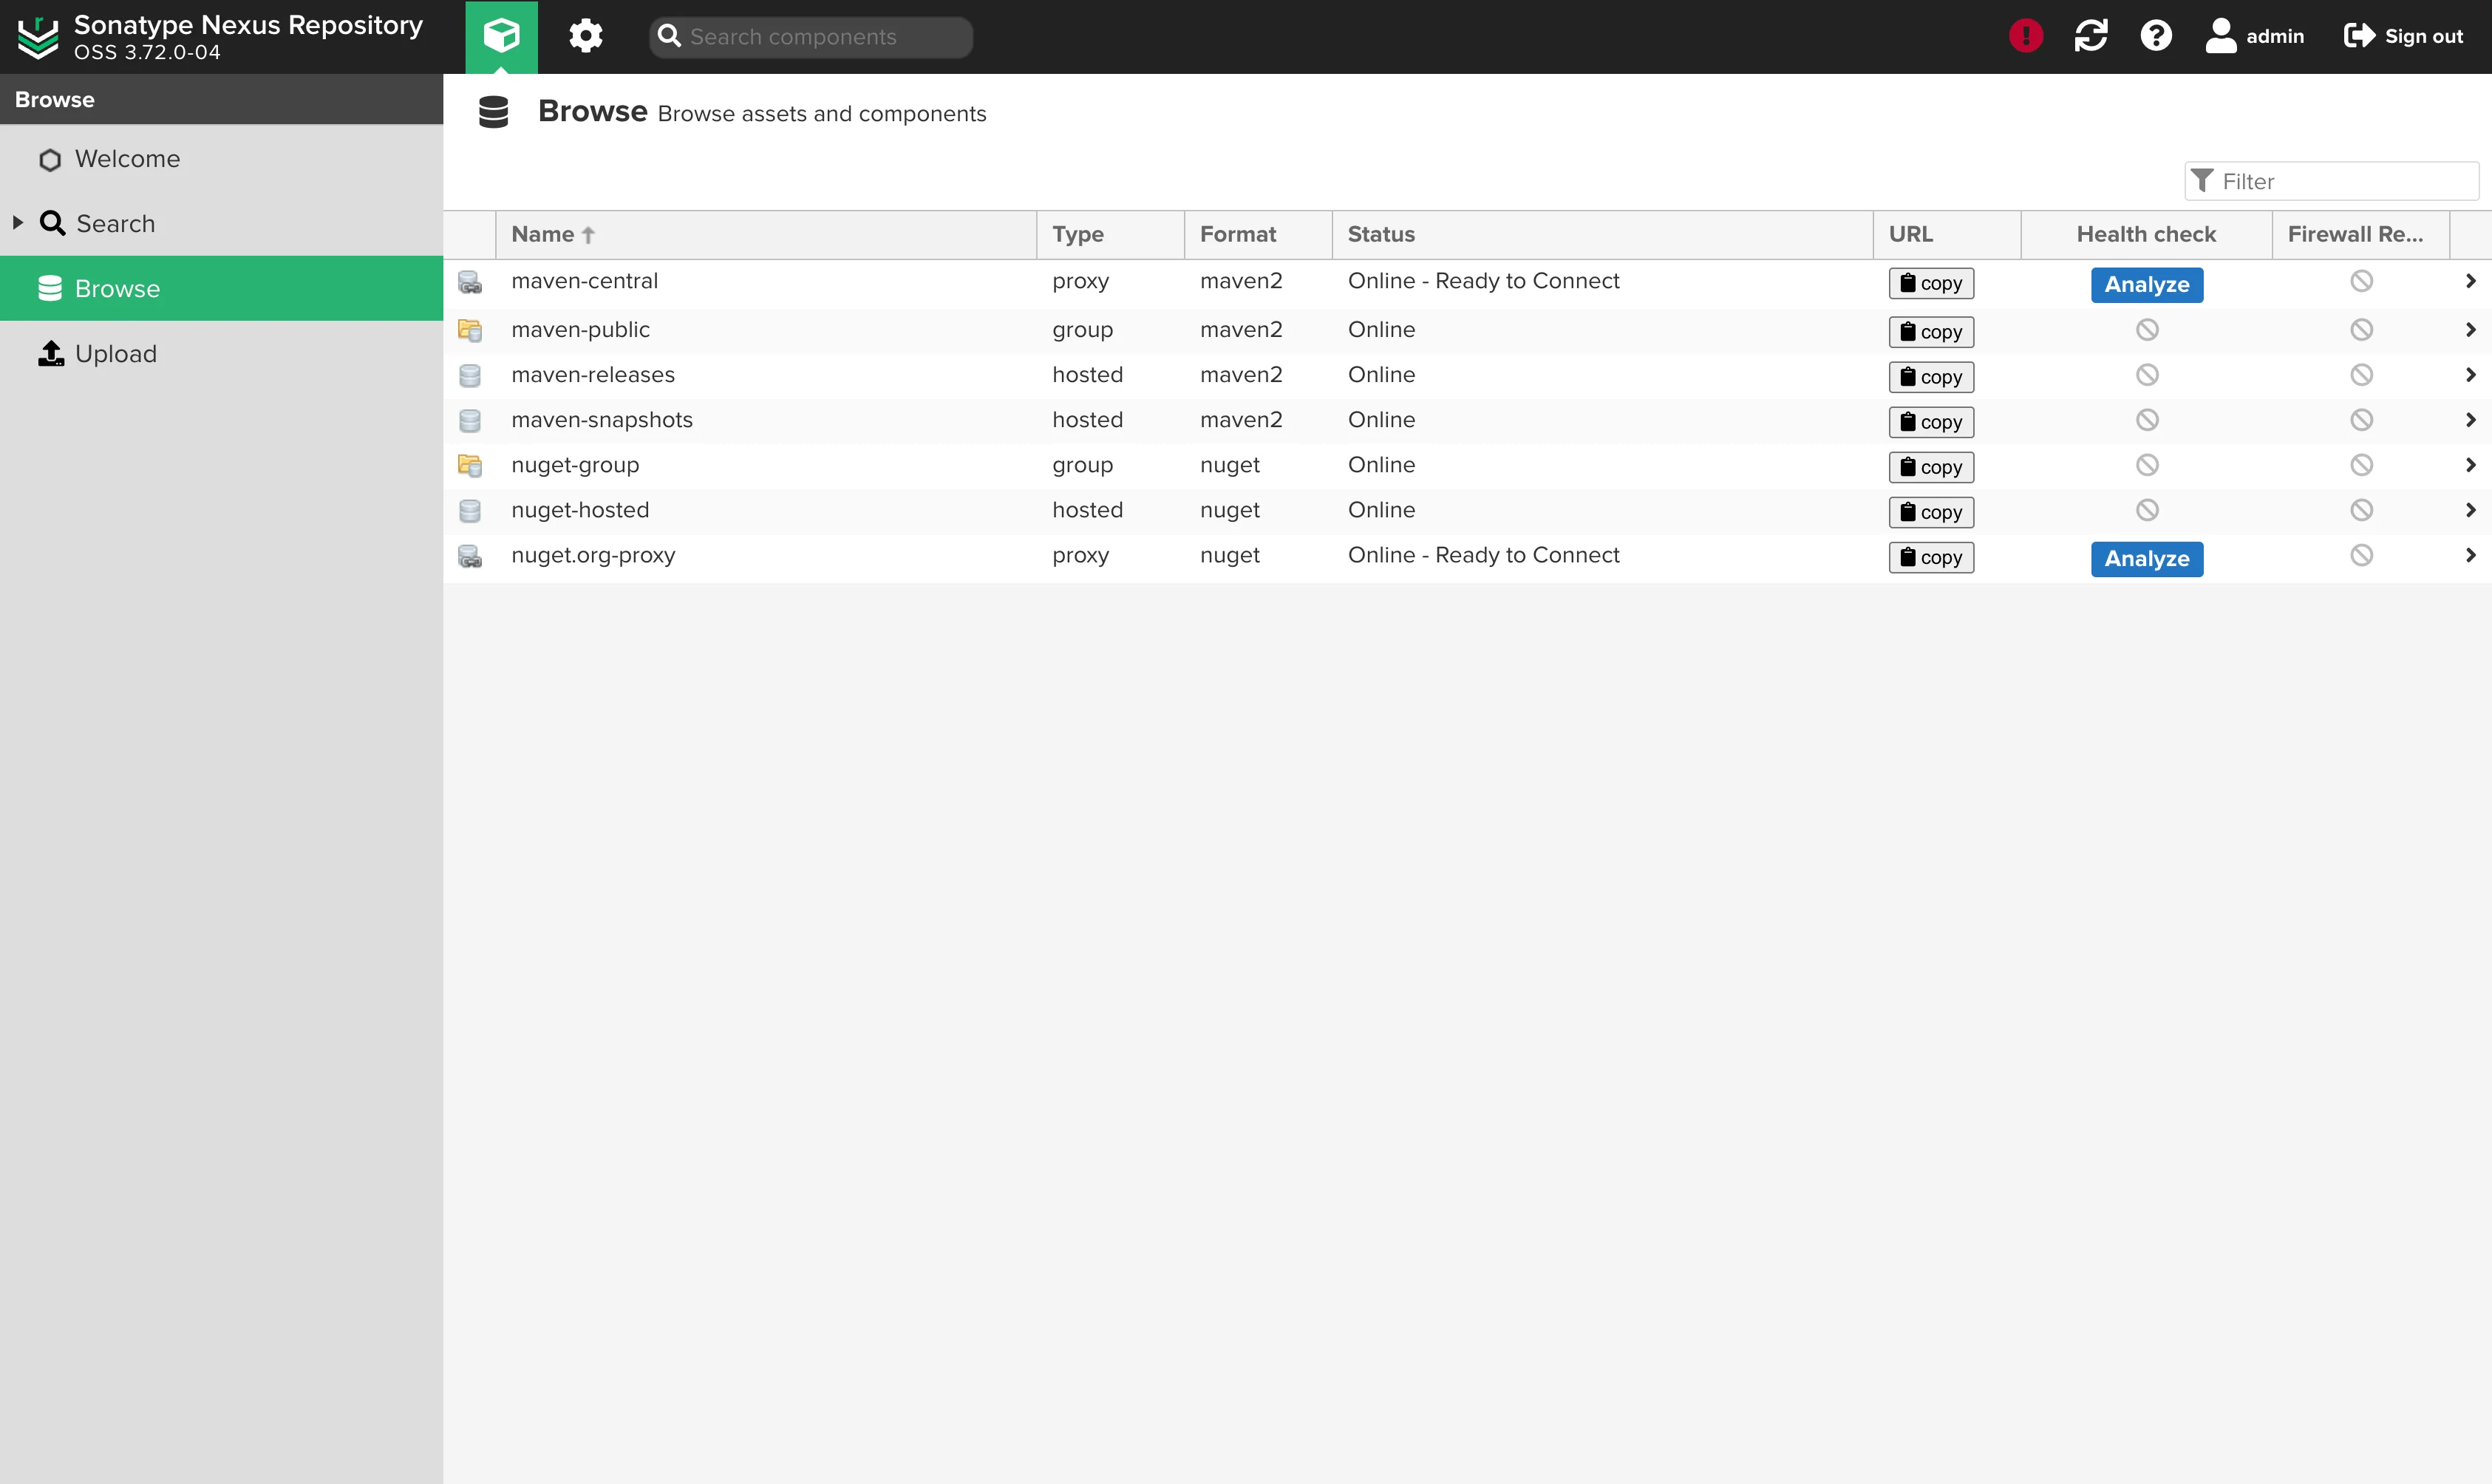
For those of us who prefer a clean slate and better organization, we’re going to start by decluttering. We’ll remove all the pre-defined repositories and the default blob storage. This approach allows us to create a more tailored setup, with dedicated repositories and blobs for each category we’ll be working with.
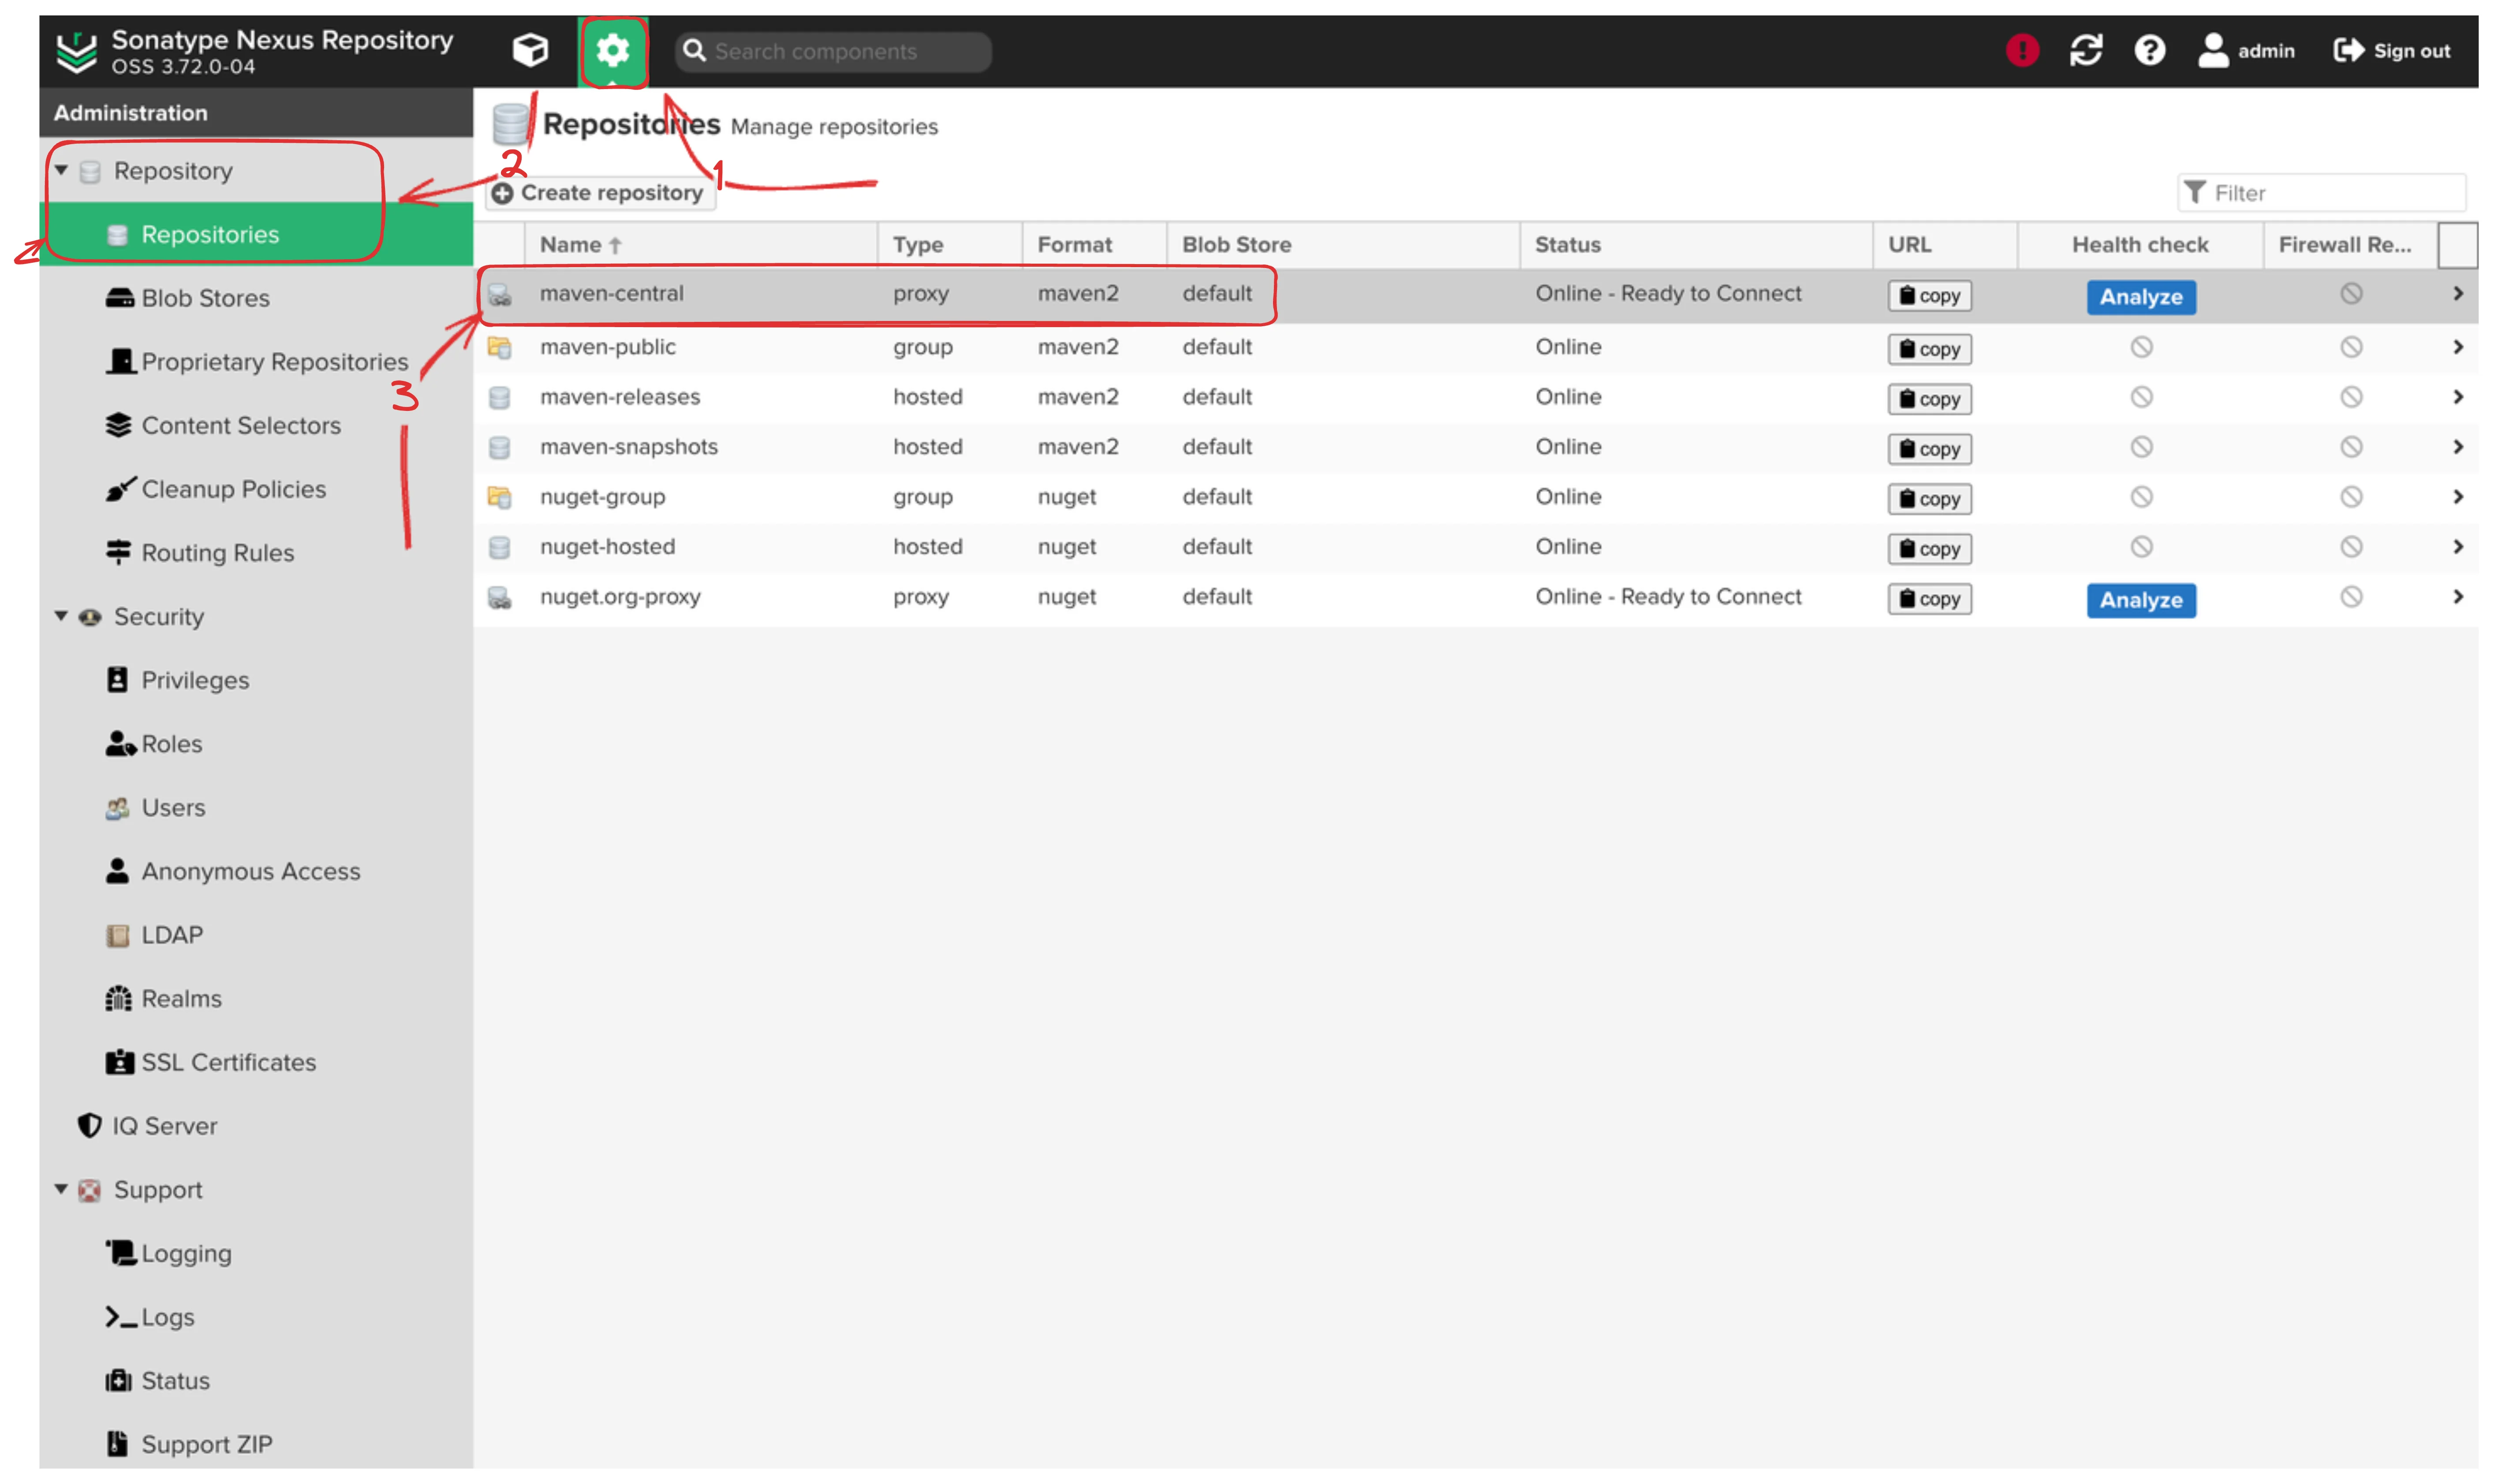
Let’s begin by logging in with the admin user and navigating to the
administration section.
Clearing the Slate
First, we’ll tackle the repositories. One by one, we’ll select each
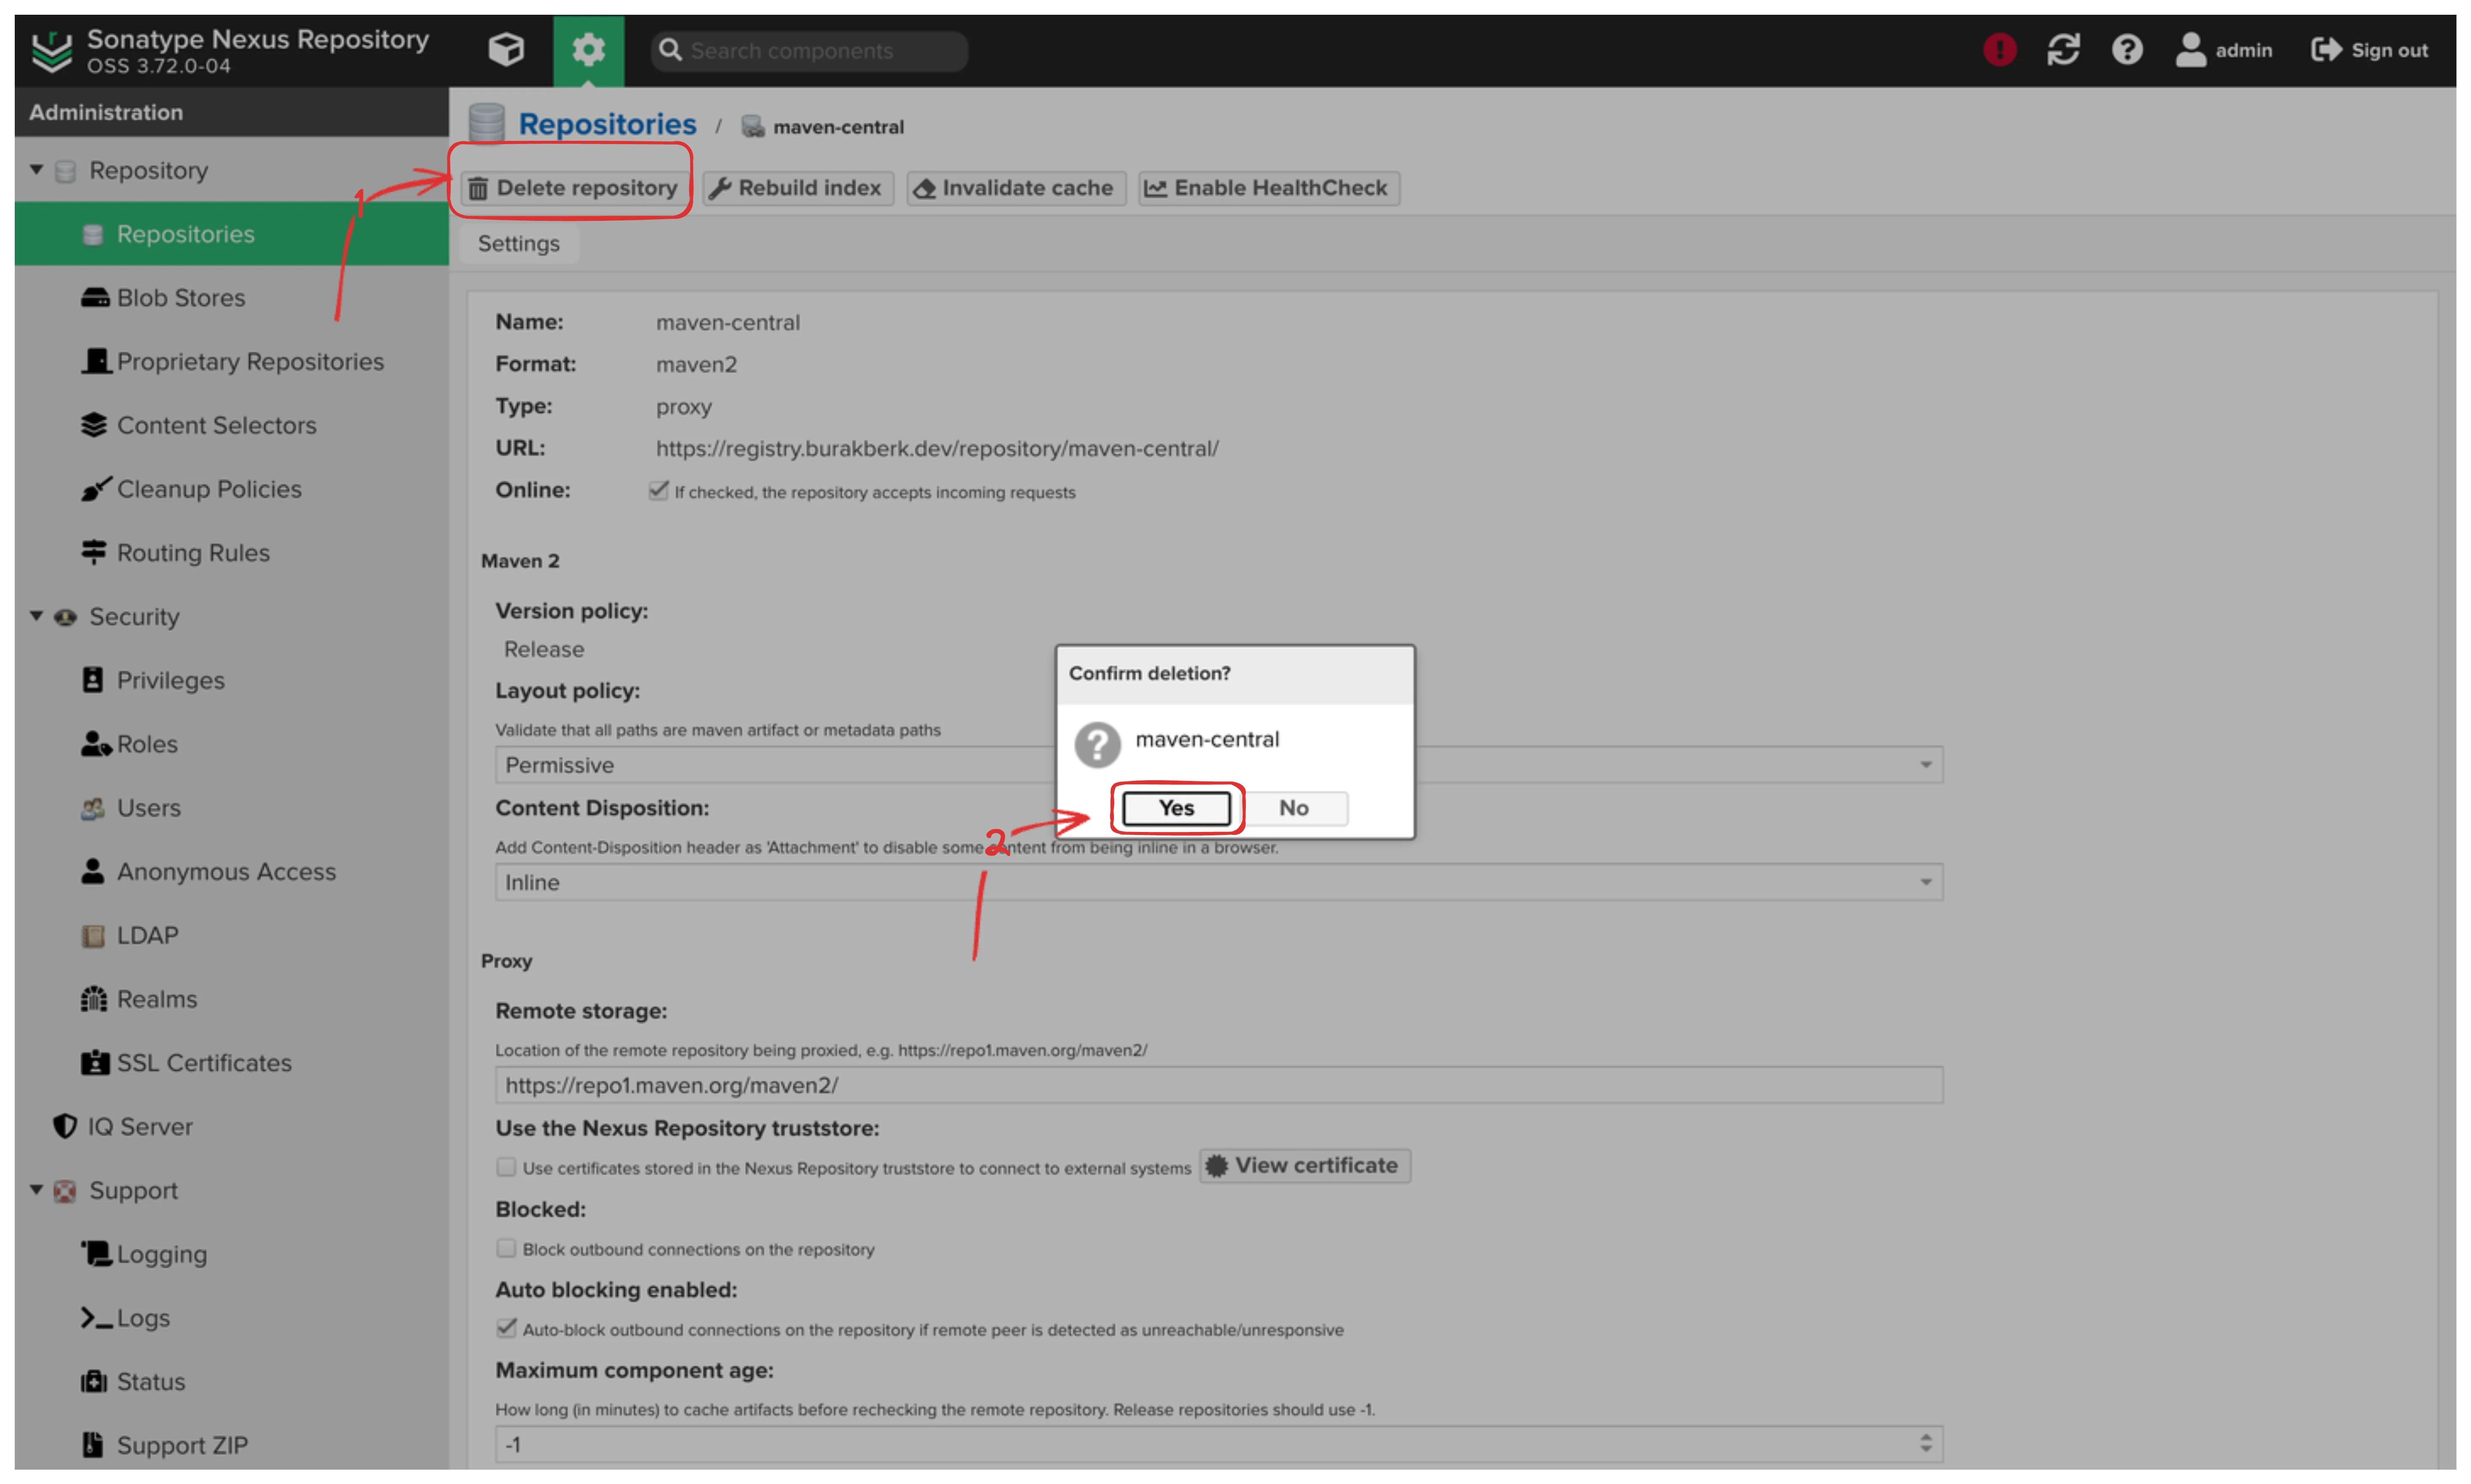
repository and hit that Delete repository button.
Hit Delete and confirm your choice.
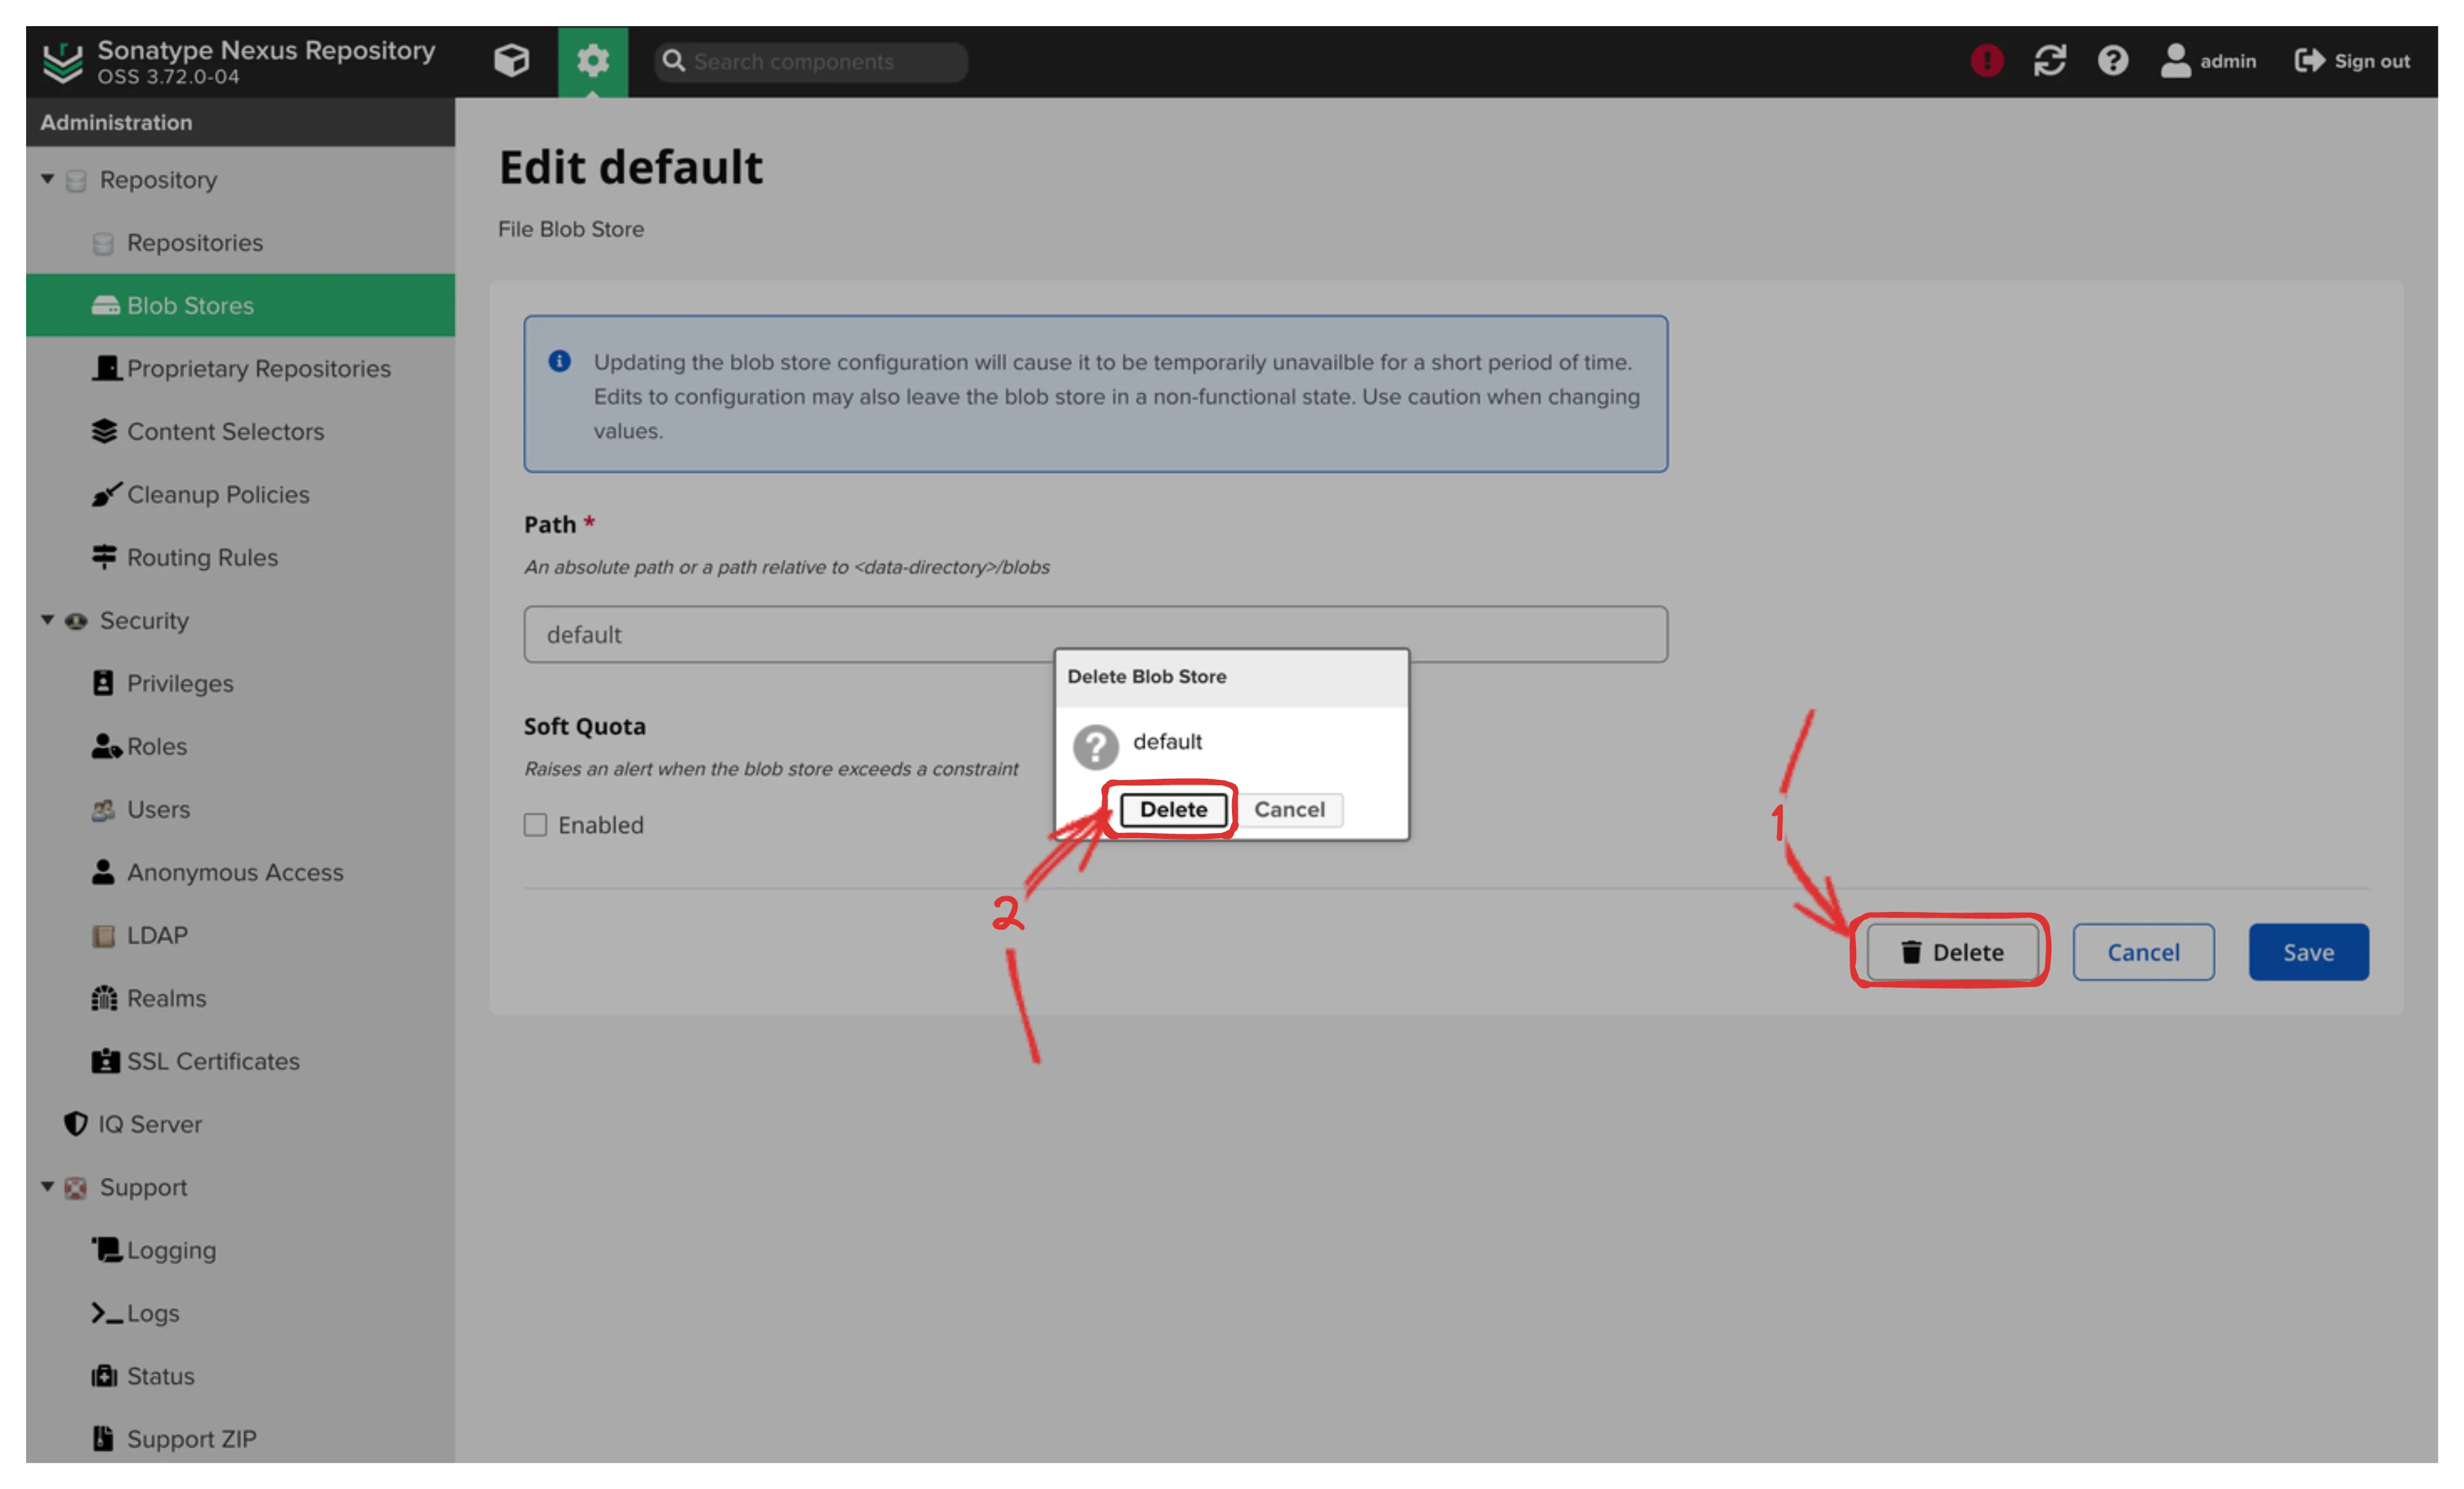
Next, we’ll turn our attention to the default blob storage.
Head over to the Blob Stores section and locate the default blob
store.
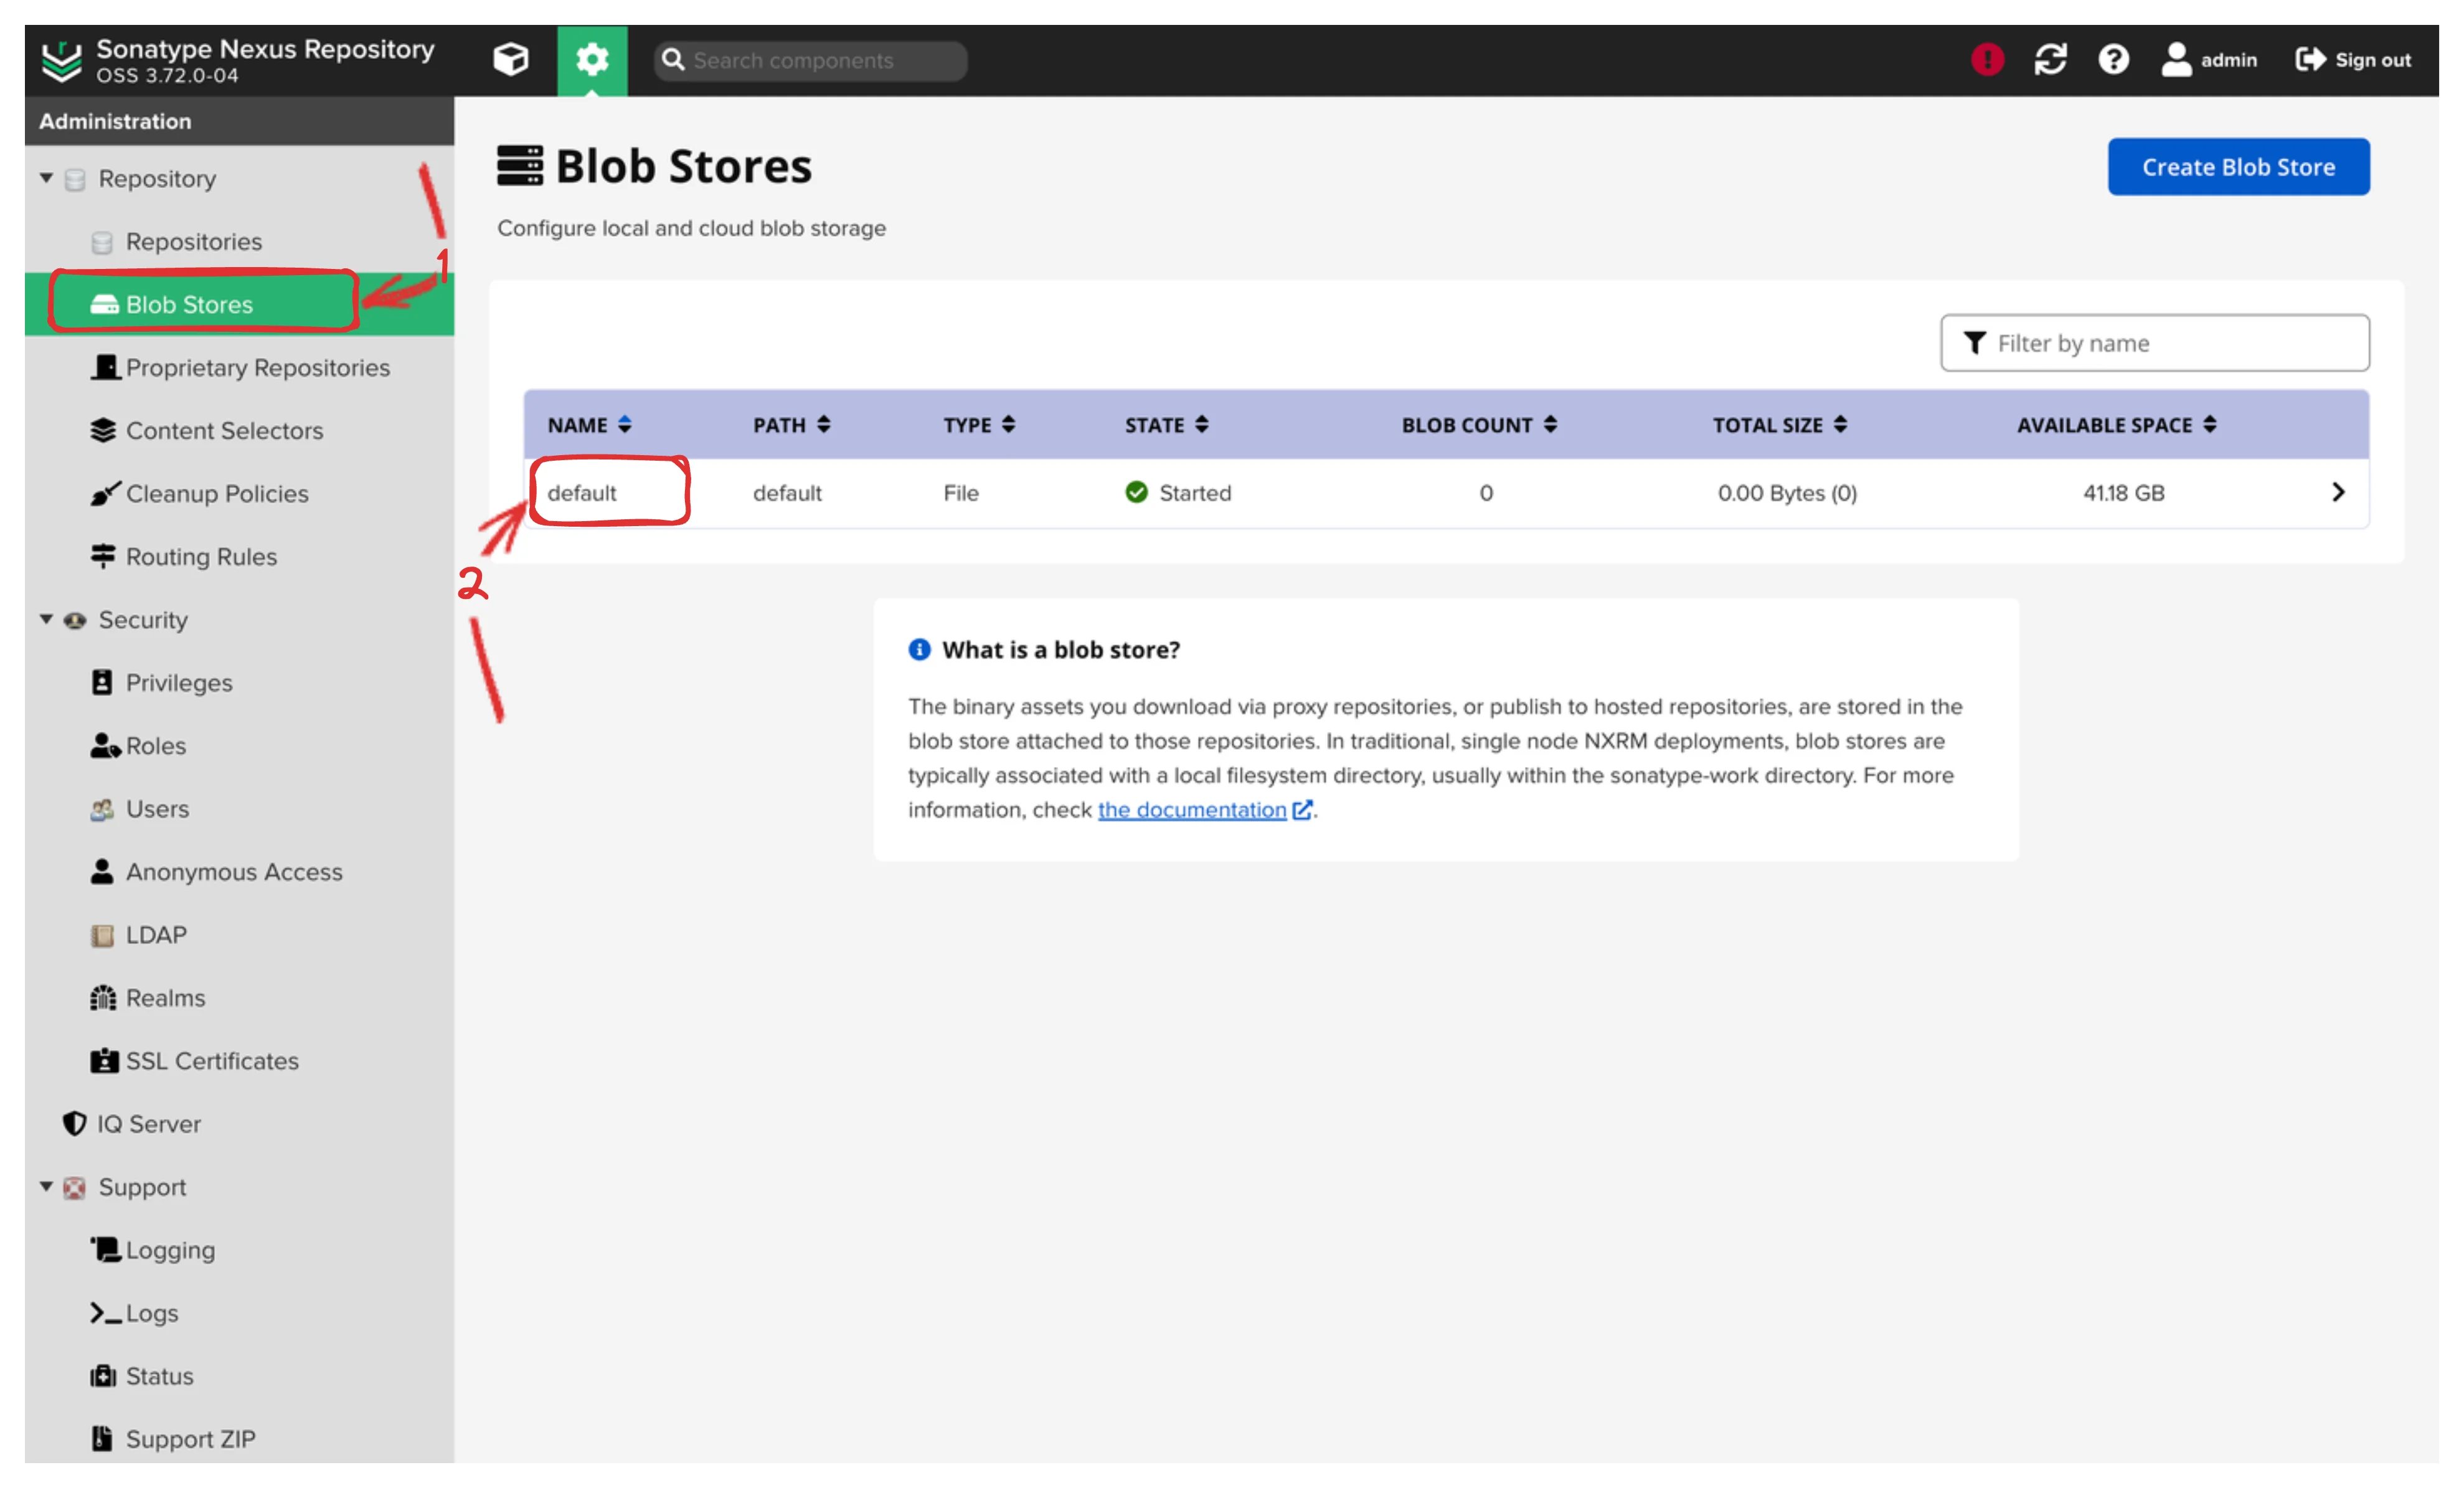
Hit Delete and confirm your choice.
Building Our Custom Setup
Now that we’ve cleared the decks, it’s time to start building our custom setup. We’ll create new blob stores, each dedicated to a specific type of repository. This approach allows for better organization and management of our assets.
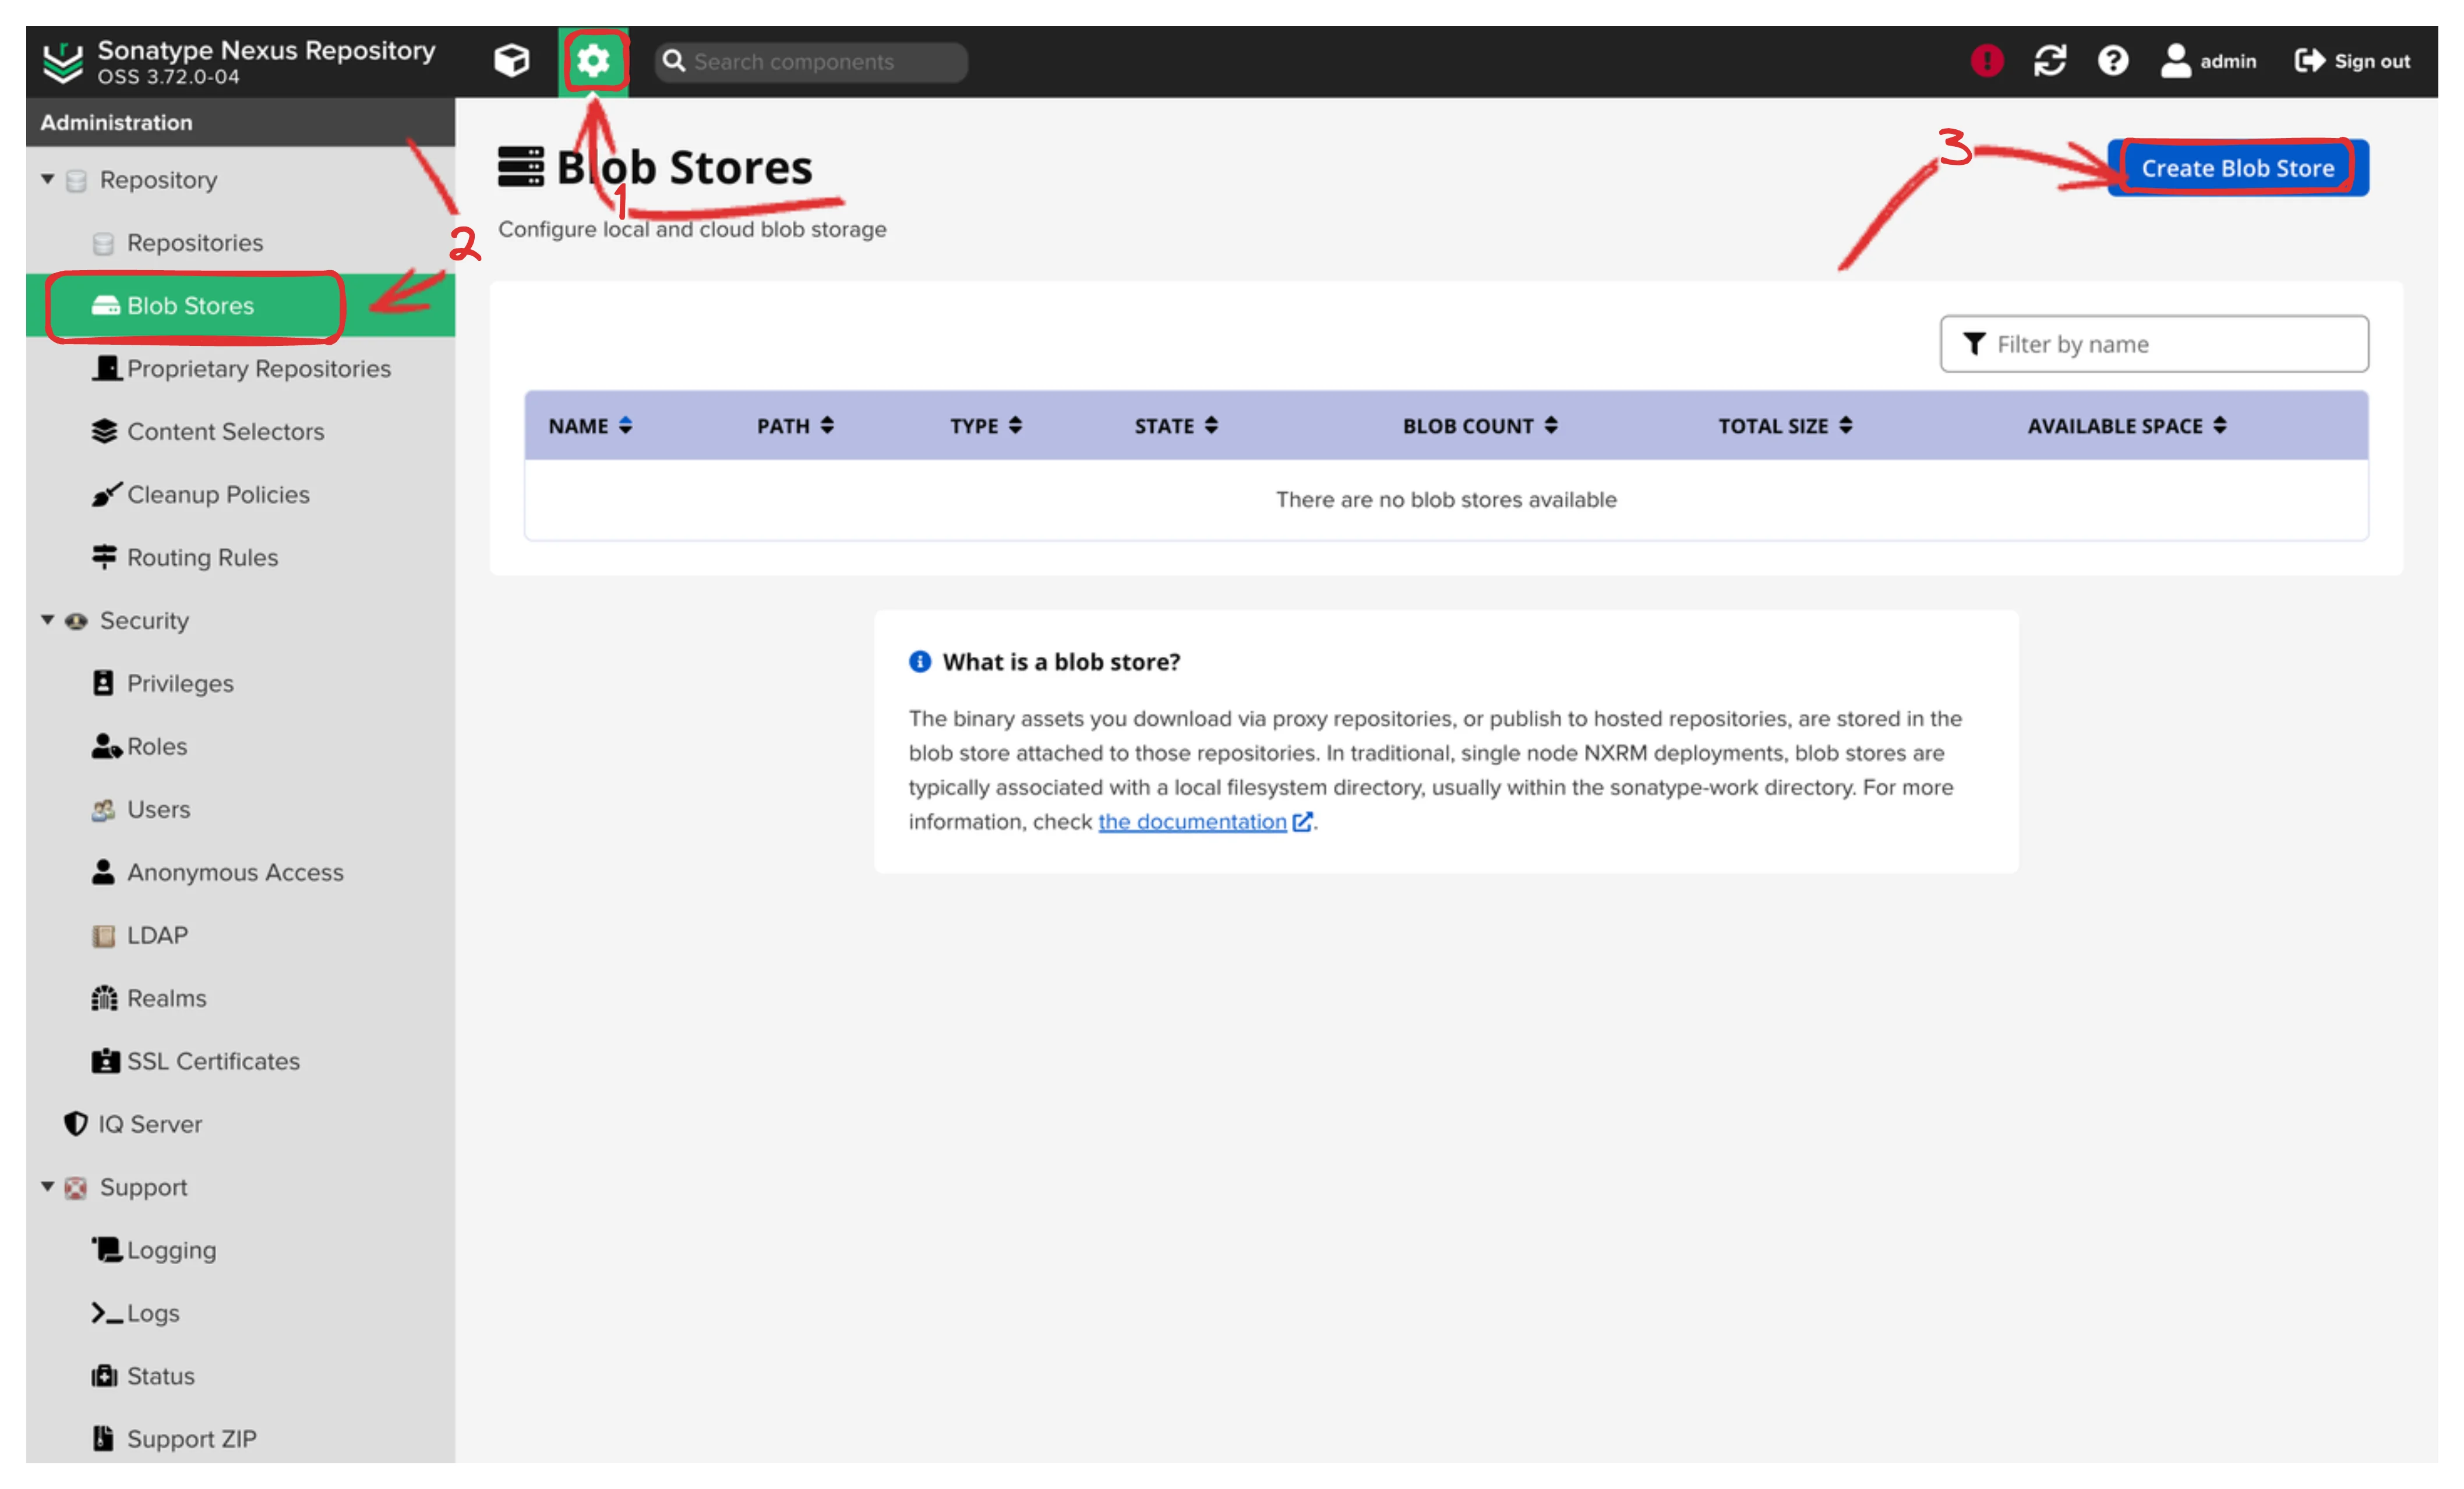
Let’s start by creating a new blob store for our Maven repositories.
Navigate to the administrator blob stores menu and click on
Create blob store.
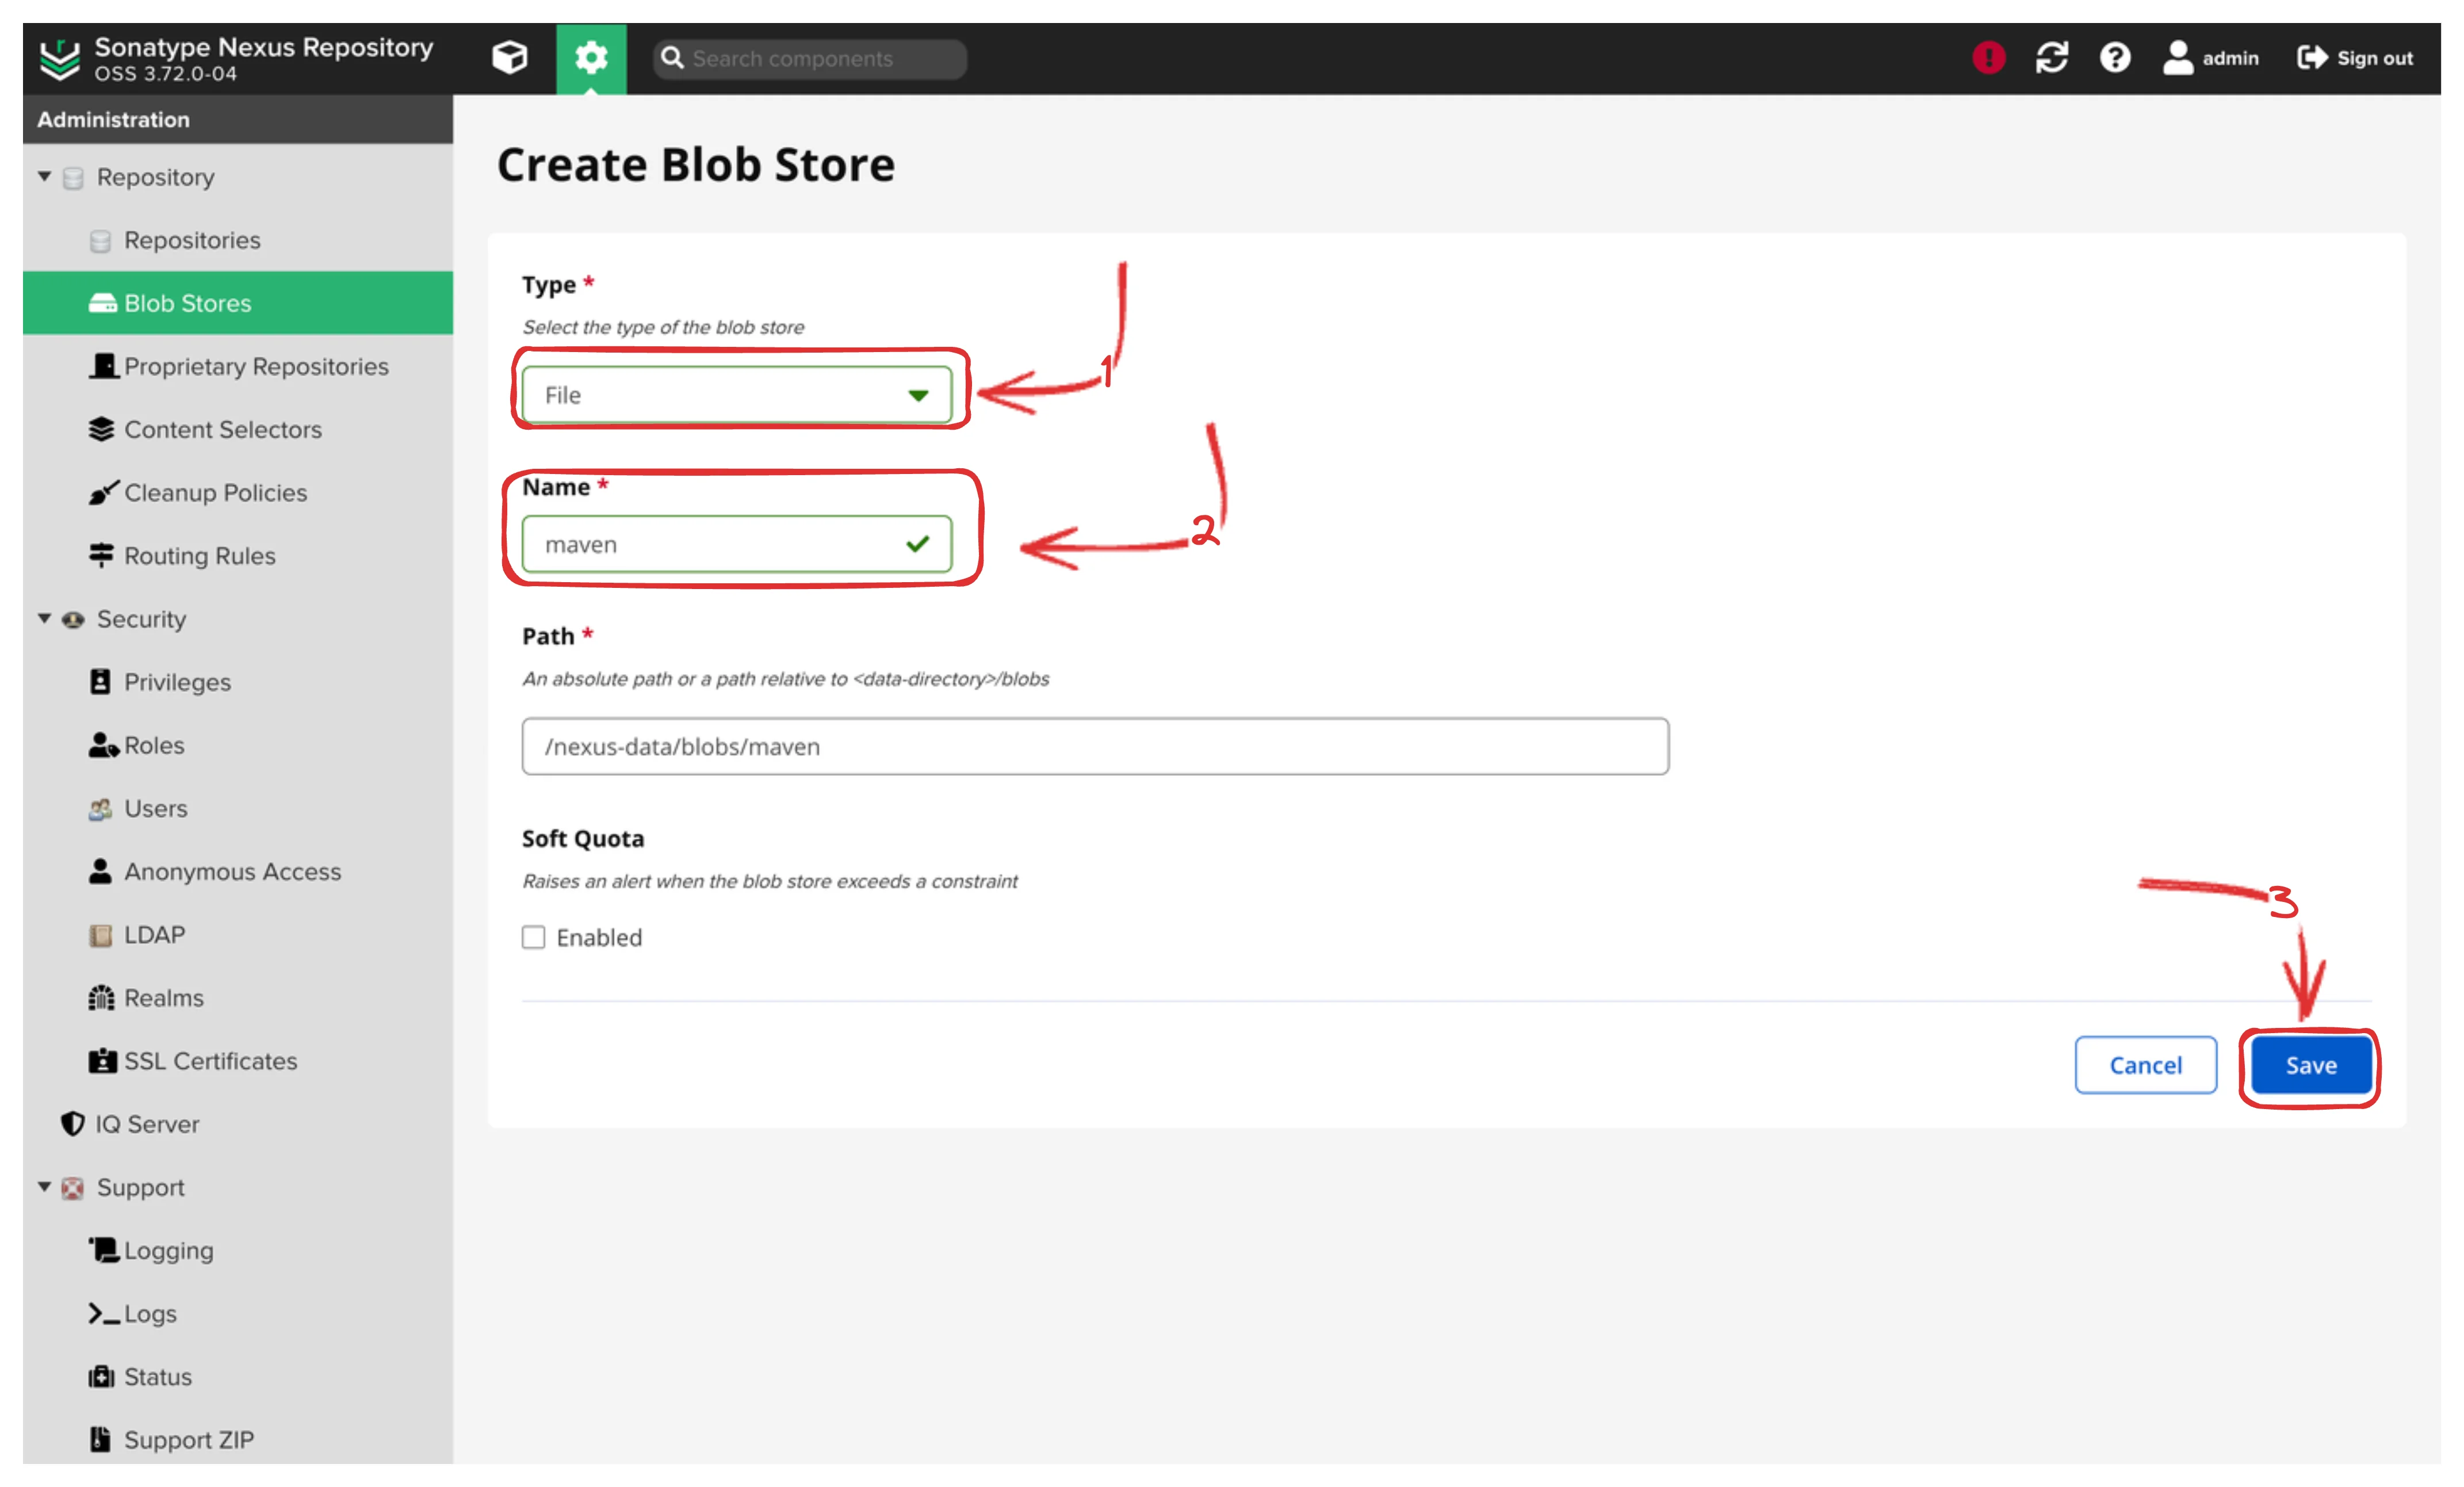
Select File as the type and name it maven. This will be our
dedicated storage space for all things Maven.
Repeat this process to create blob stores for other types of repositories you’ll be working with. In our case, we’ll set up separate stores for:
- Maven
- NPM
- Docker
- Yum
By the end of this process, you’ll have a clean, organized foundation for your Nexus setup.
Maven Repository
Now that we’ve laid the groundwork, it’s time to set up our Maven repositories. Maven is a staple in the Java ecosystem, and having a well-configured Maven repository in Nexus can significantly streamline your development process.
Maven Proxy Repository
We’re going to create two Maven proxy repositories. We’ll set up one for the central Maven repository and another for the Google Maven repository.
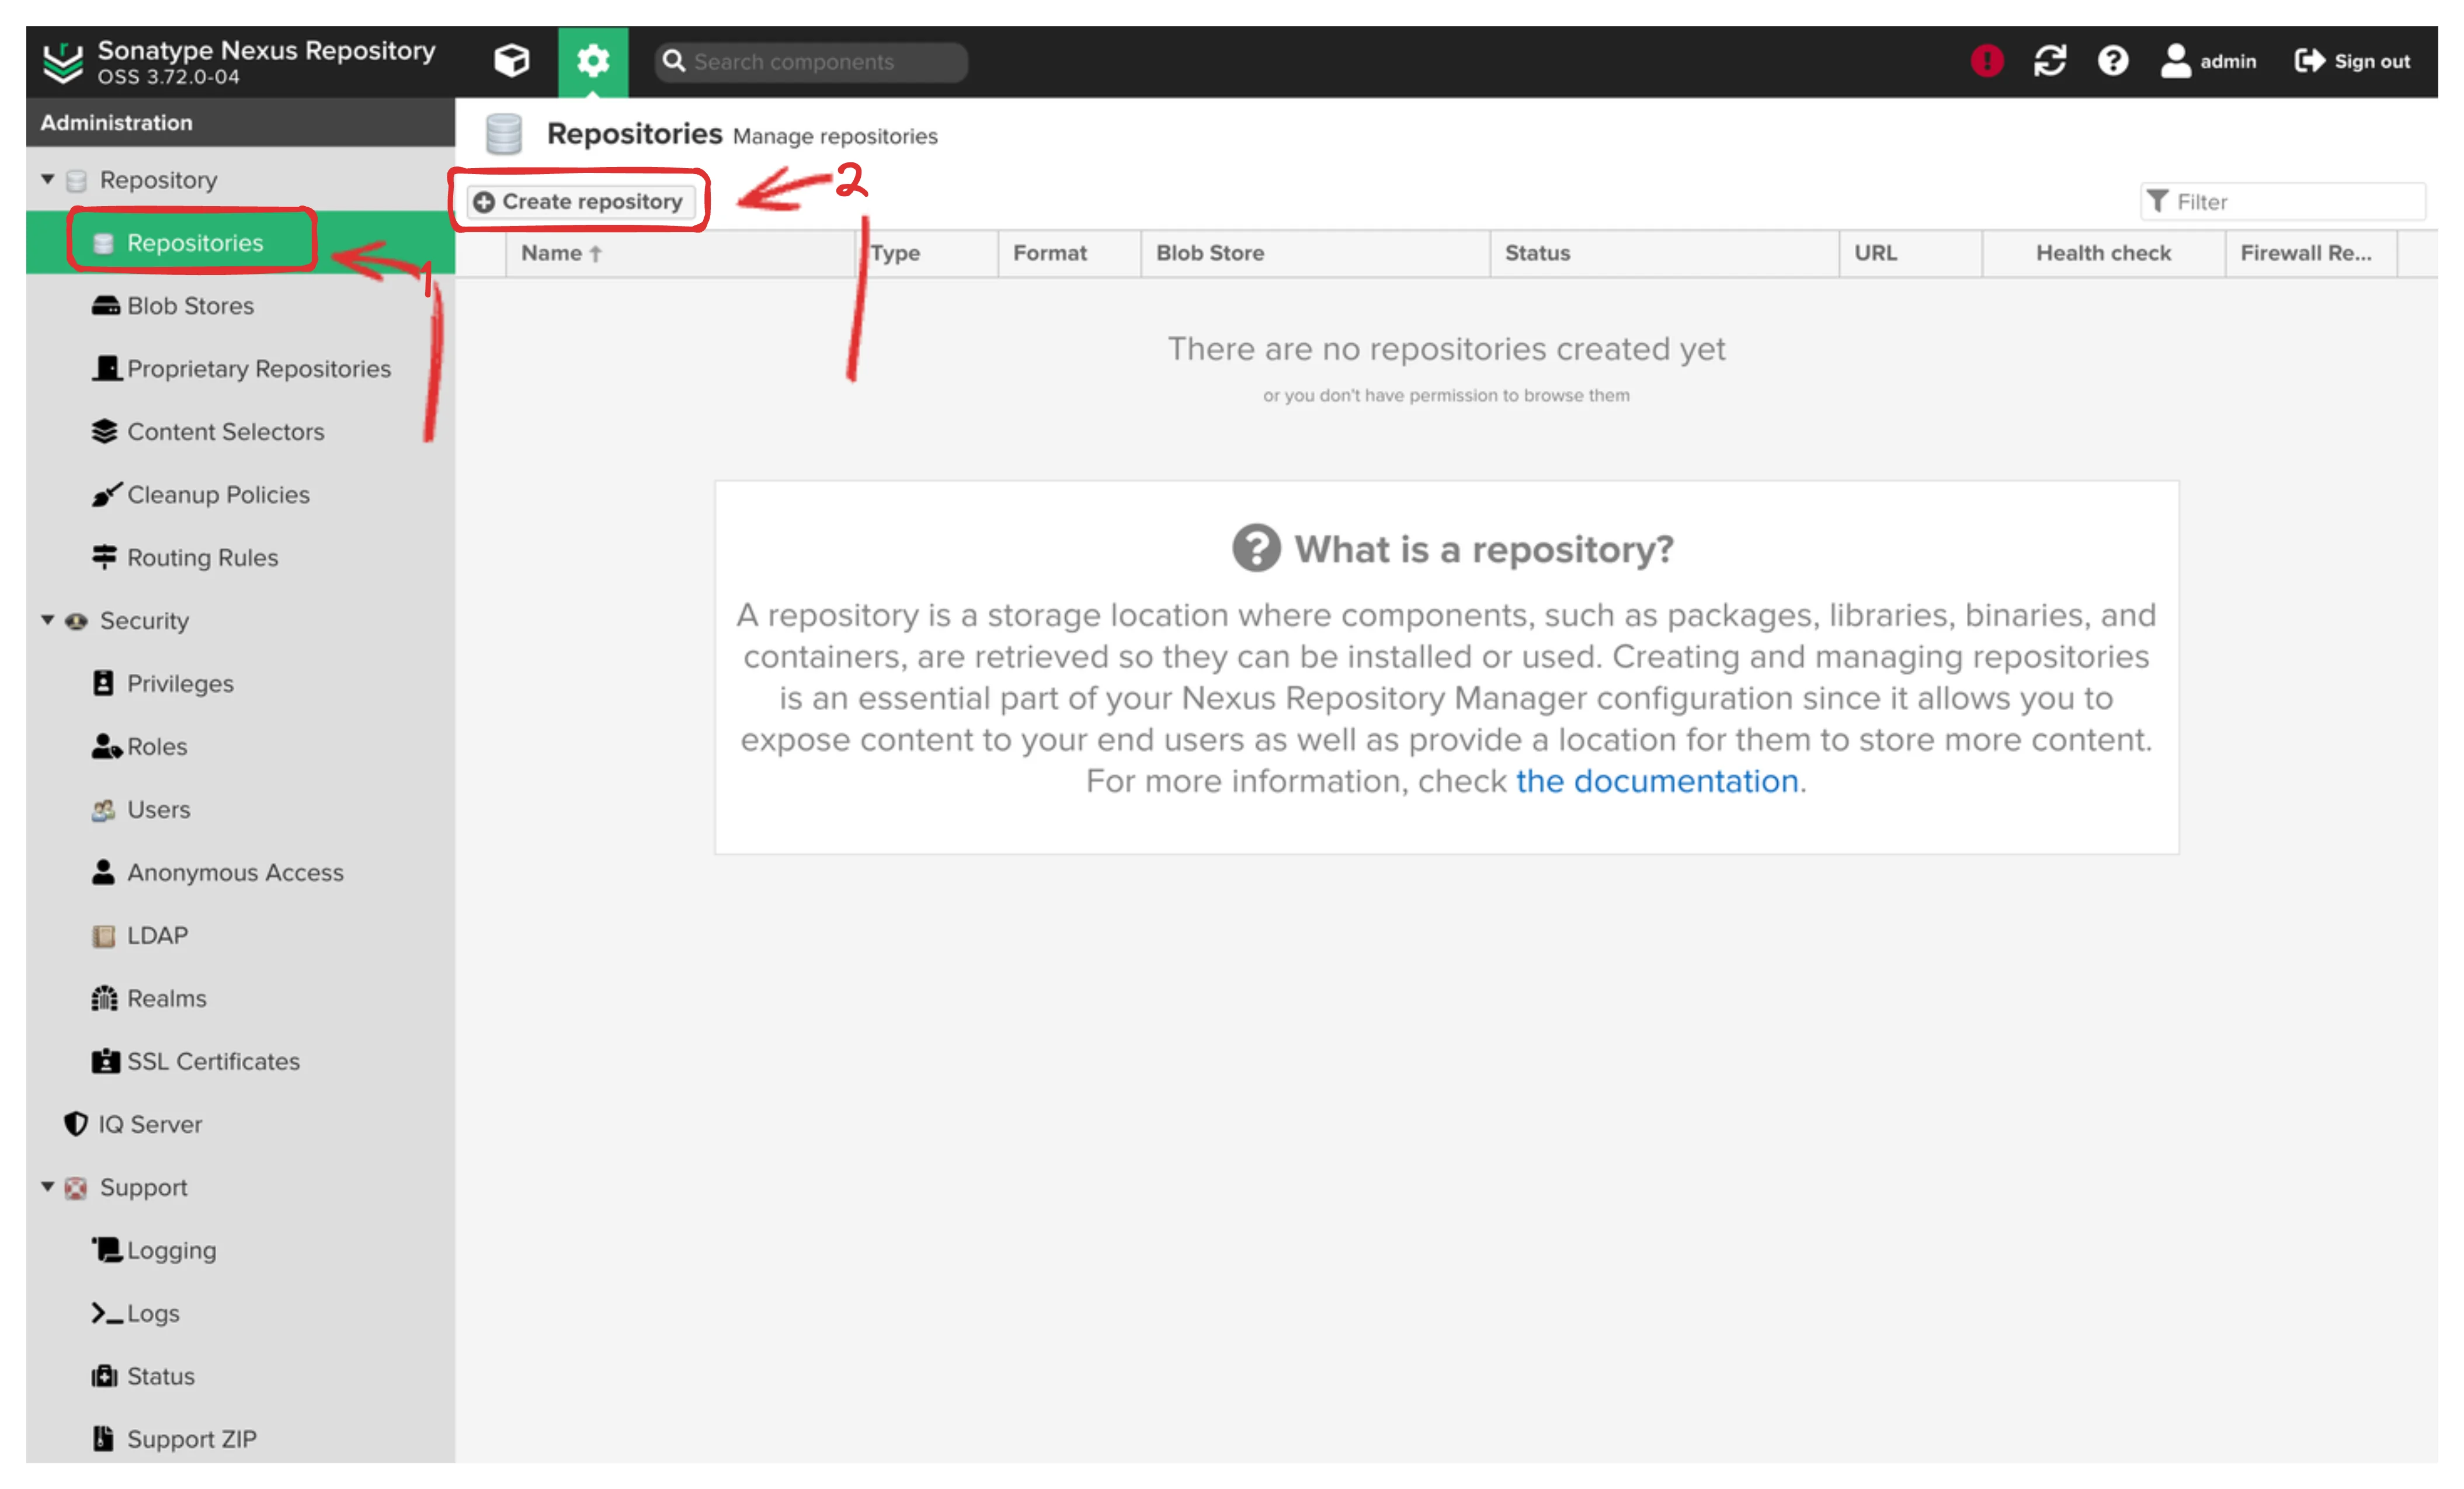
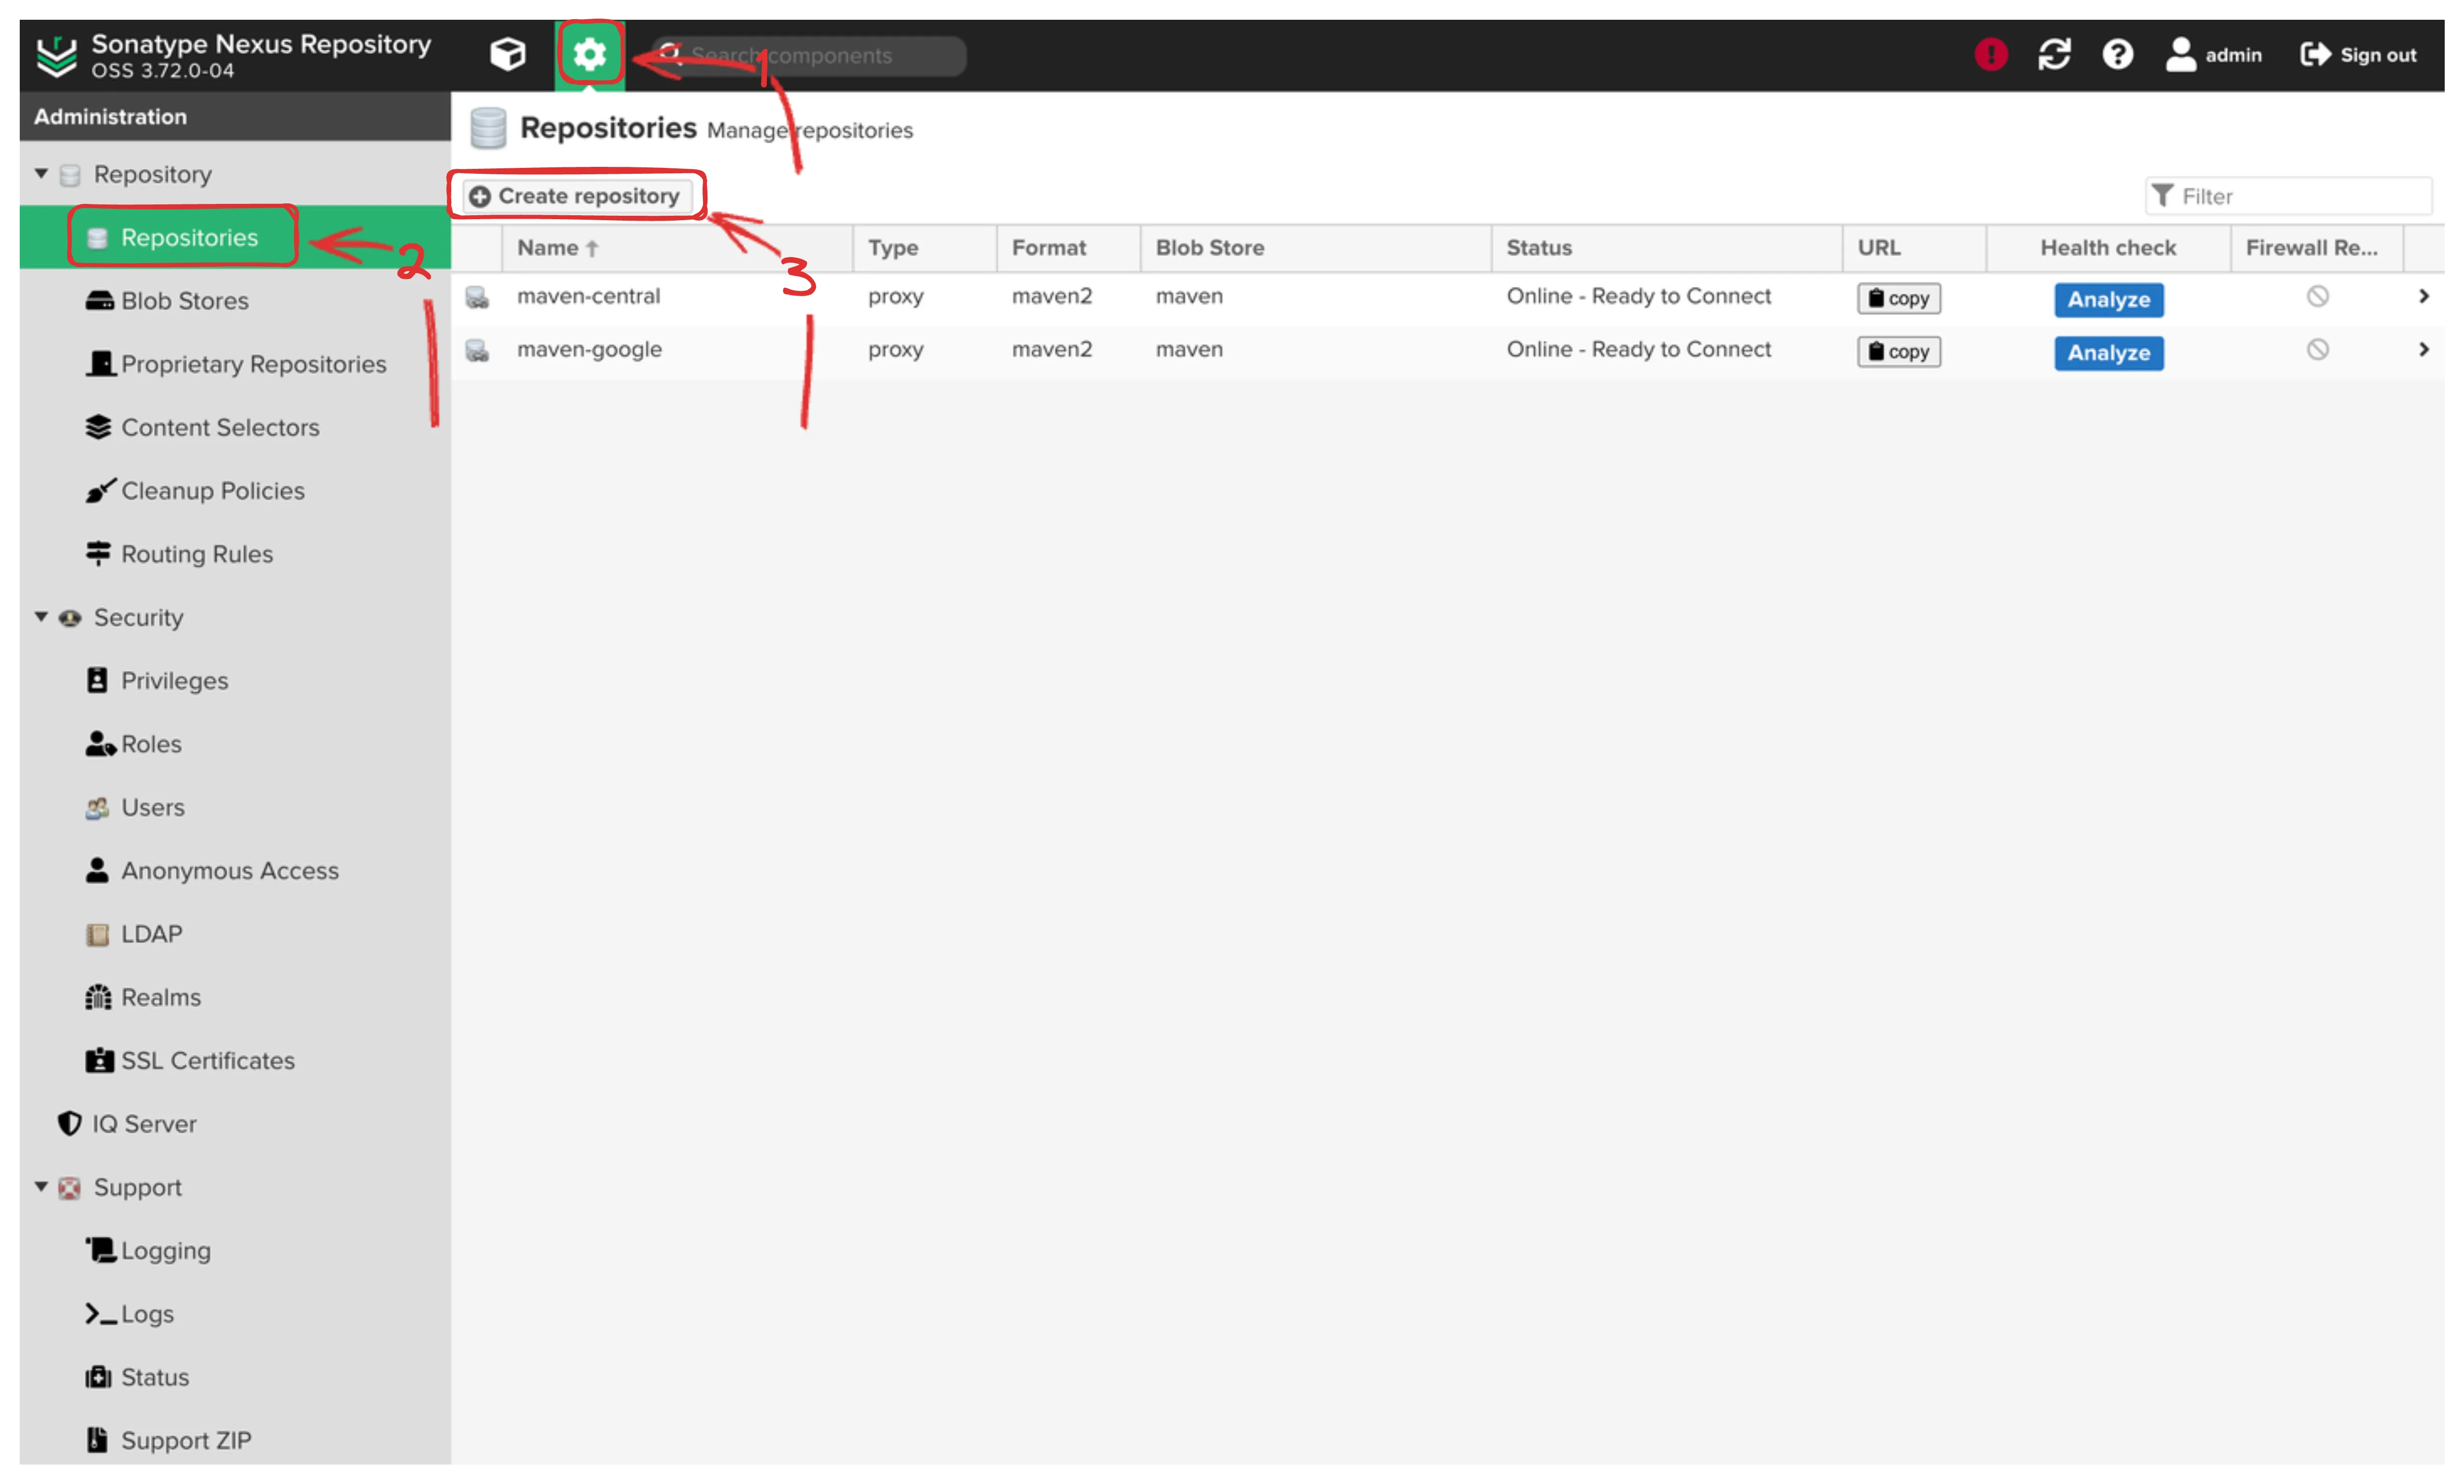
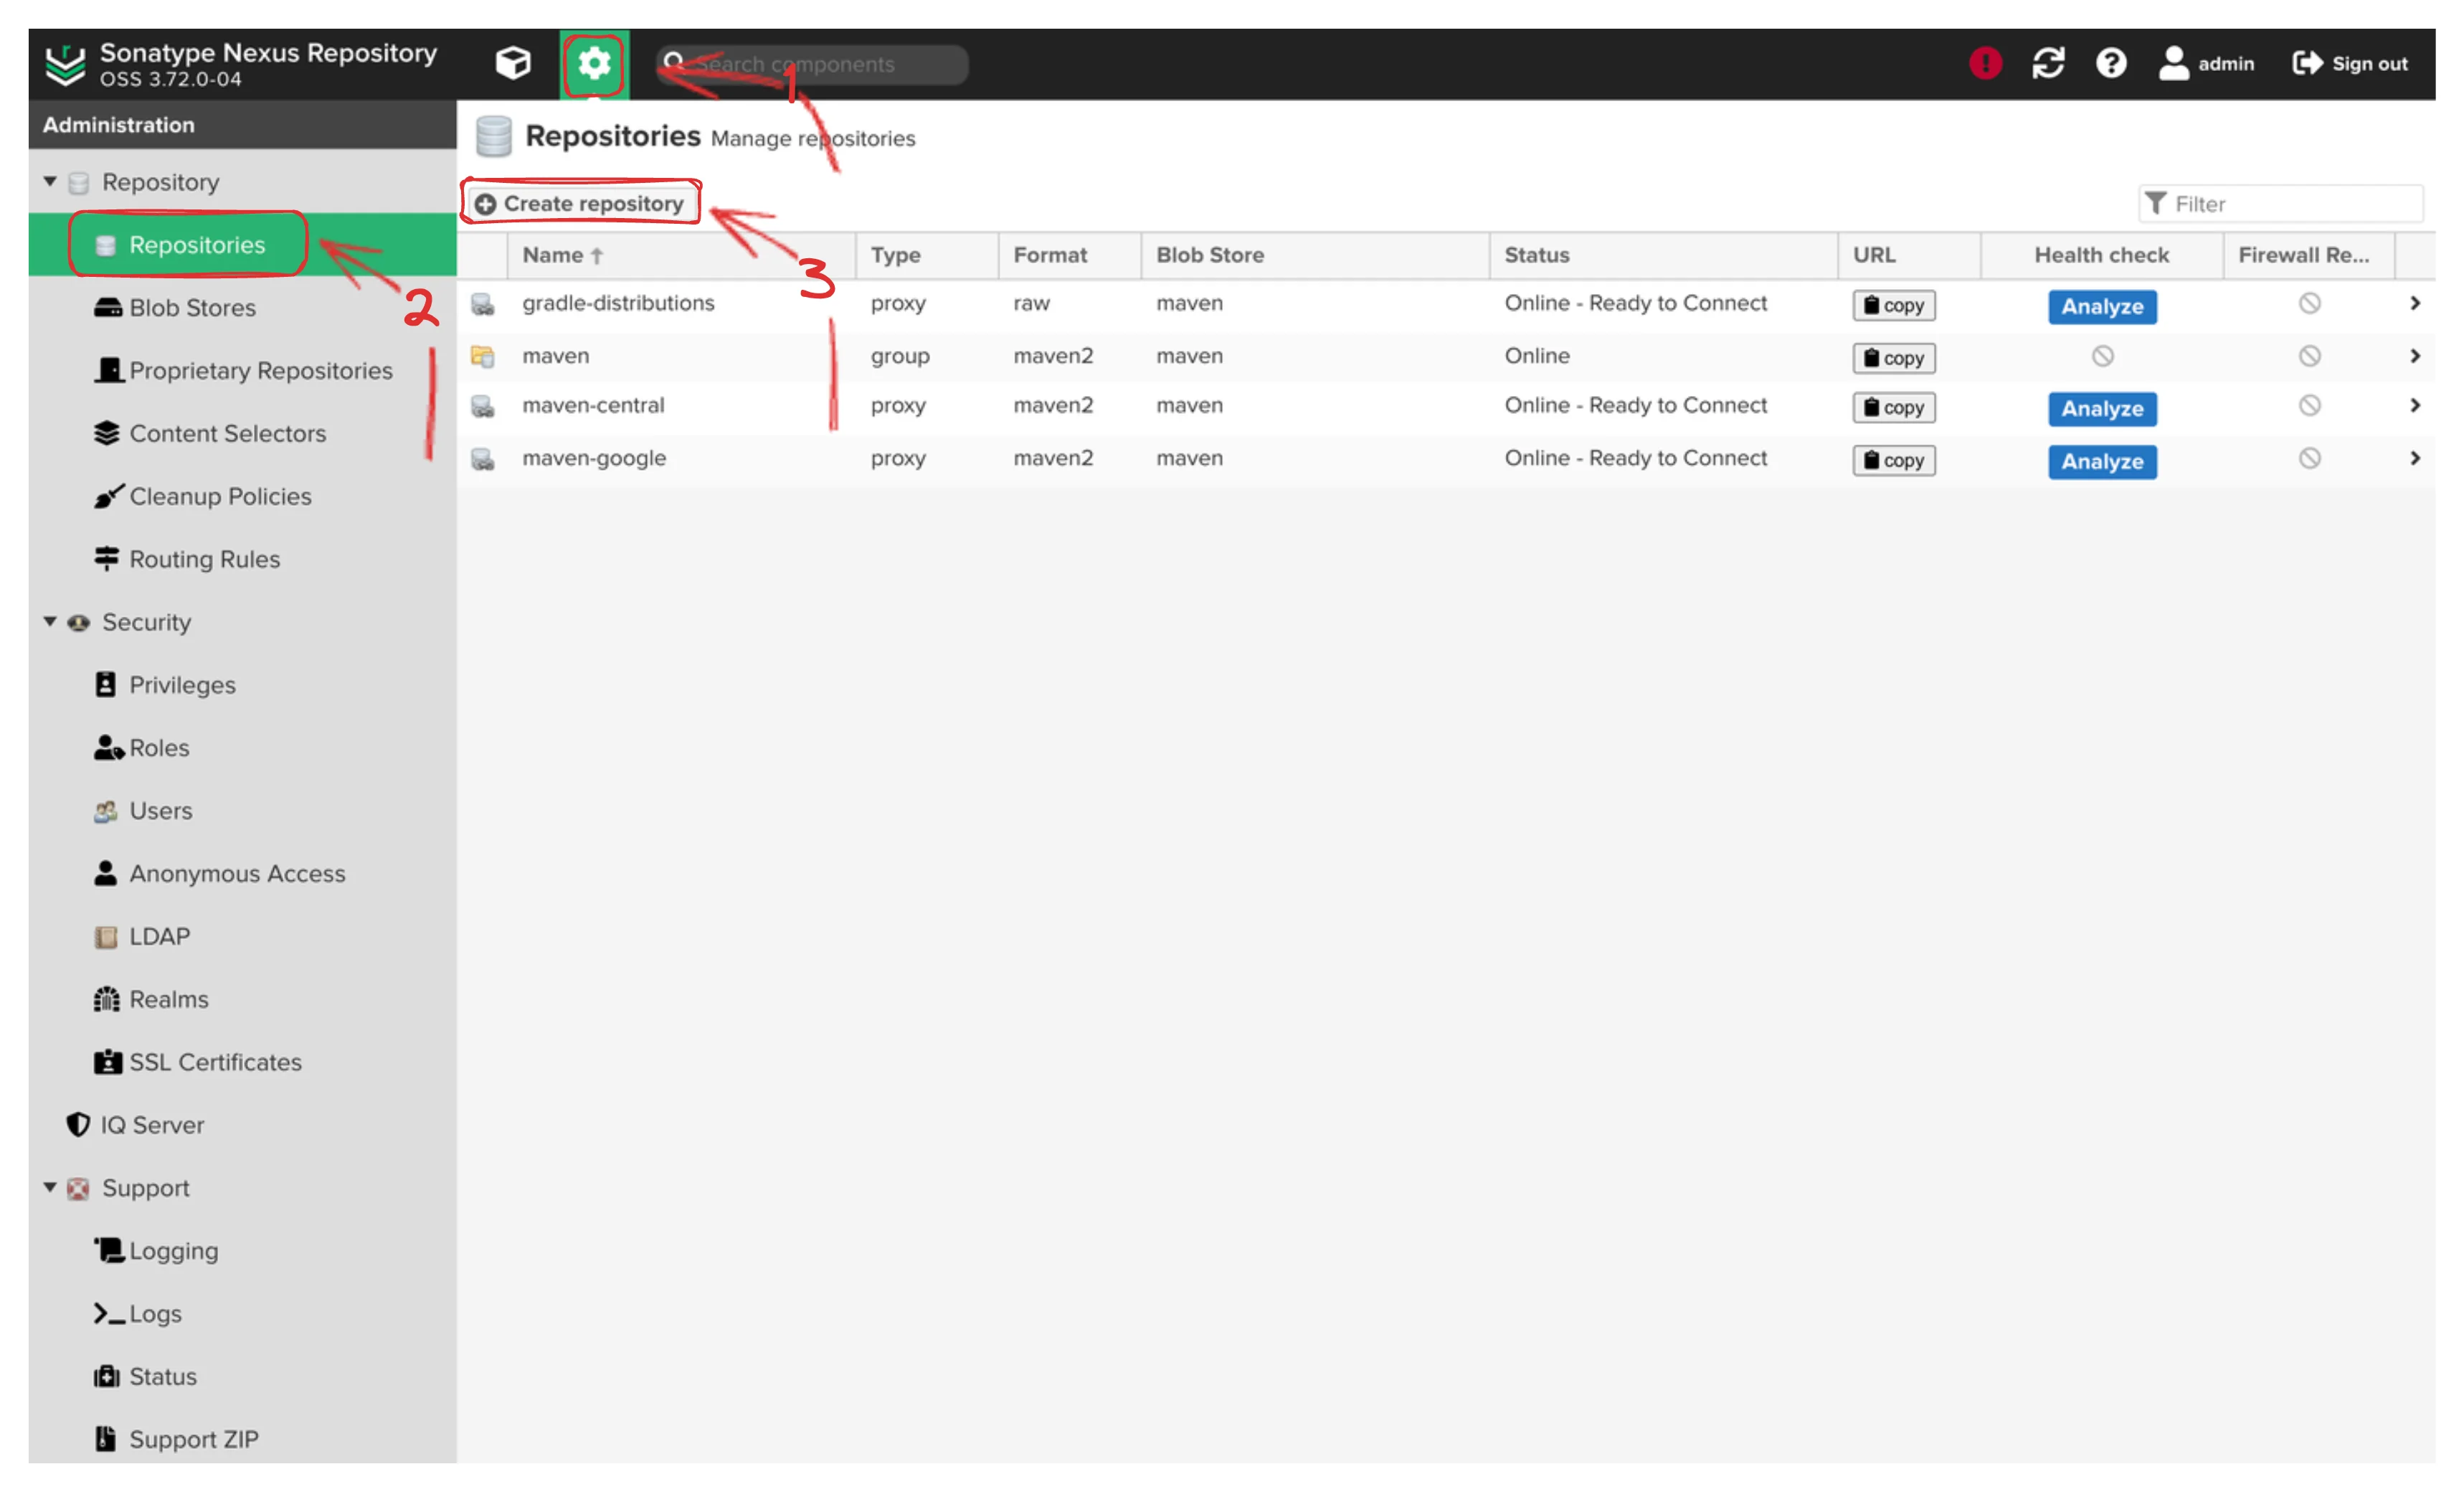
Let’s start by navigating to the repositories administrator menu and
clicking that inviting Create repository button.
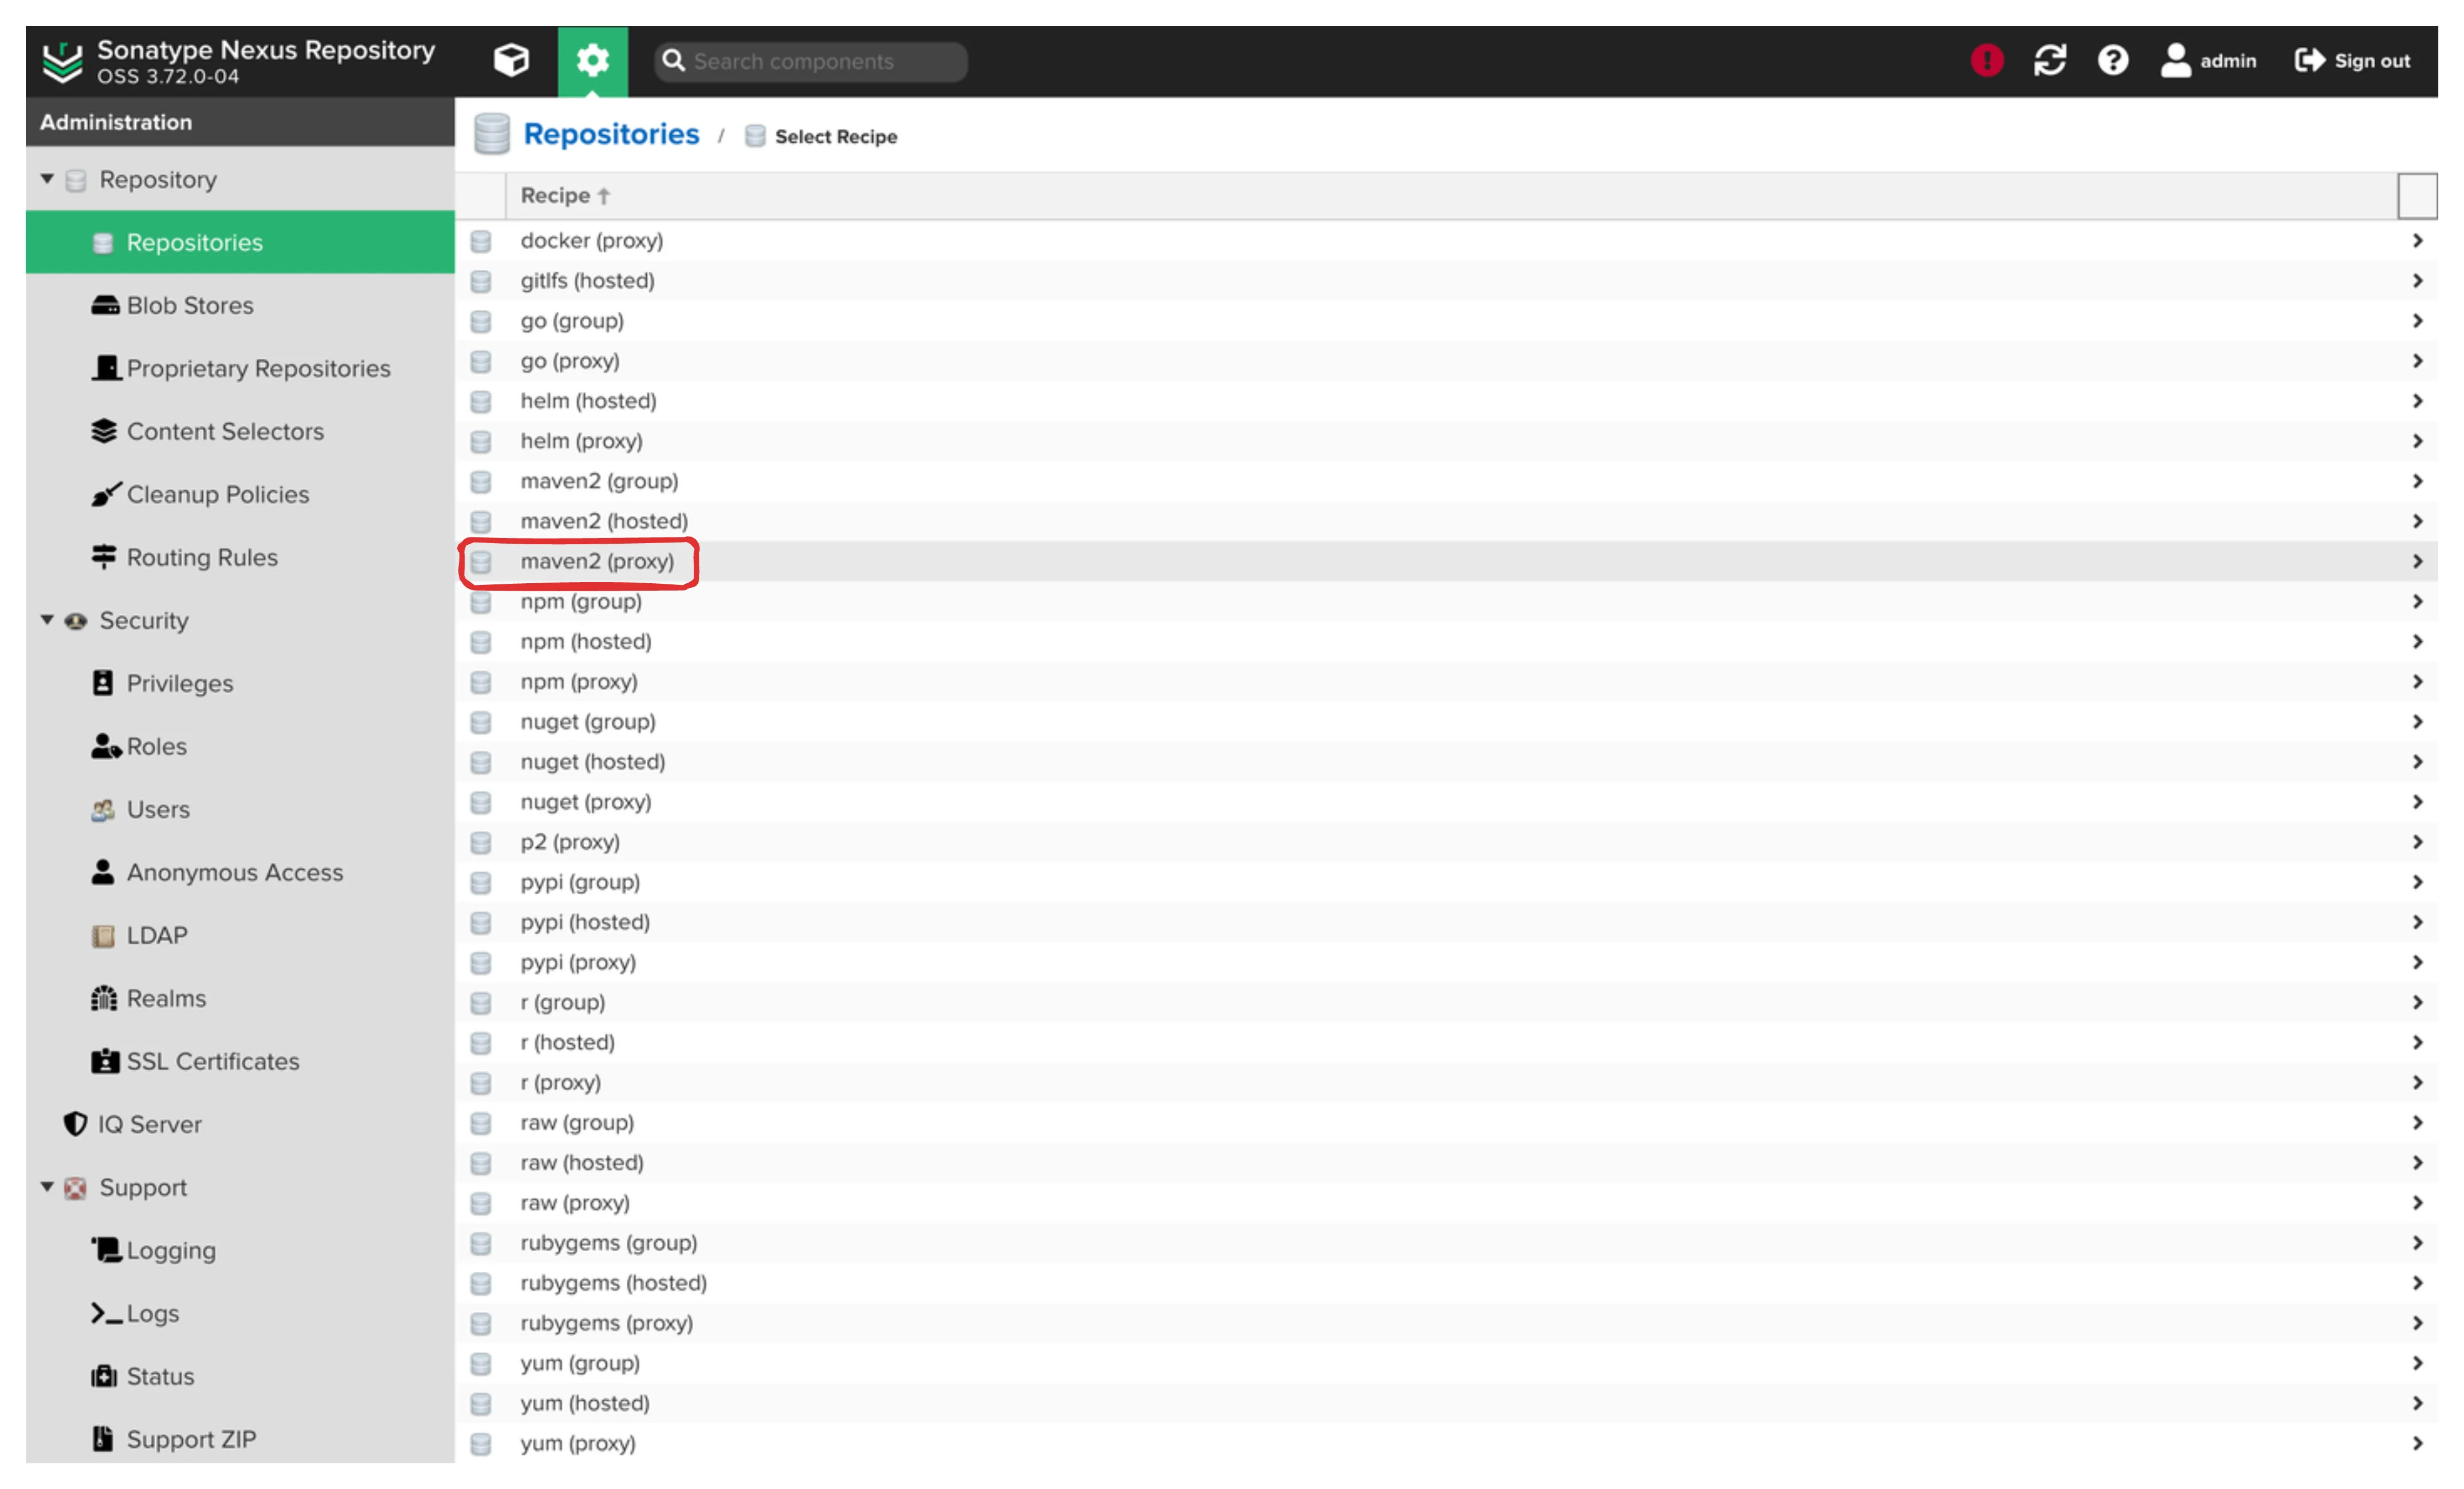
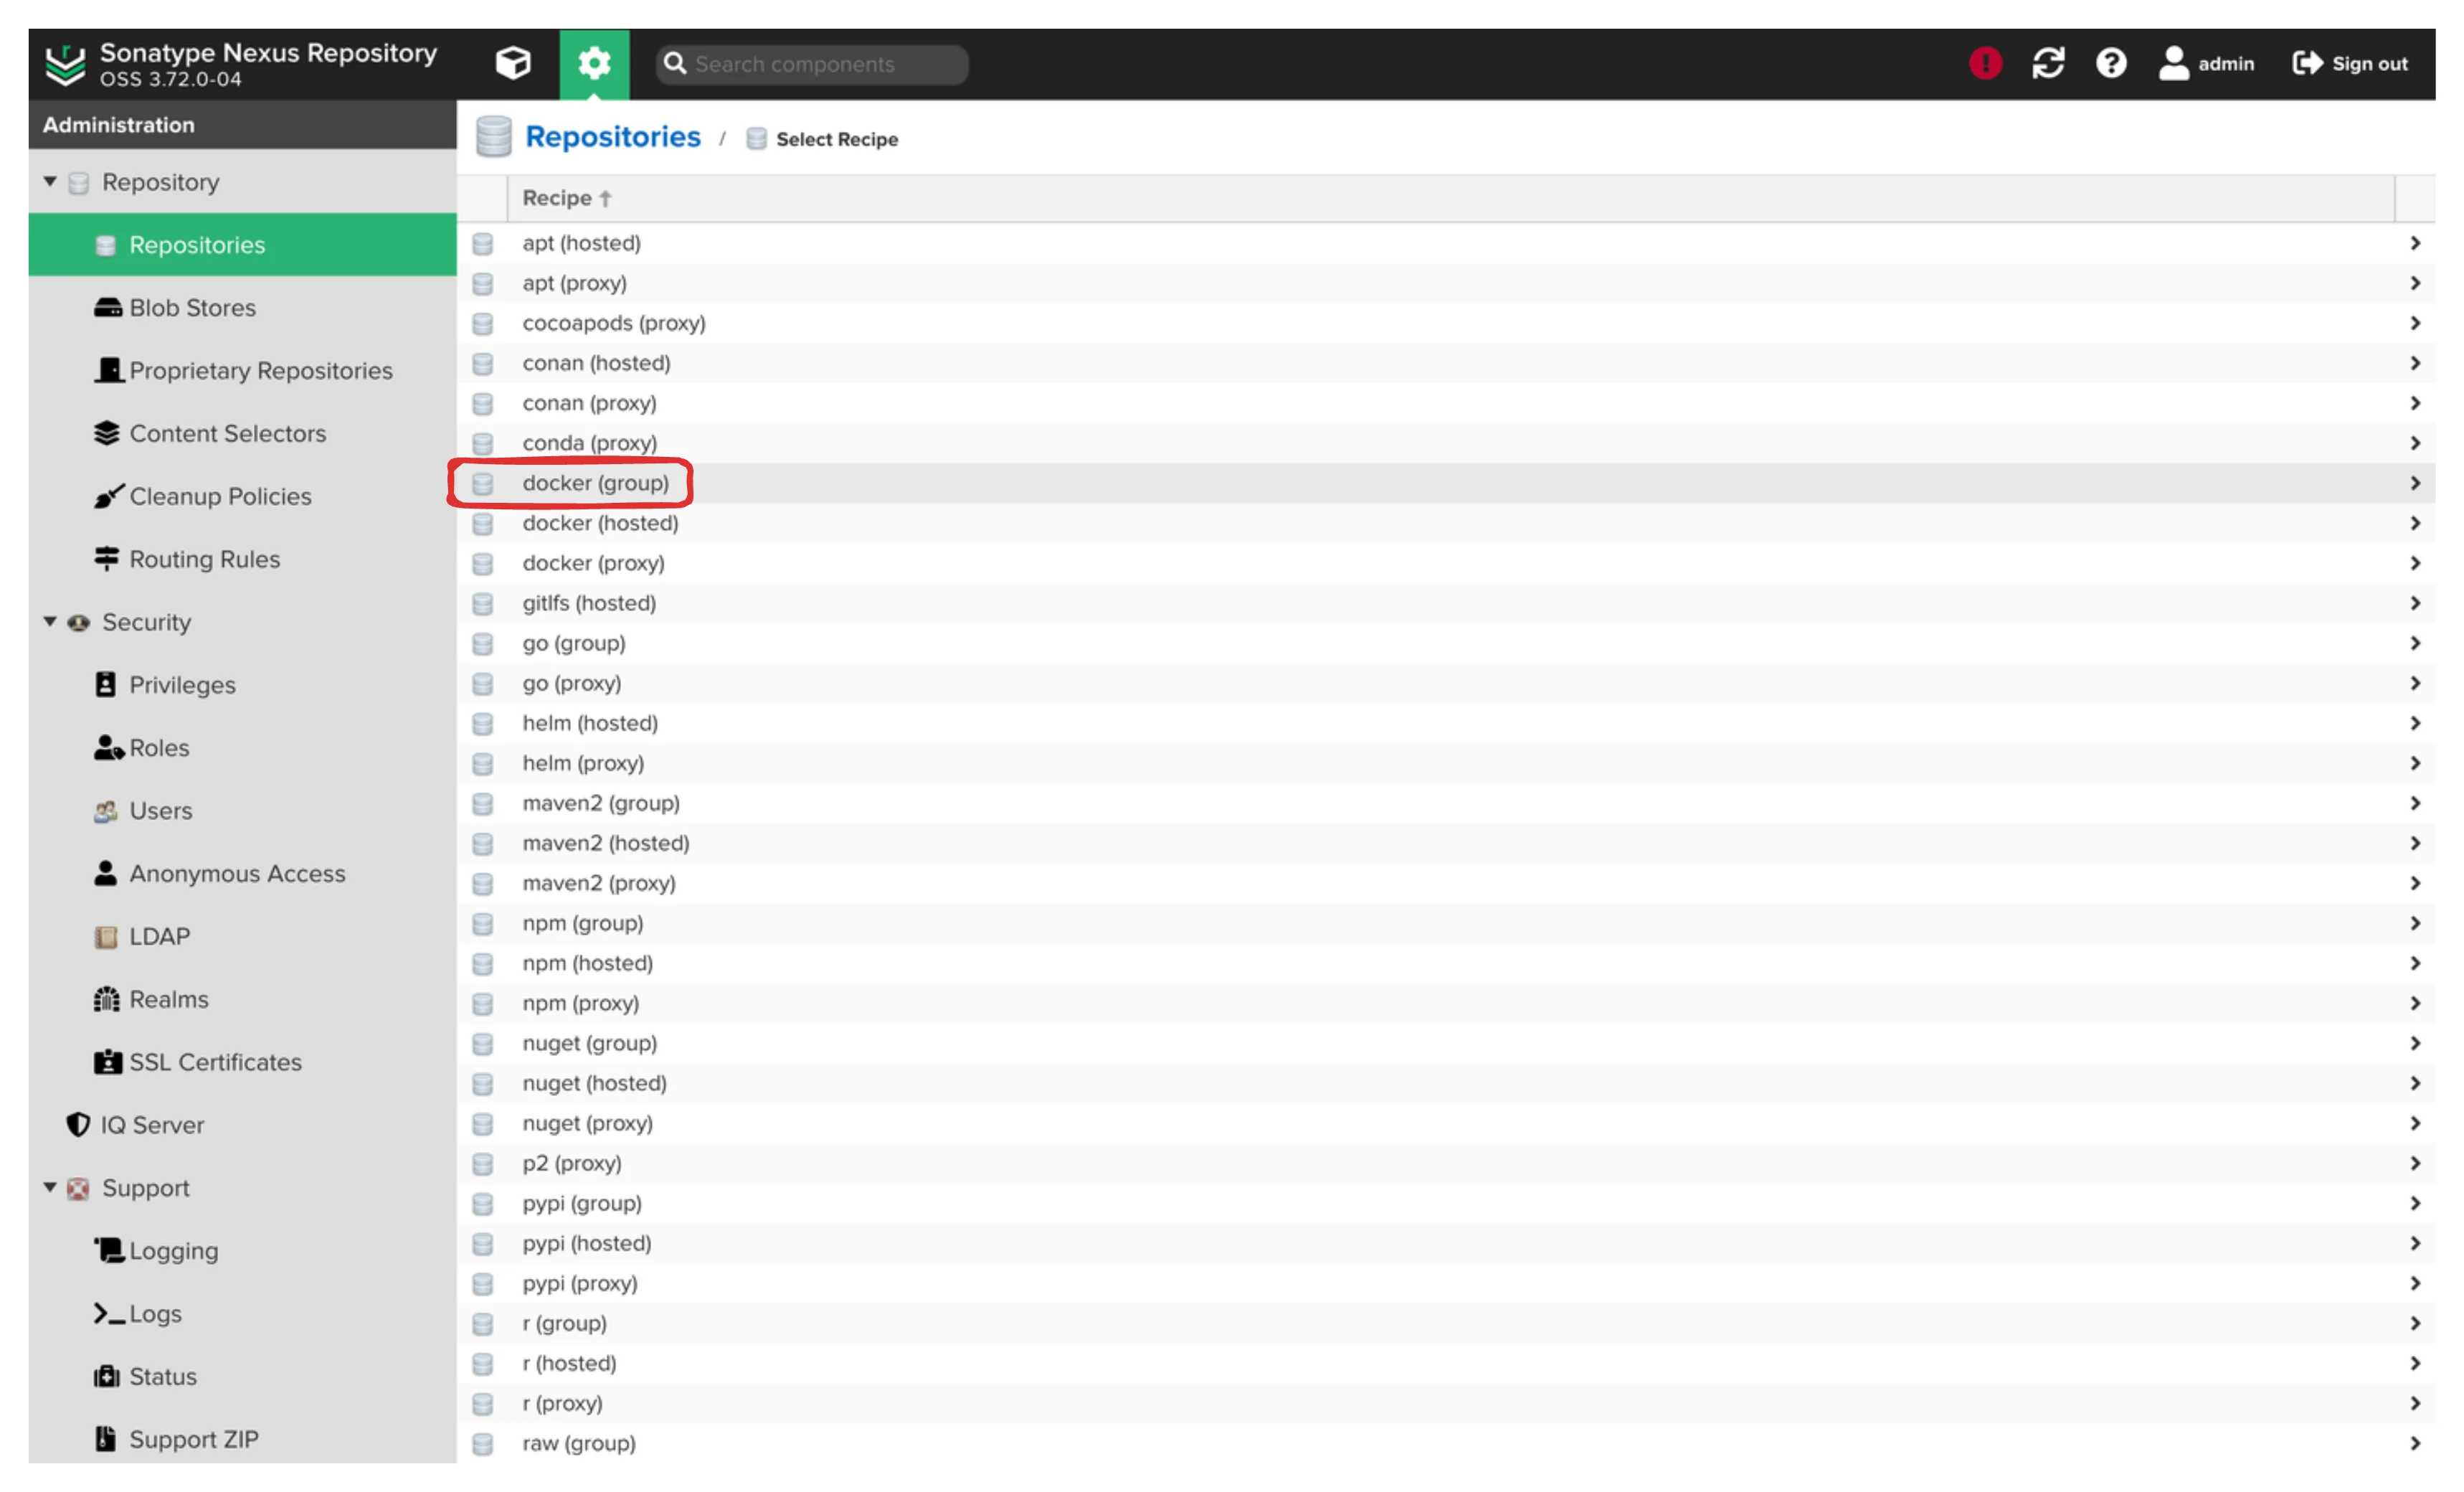
Select maven2 (proxy) from the list.
Now, let’s fill in the details for our central Maven repository:
Name: maven-centralRemote Storage: https://repo1.maven.org/maven2/Blob Store: maven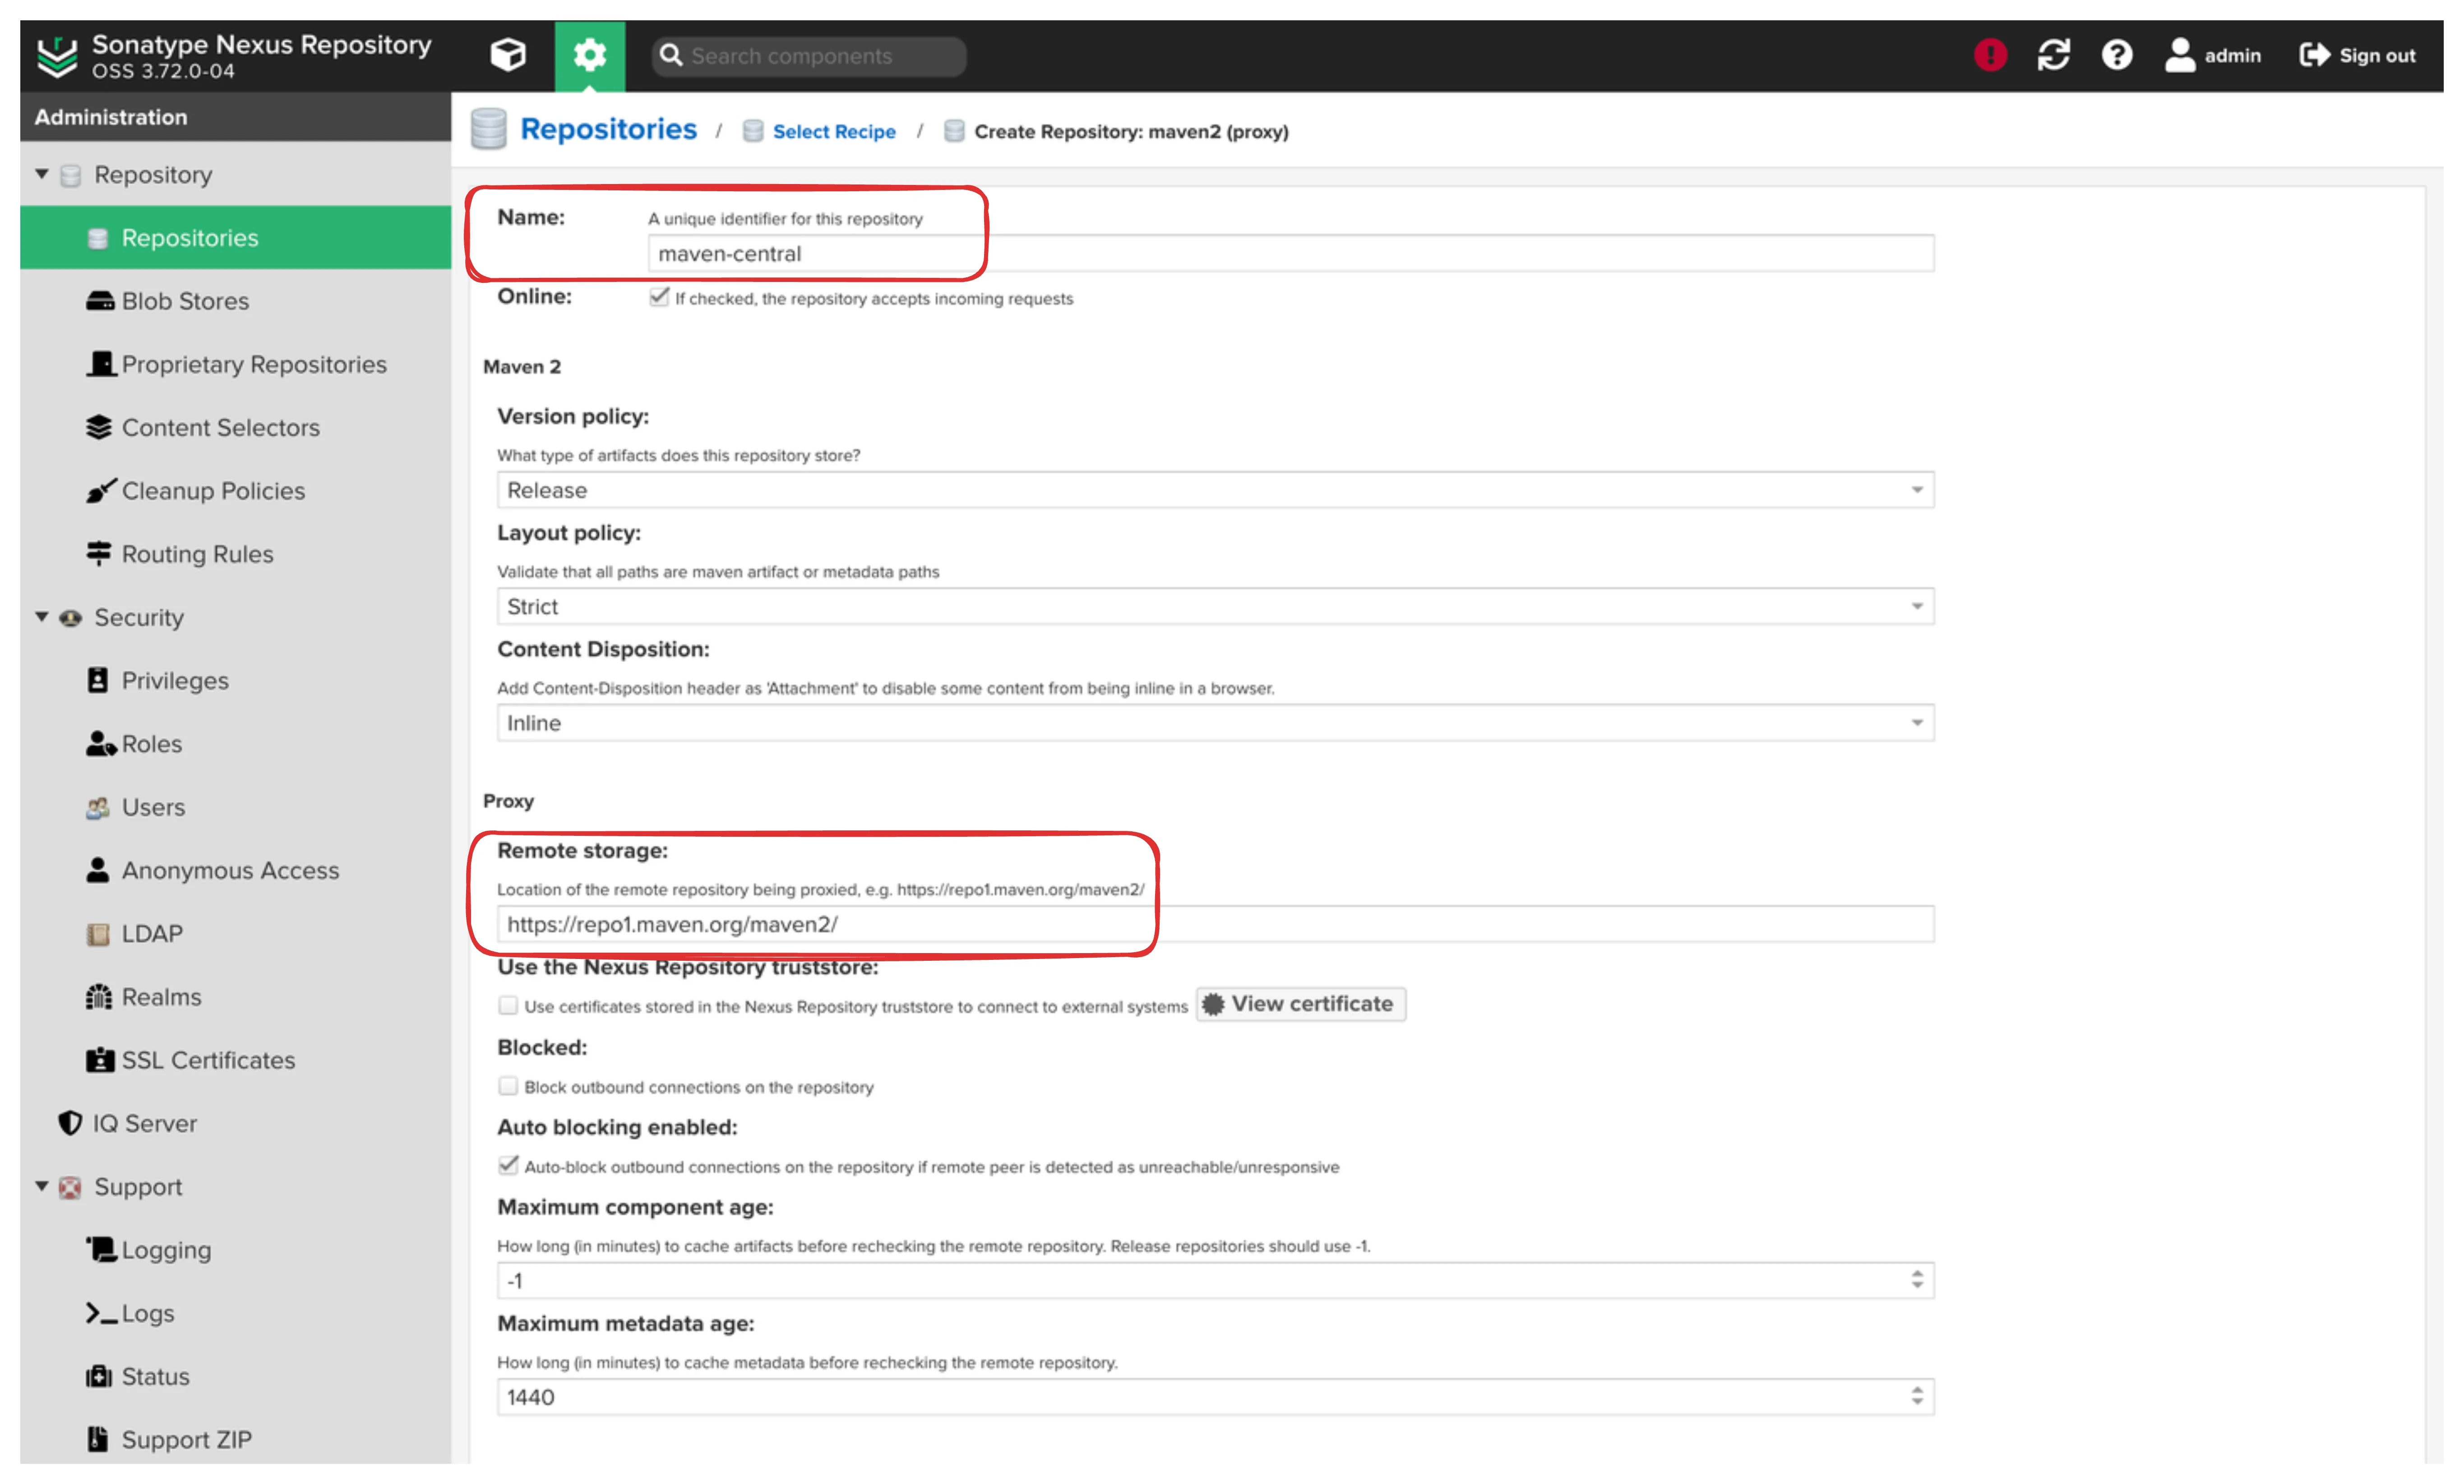
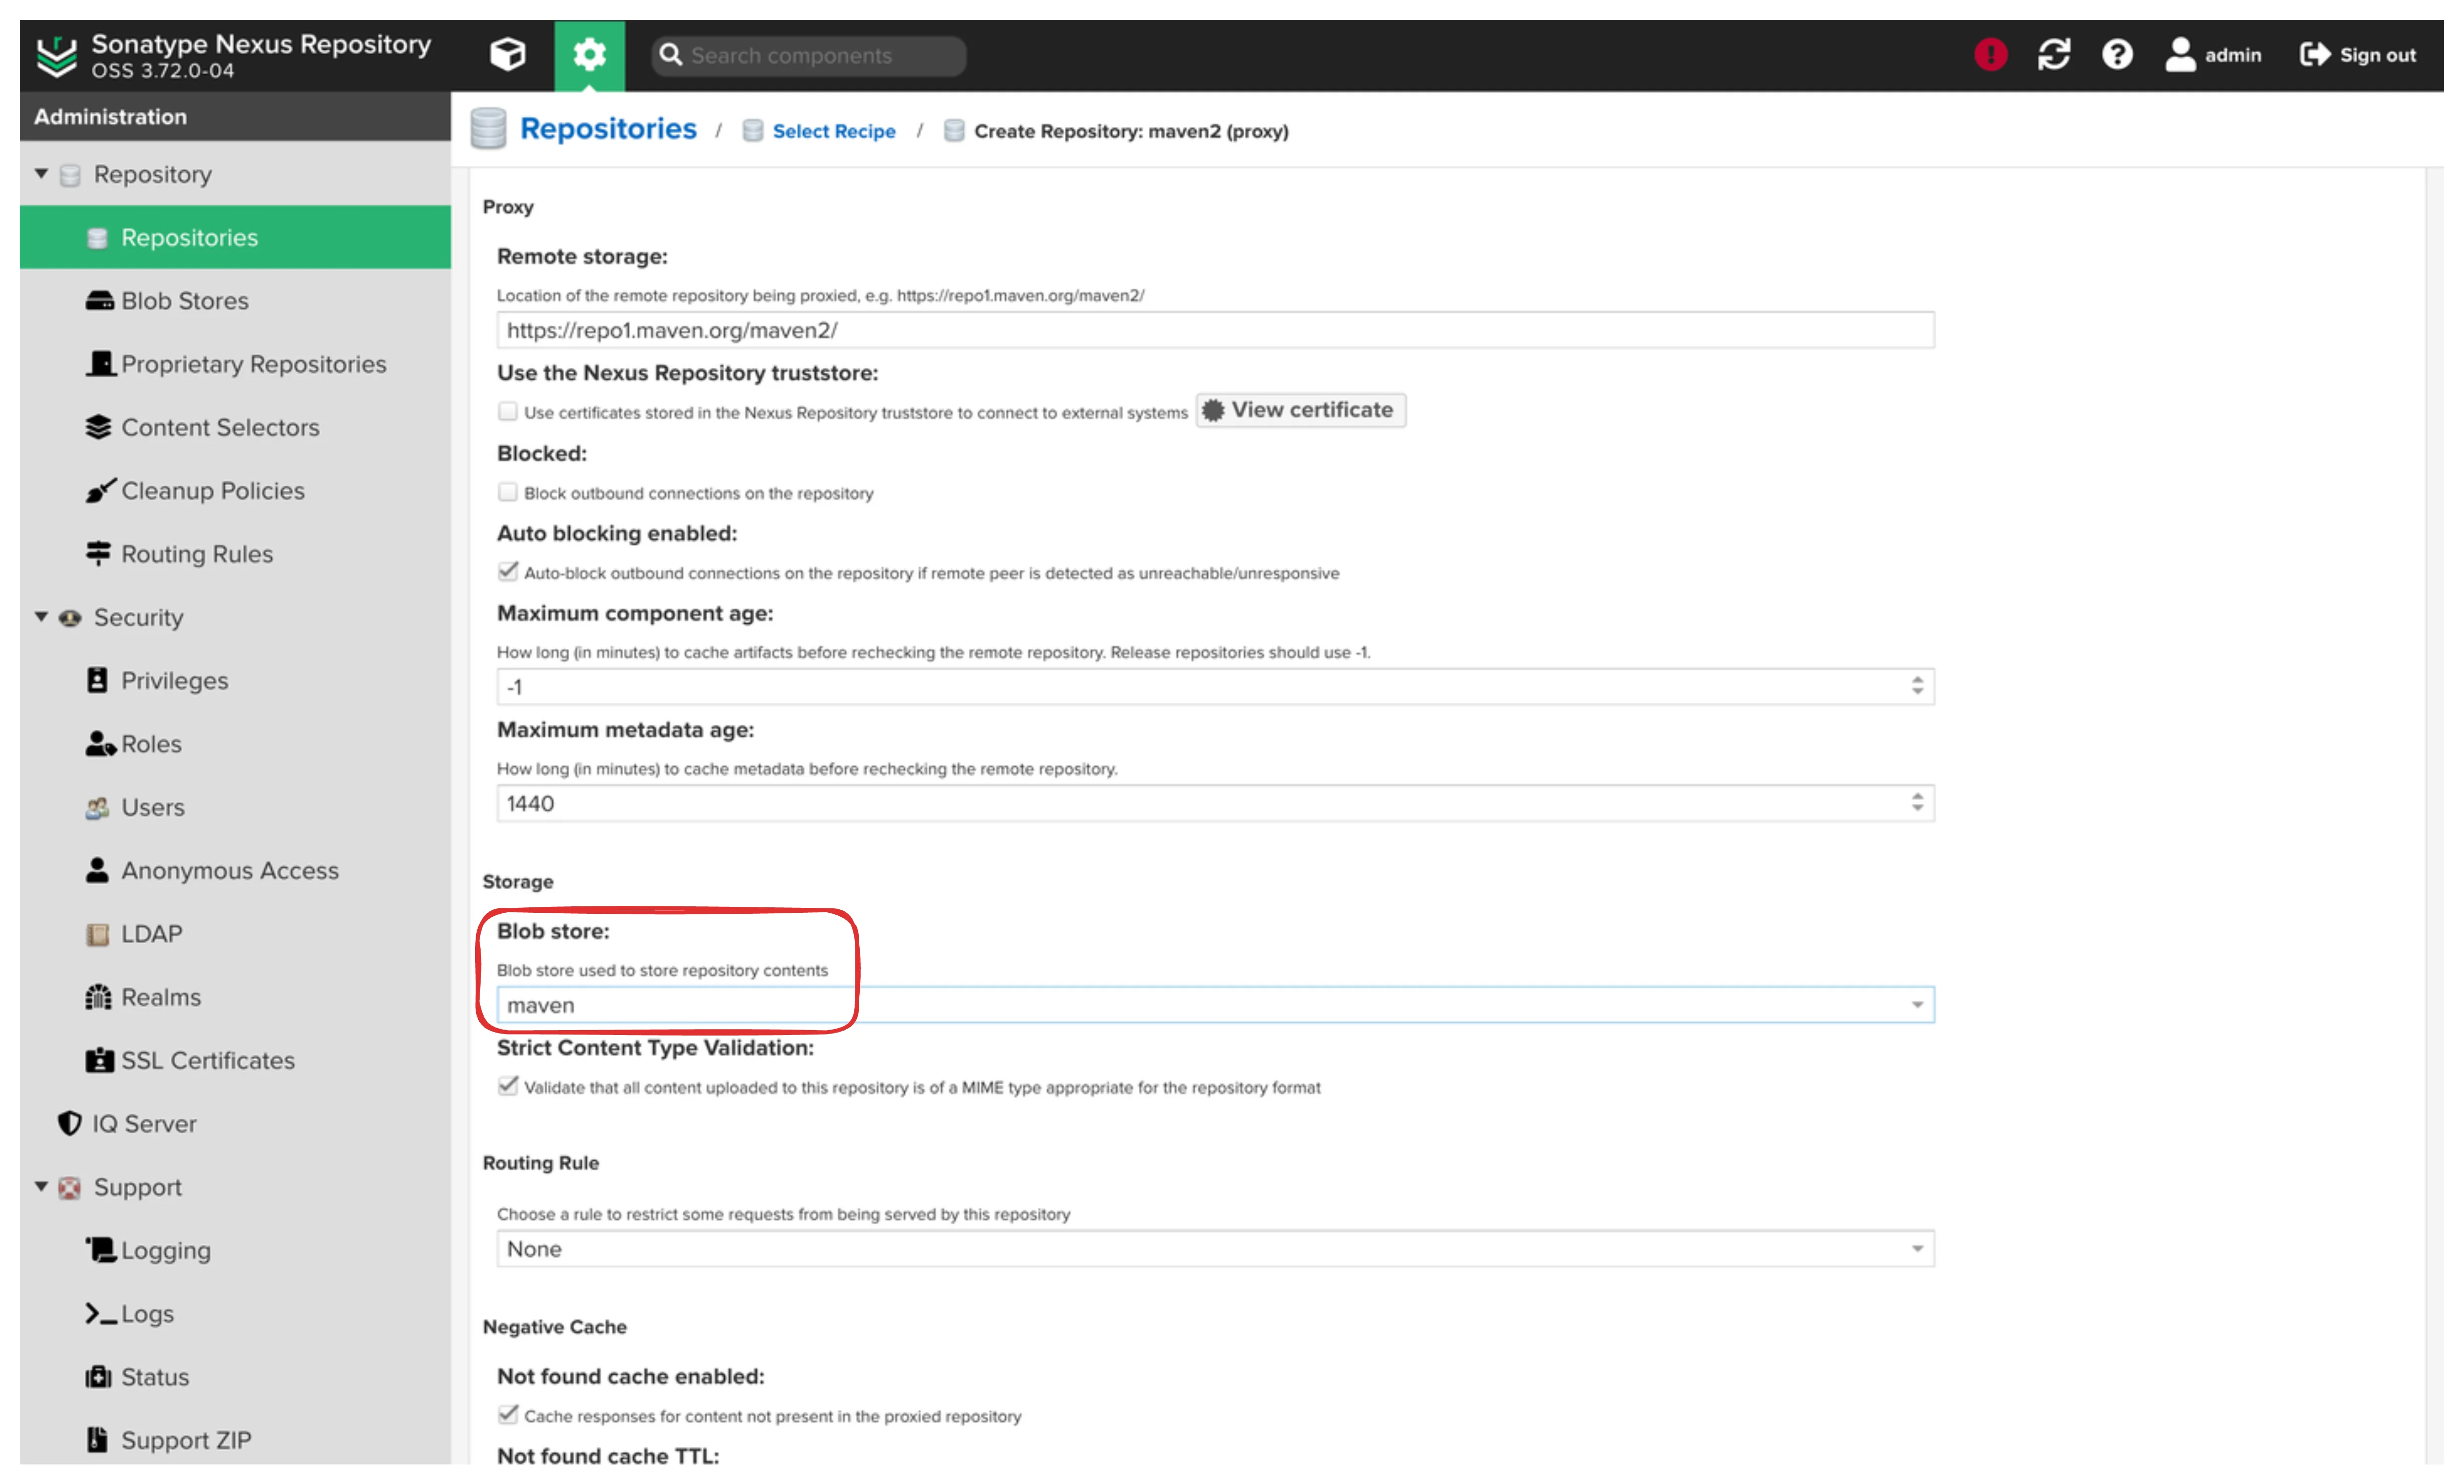
Hit Create to create the repository.
Great! Now let’s repeat this process for the Google Maven repository. Use these values:
Name: maven-googleRemote Storage: https://maven.google.com/Blob Store: mavenMaven Group Repository
Now that we have our individual Maven proxy repositories set up, it’s time to group them together. You can give clients the single URL of the group repository and manage the group repository on the Nexus side without having to change the repository URL.
Head back to the repositories administrator menu and click
Create repository again. This time, select maven2 (group).
Select maven2 (group).
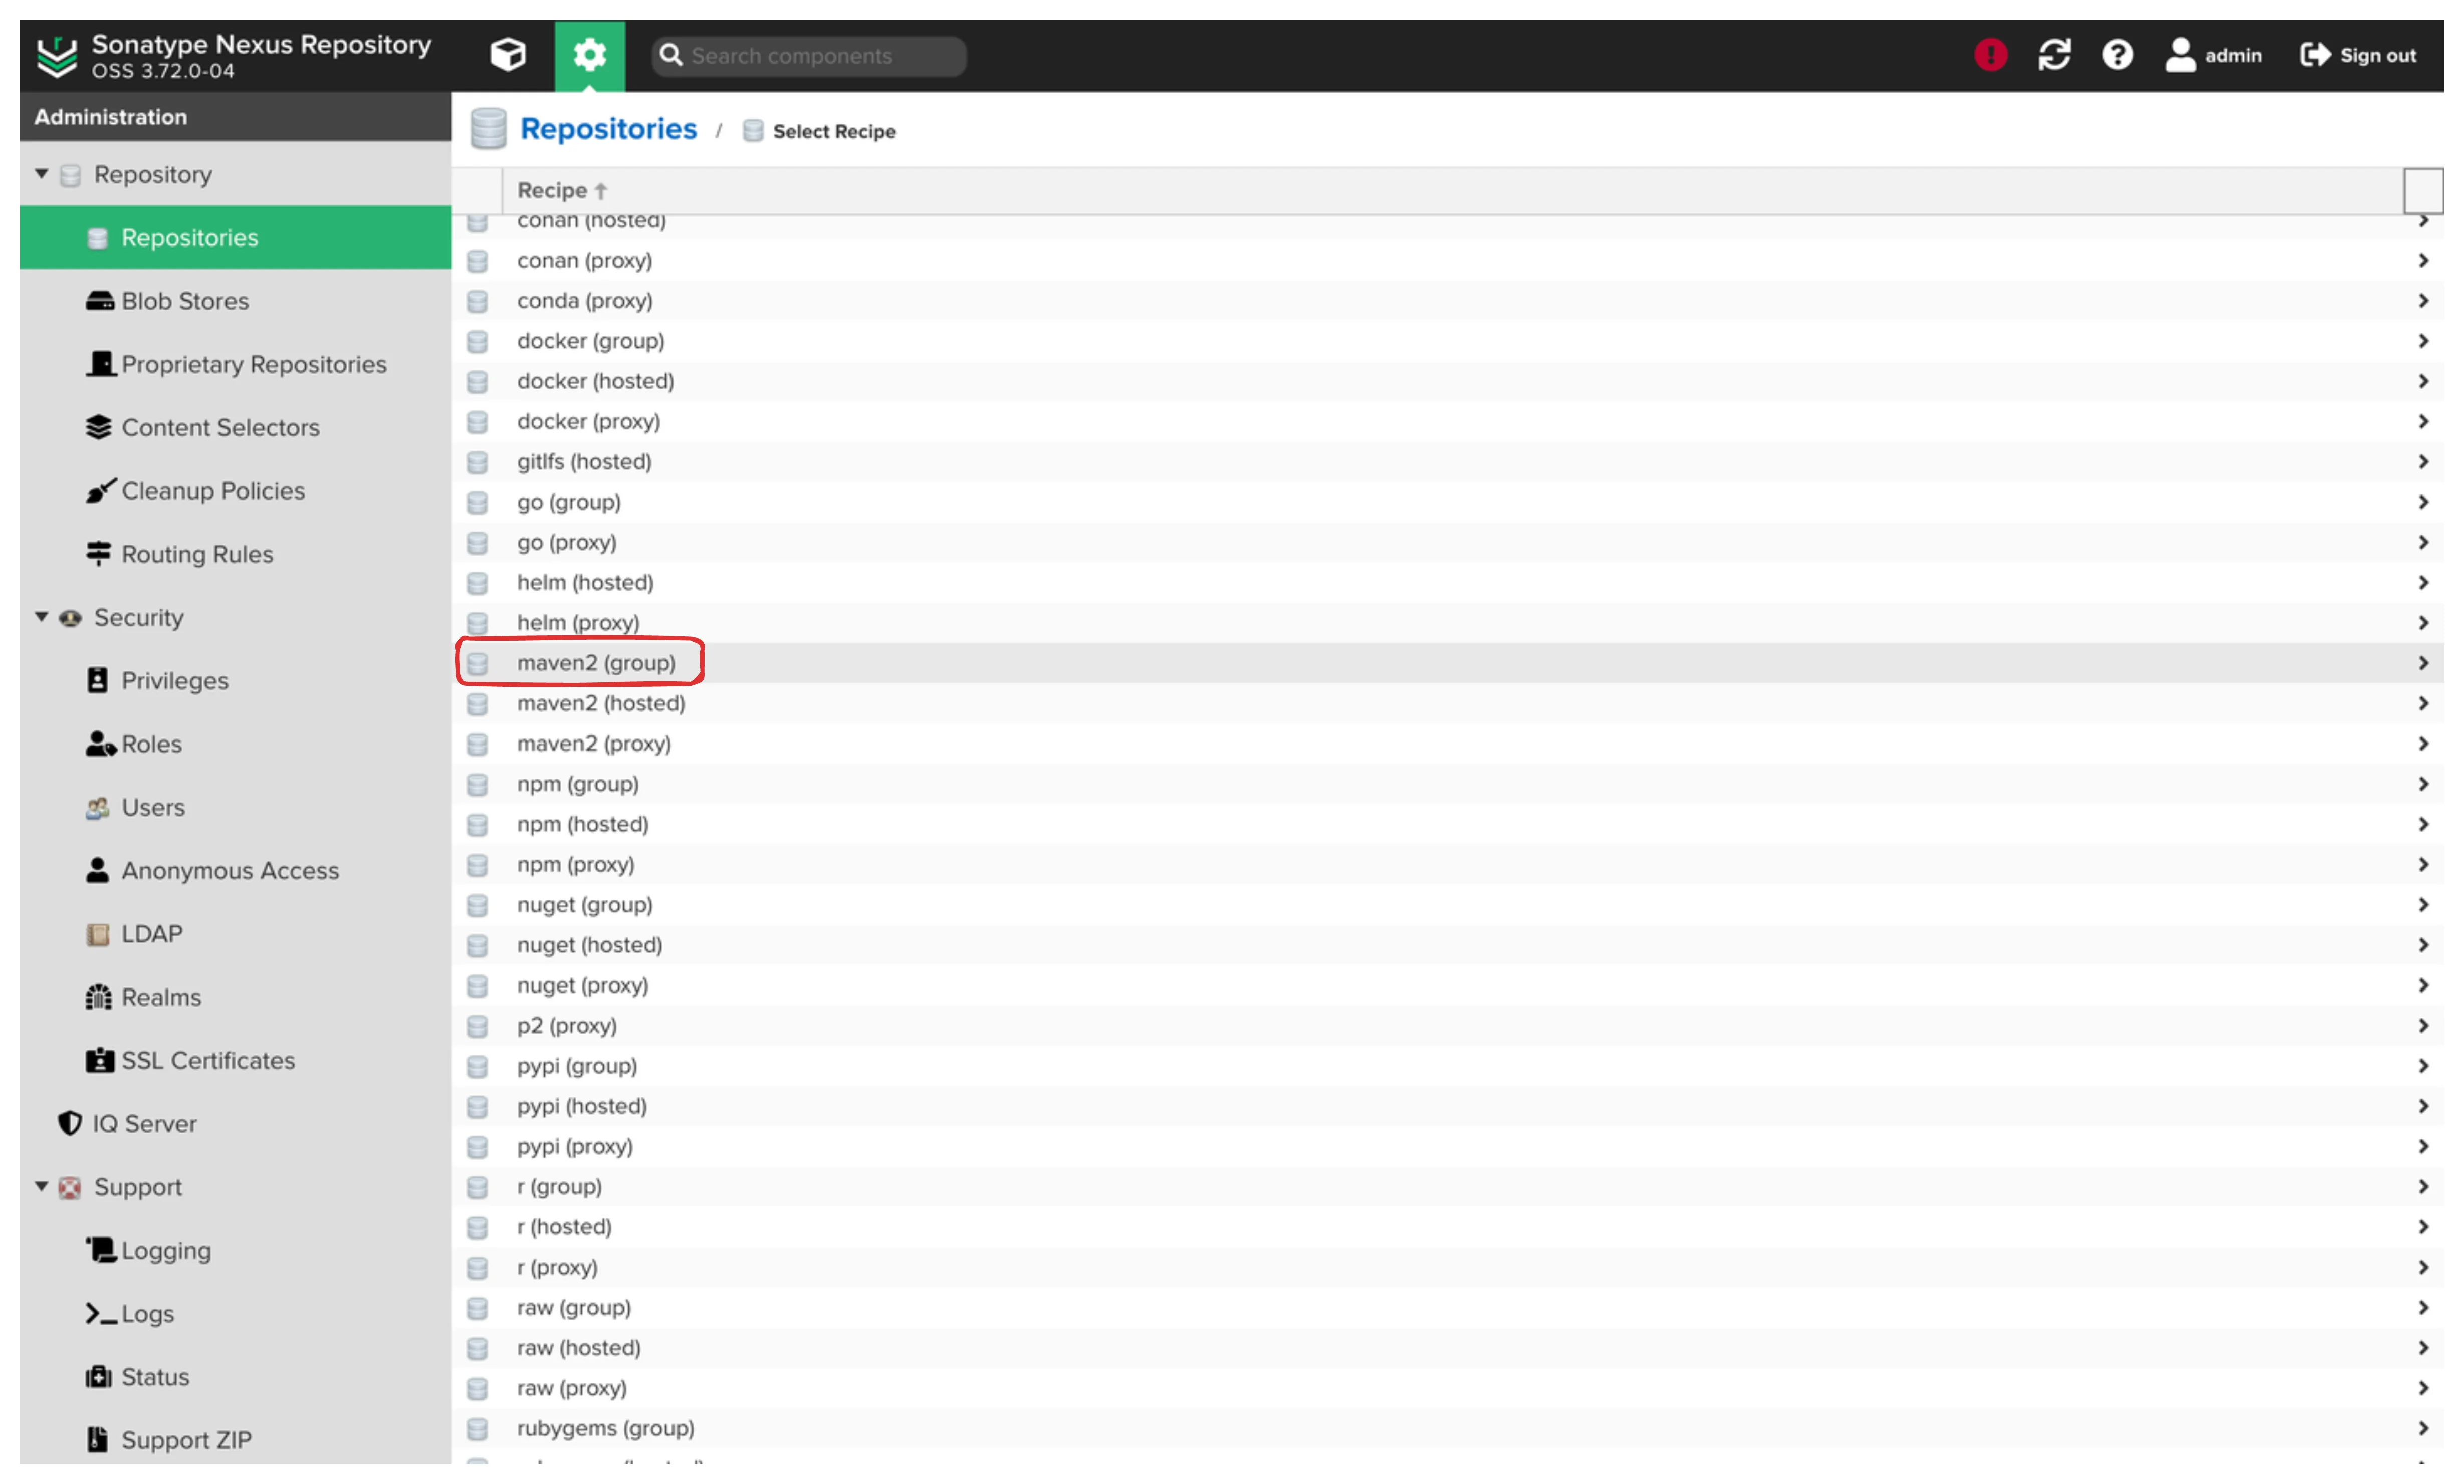
Let’s set it up with these details:
Name: mavenBlob: mavenIn the group section, click on the previously created repositories and use the right arrow to move both repositories to the members column.
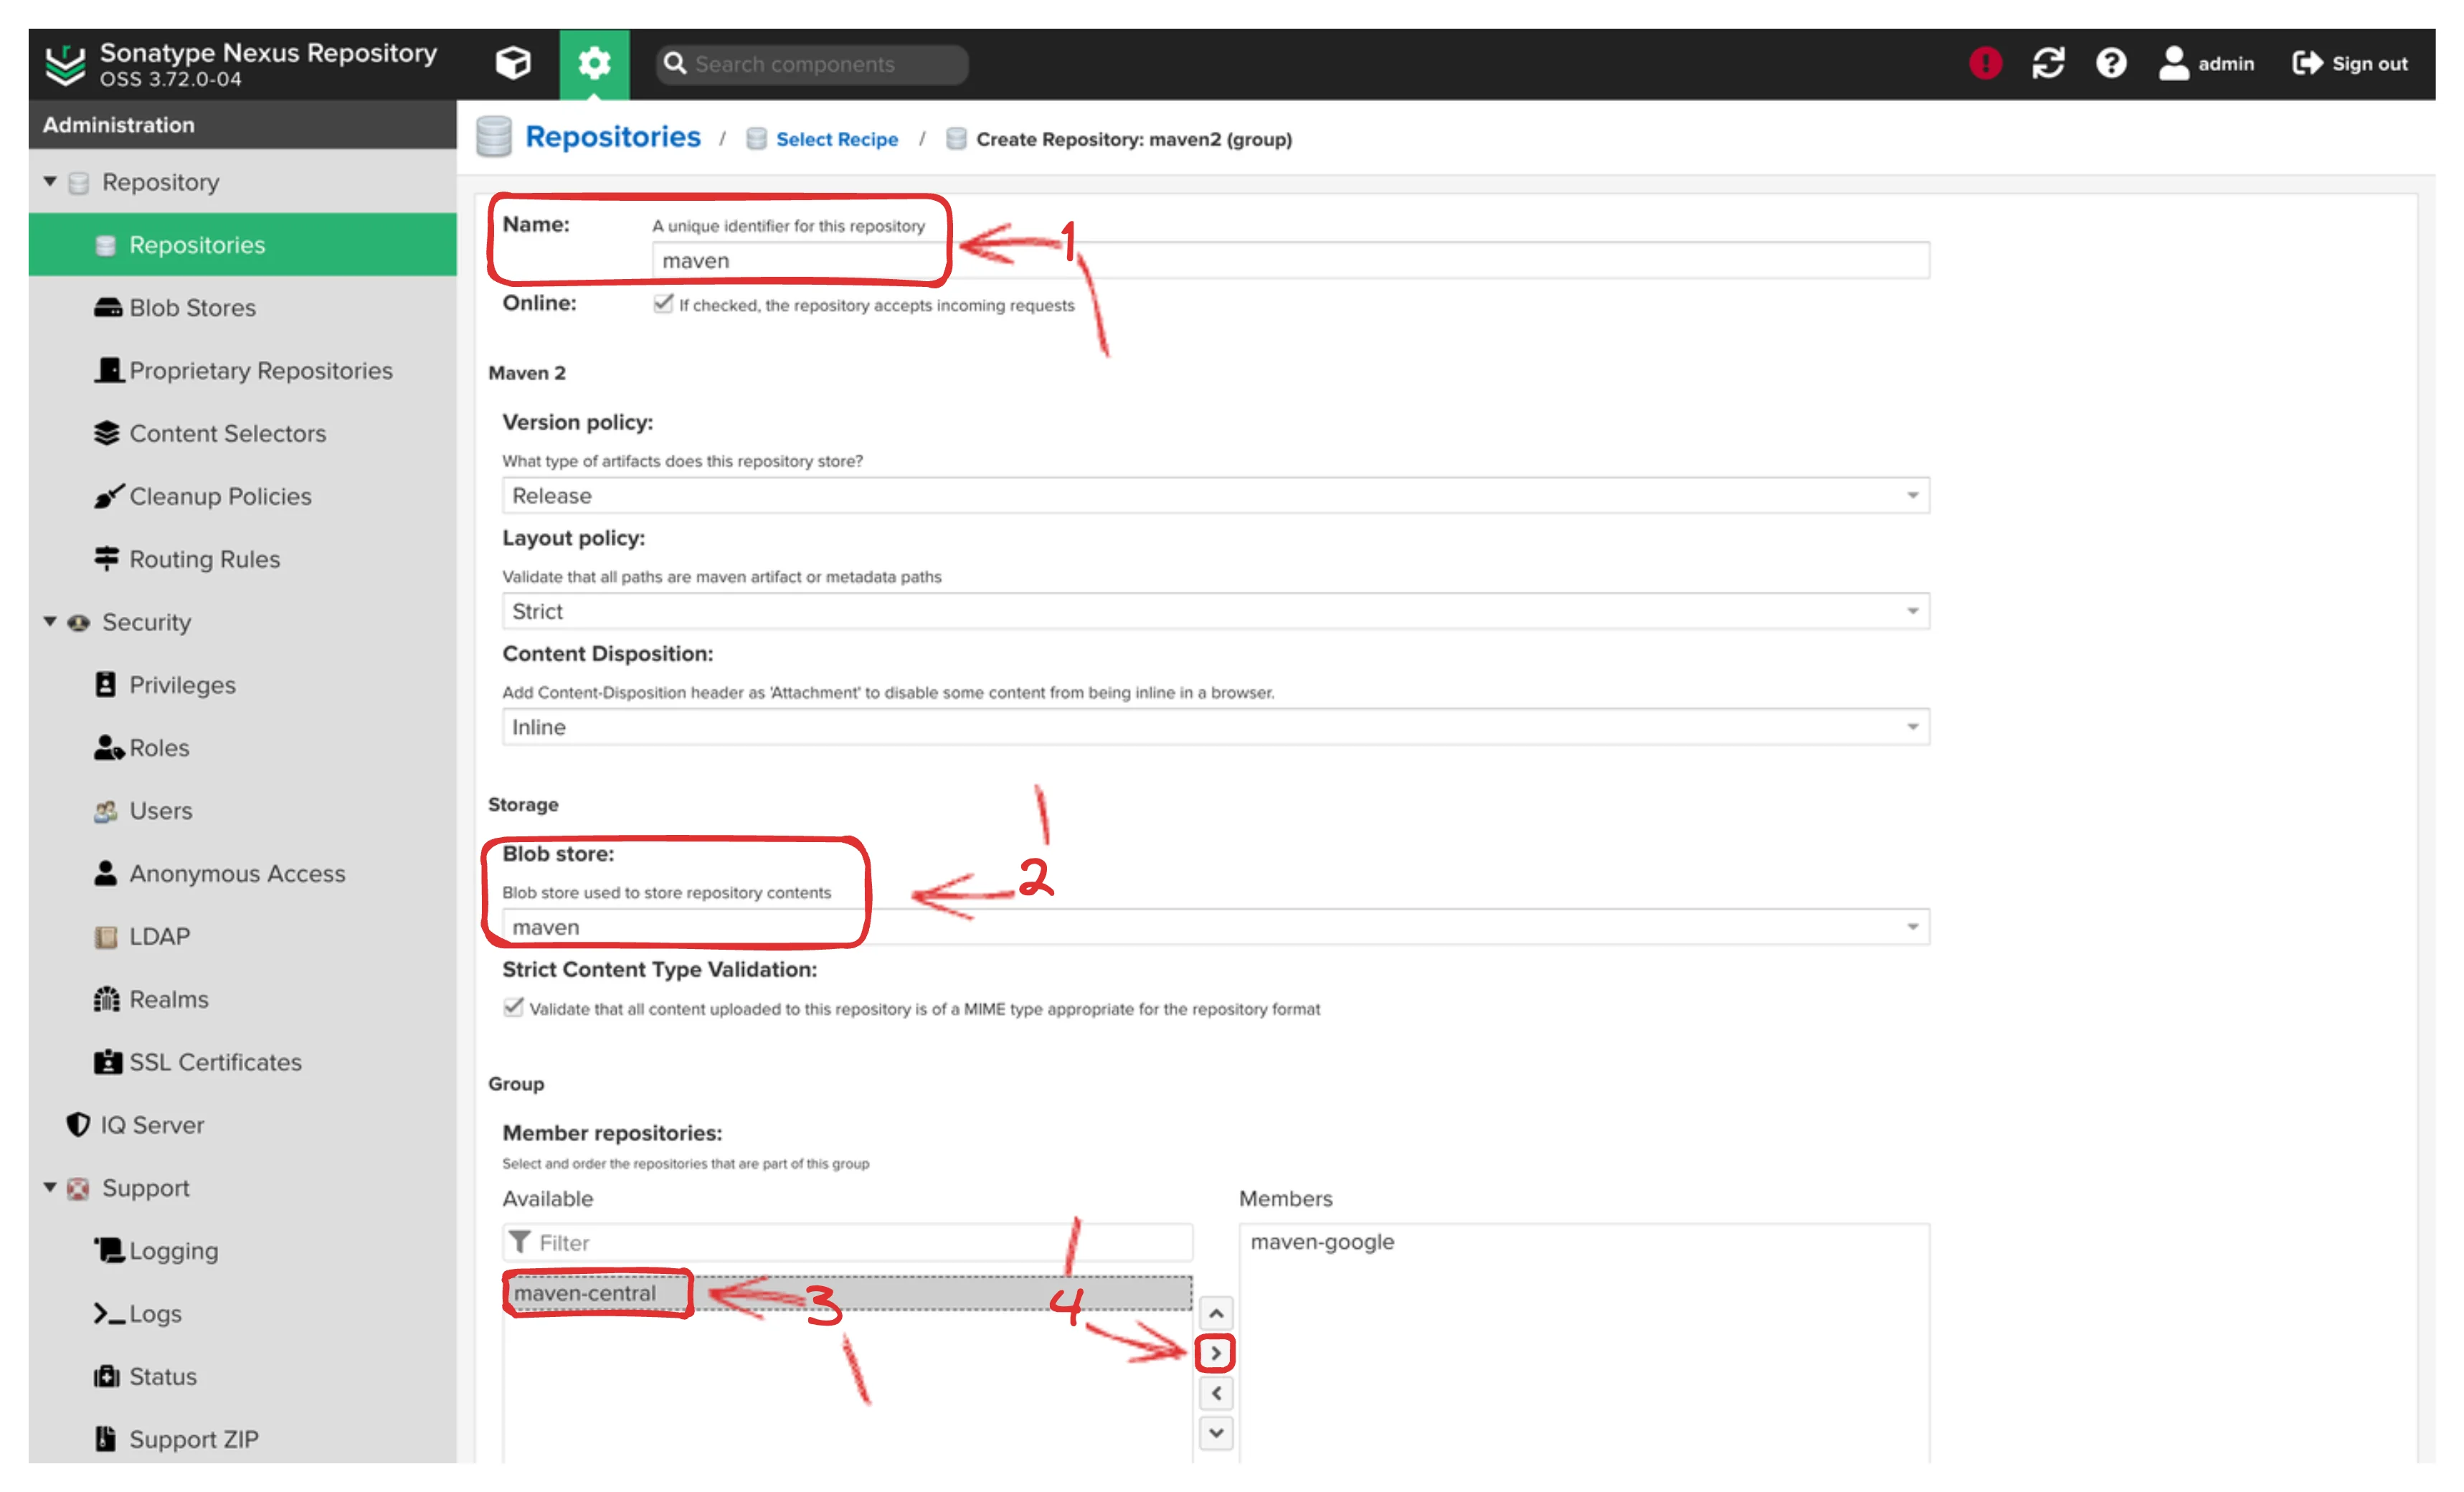
Hit that ‘Create repository’ button, and voila! Your Maven repository is ready to serve.
Raw Proxy for Gradle Zip File
If you’re planning to use this Maven repository for Android development,
there’s one more piece of the puzzle we need to address. The gradlew
tool needs to download the Gradle distribution zip file, and we want to
ensure it does so through our Nexus repository.
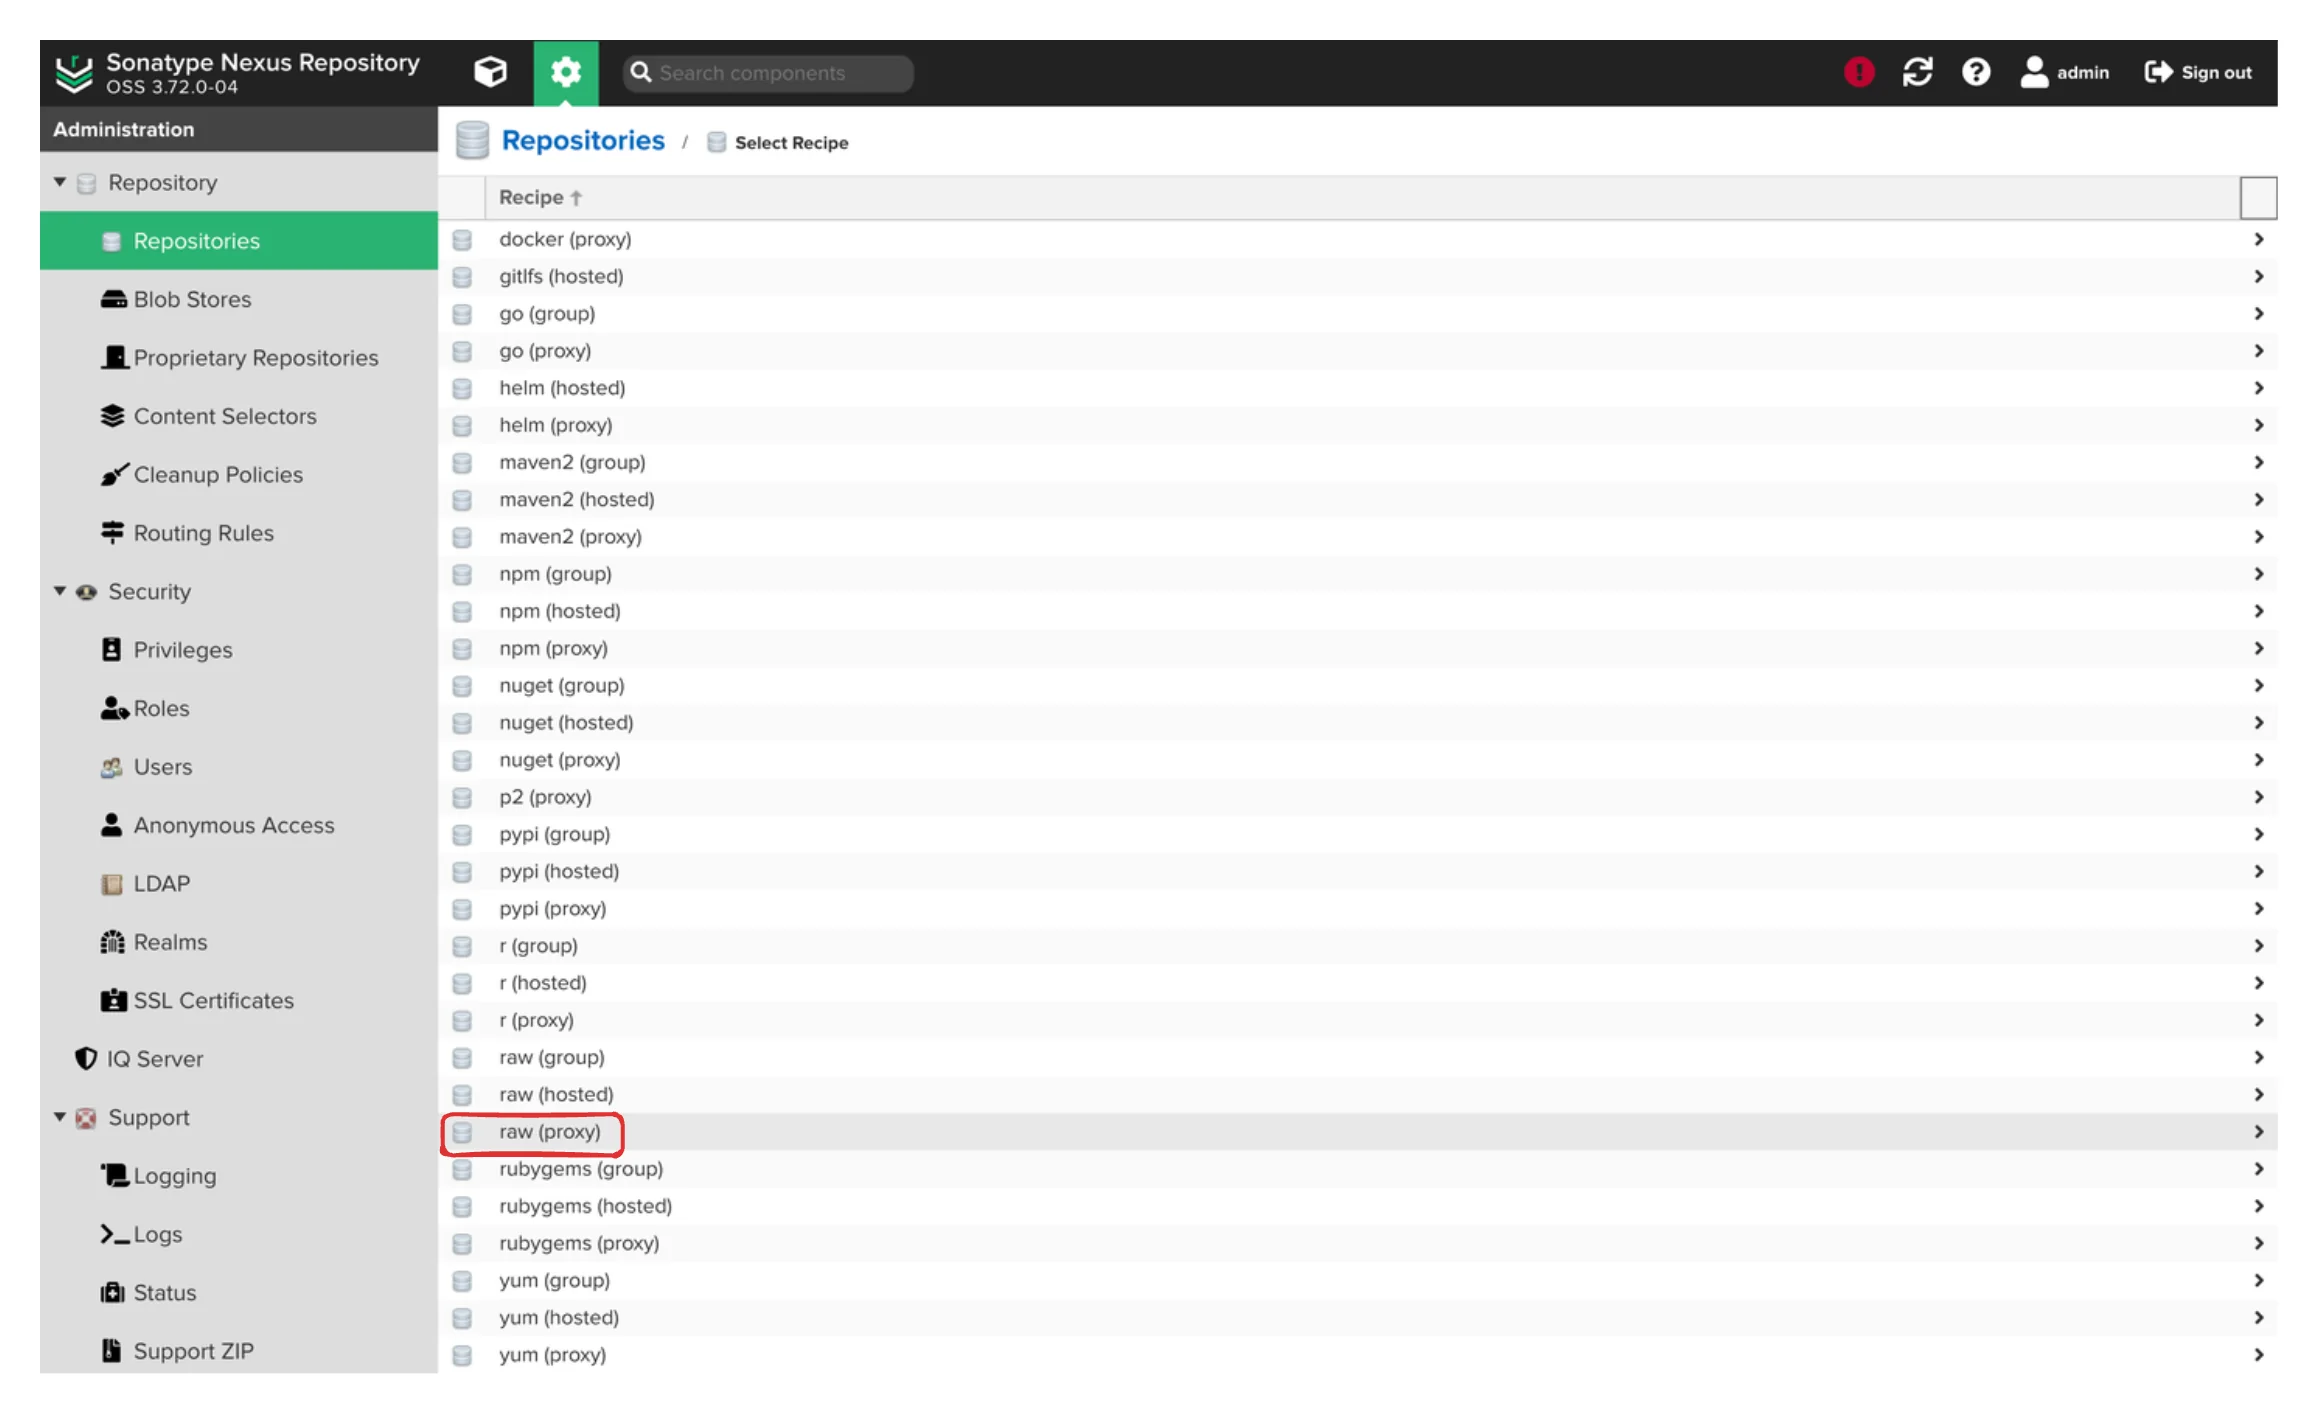
Go to the repositories administrator menu and click Create repository.
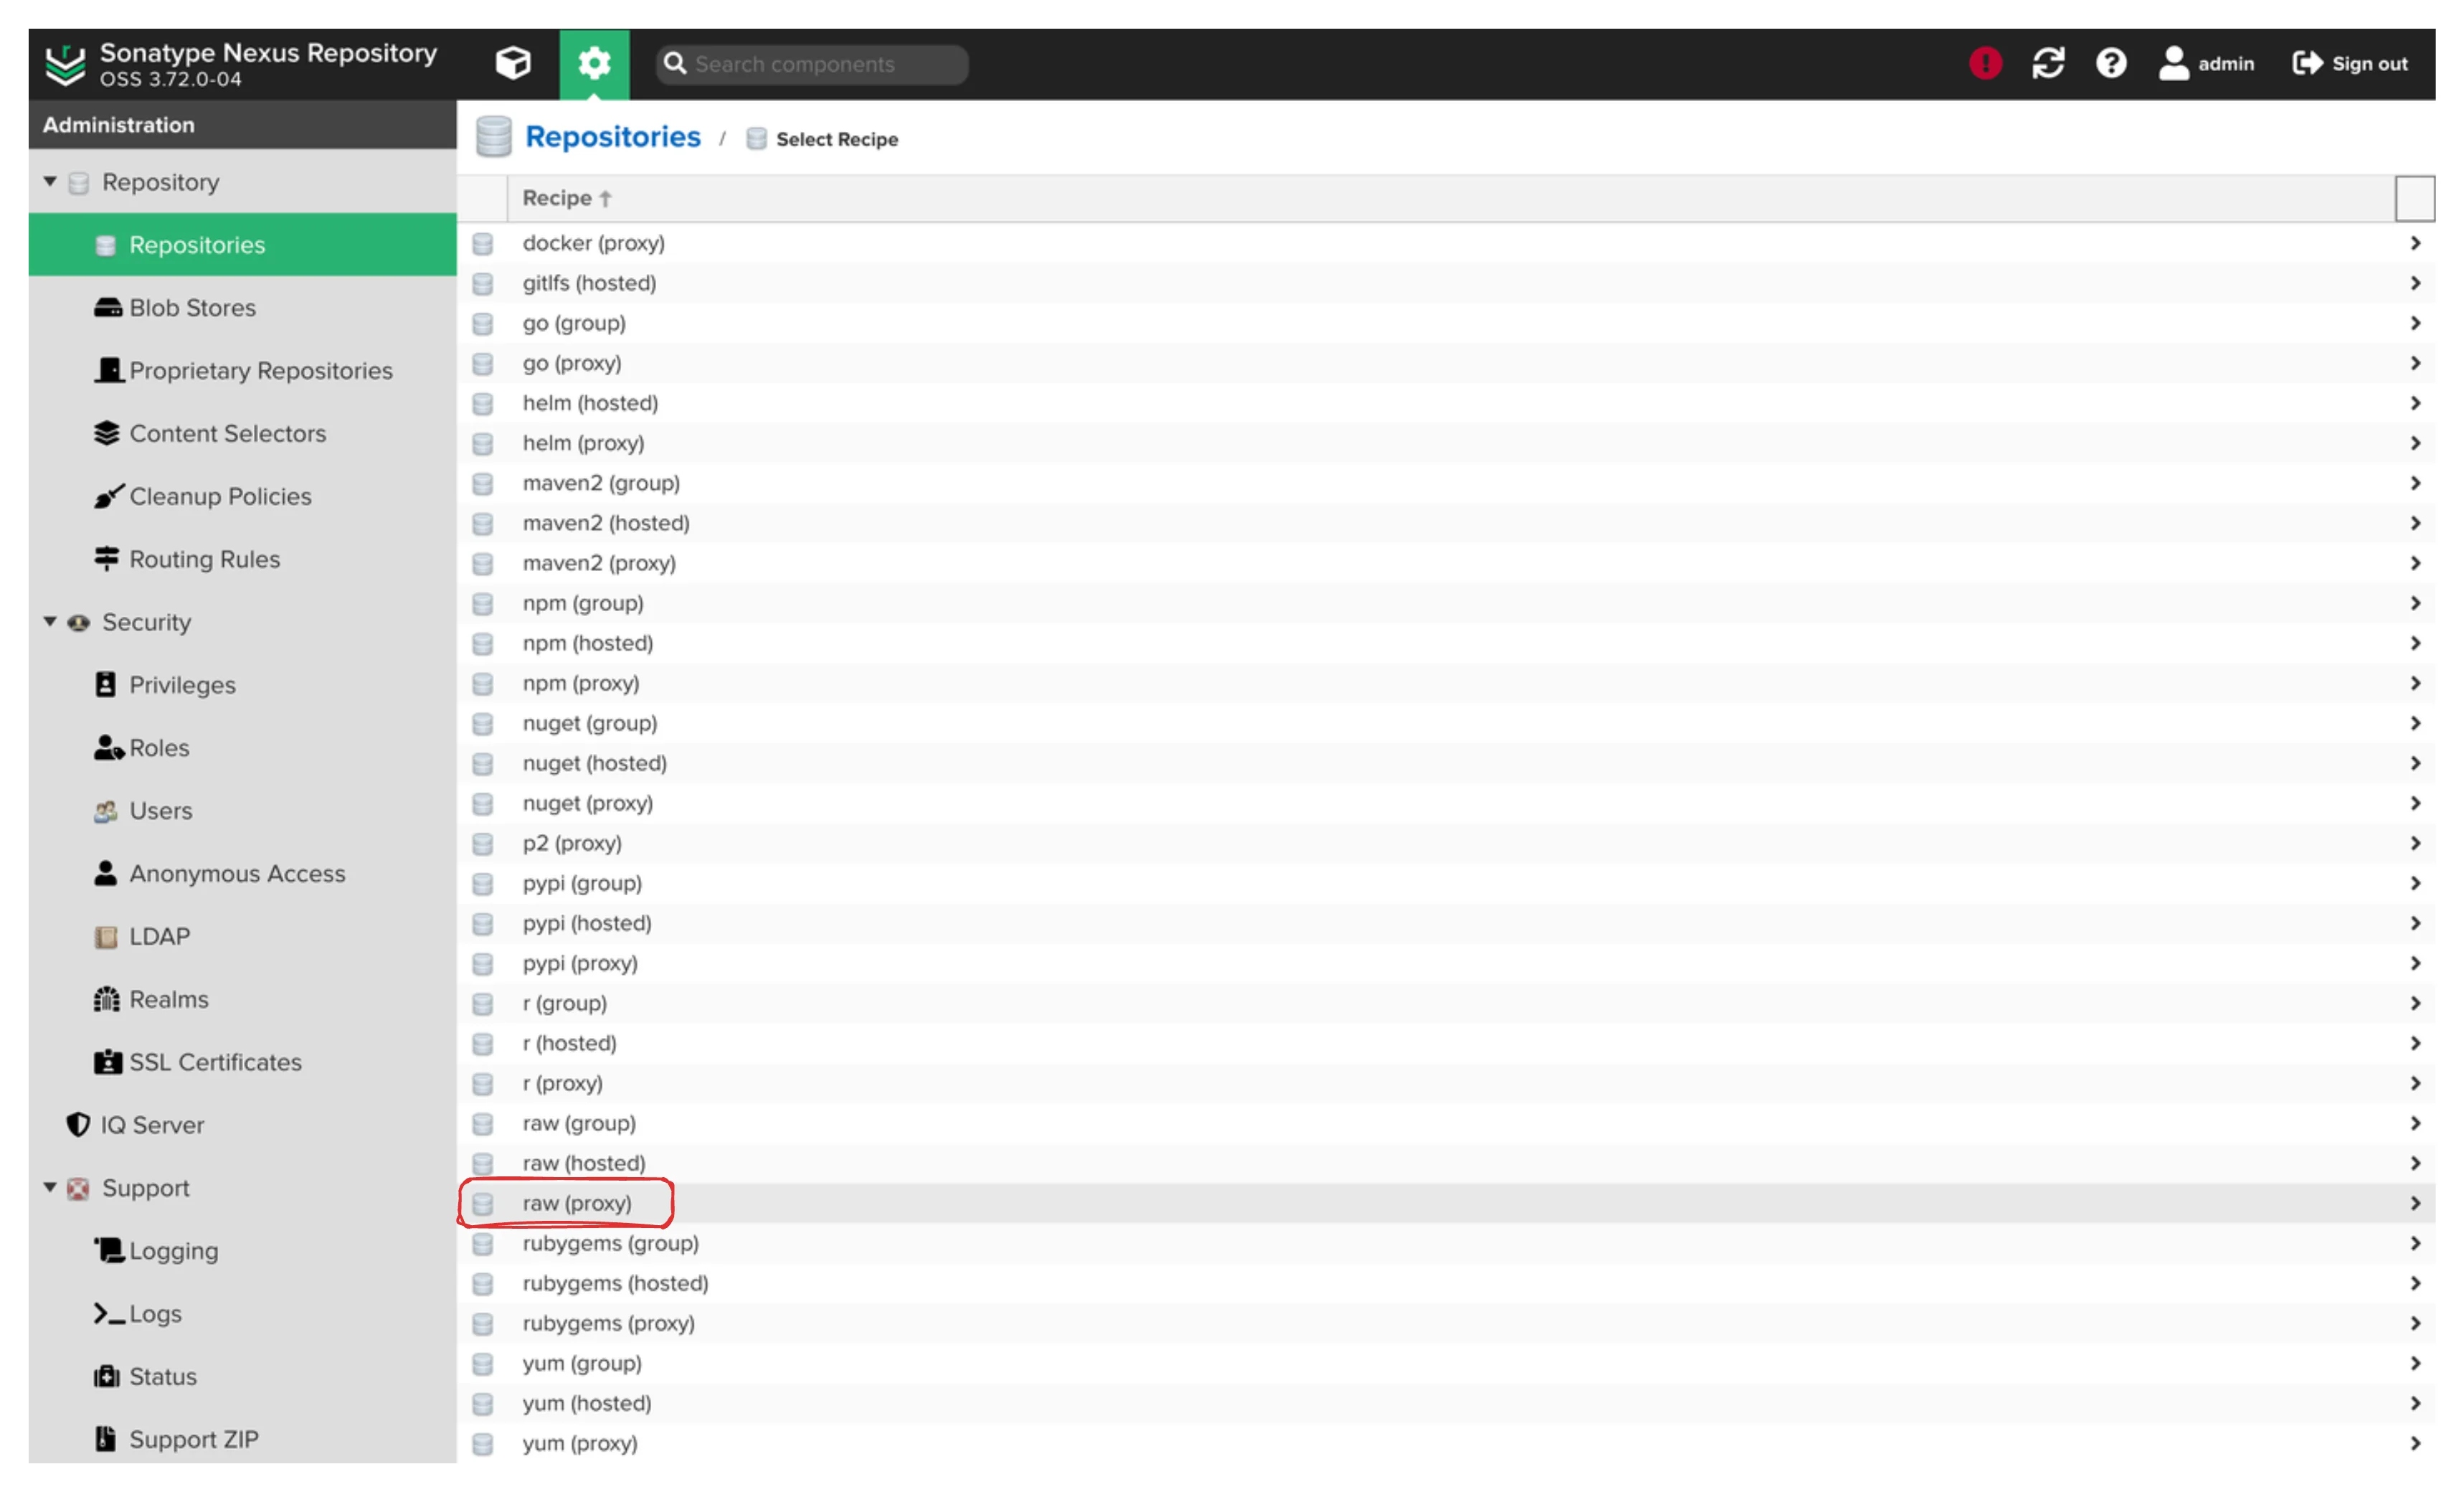
Select raw (proxy).
Fill in the details:
Name: gradle-distributionsRemote storage: https://services.gradle.org/distributions/Blob store: maven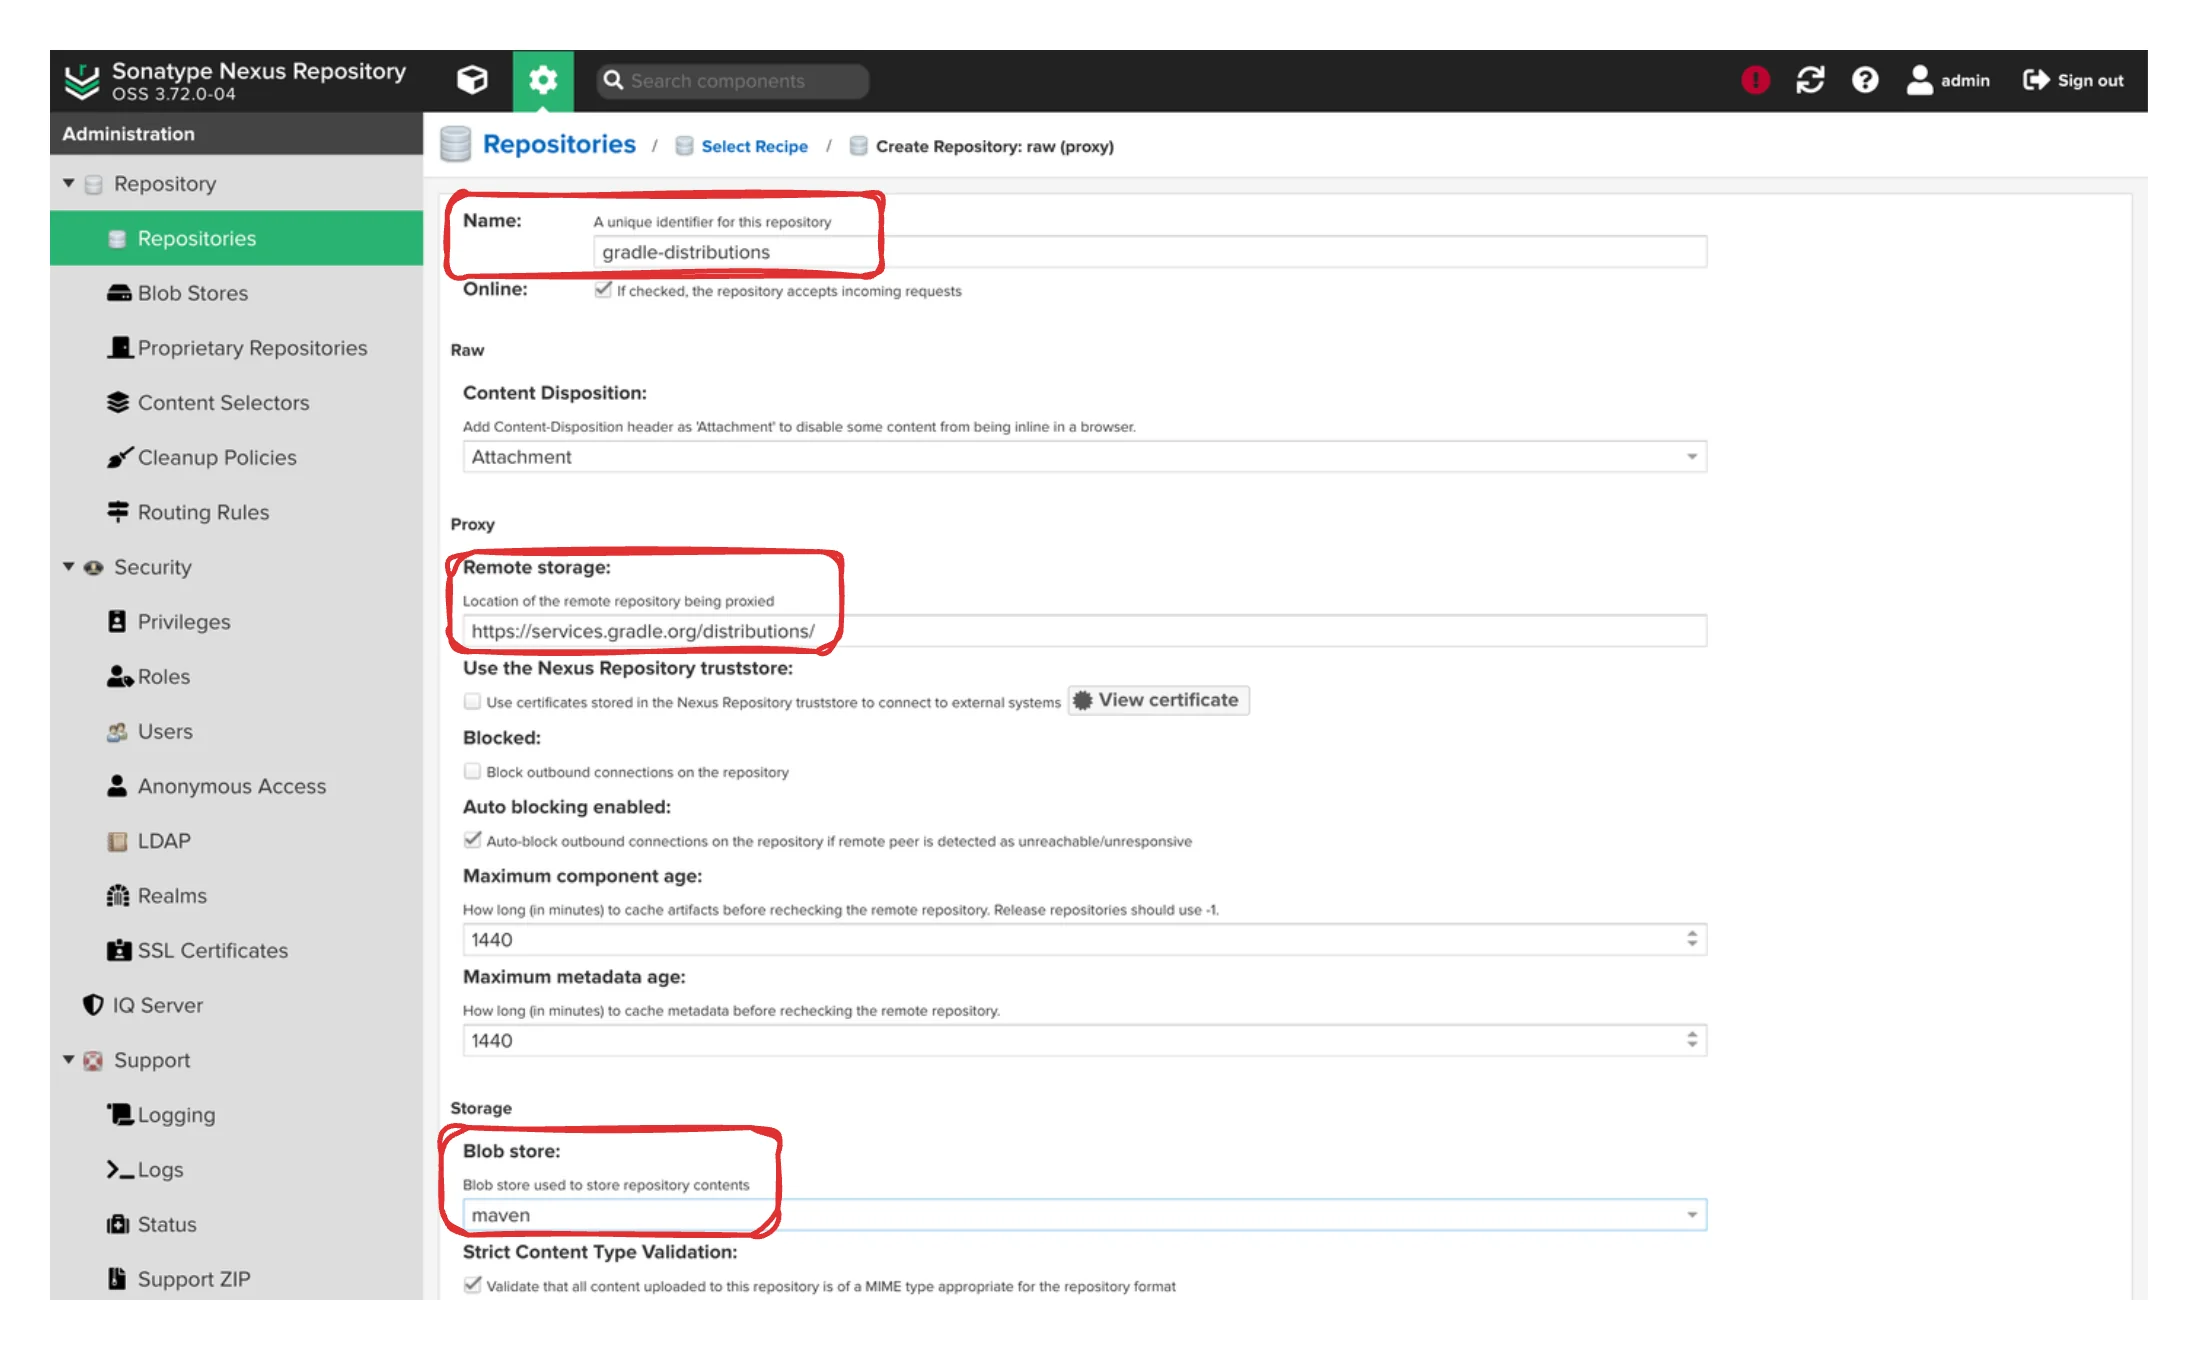
Now maven repositories are ready to use. You can head to the [[#Maven Usage Examples]] if you want to skip other repository configuration examples.
NPM Repository
Next up, let’s set up our NPM repository to manage JavaScript packages efficiently.
NPM Proxy Repository
We’ll create two NPM proxy repositories: one for the main npm registry and another for the Yarn package registry. This dual setup helps reduce potential downtime and provides a fallback option.
Navigate to the repositories menu and create a new repository, selecting
npm (proxy).
For the npm registry, use these settings:
Name: npmjsRemote Storage: https://registry.npmjs.orgBlob: npm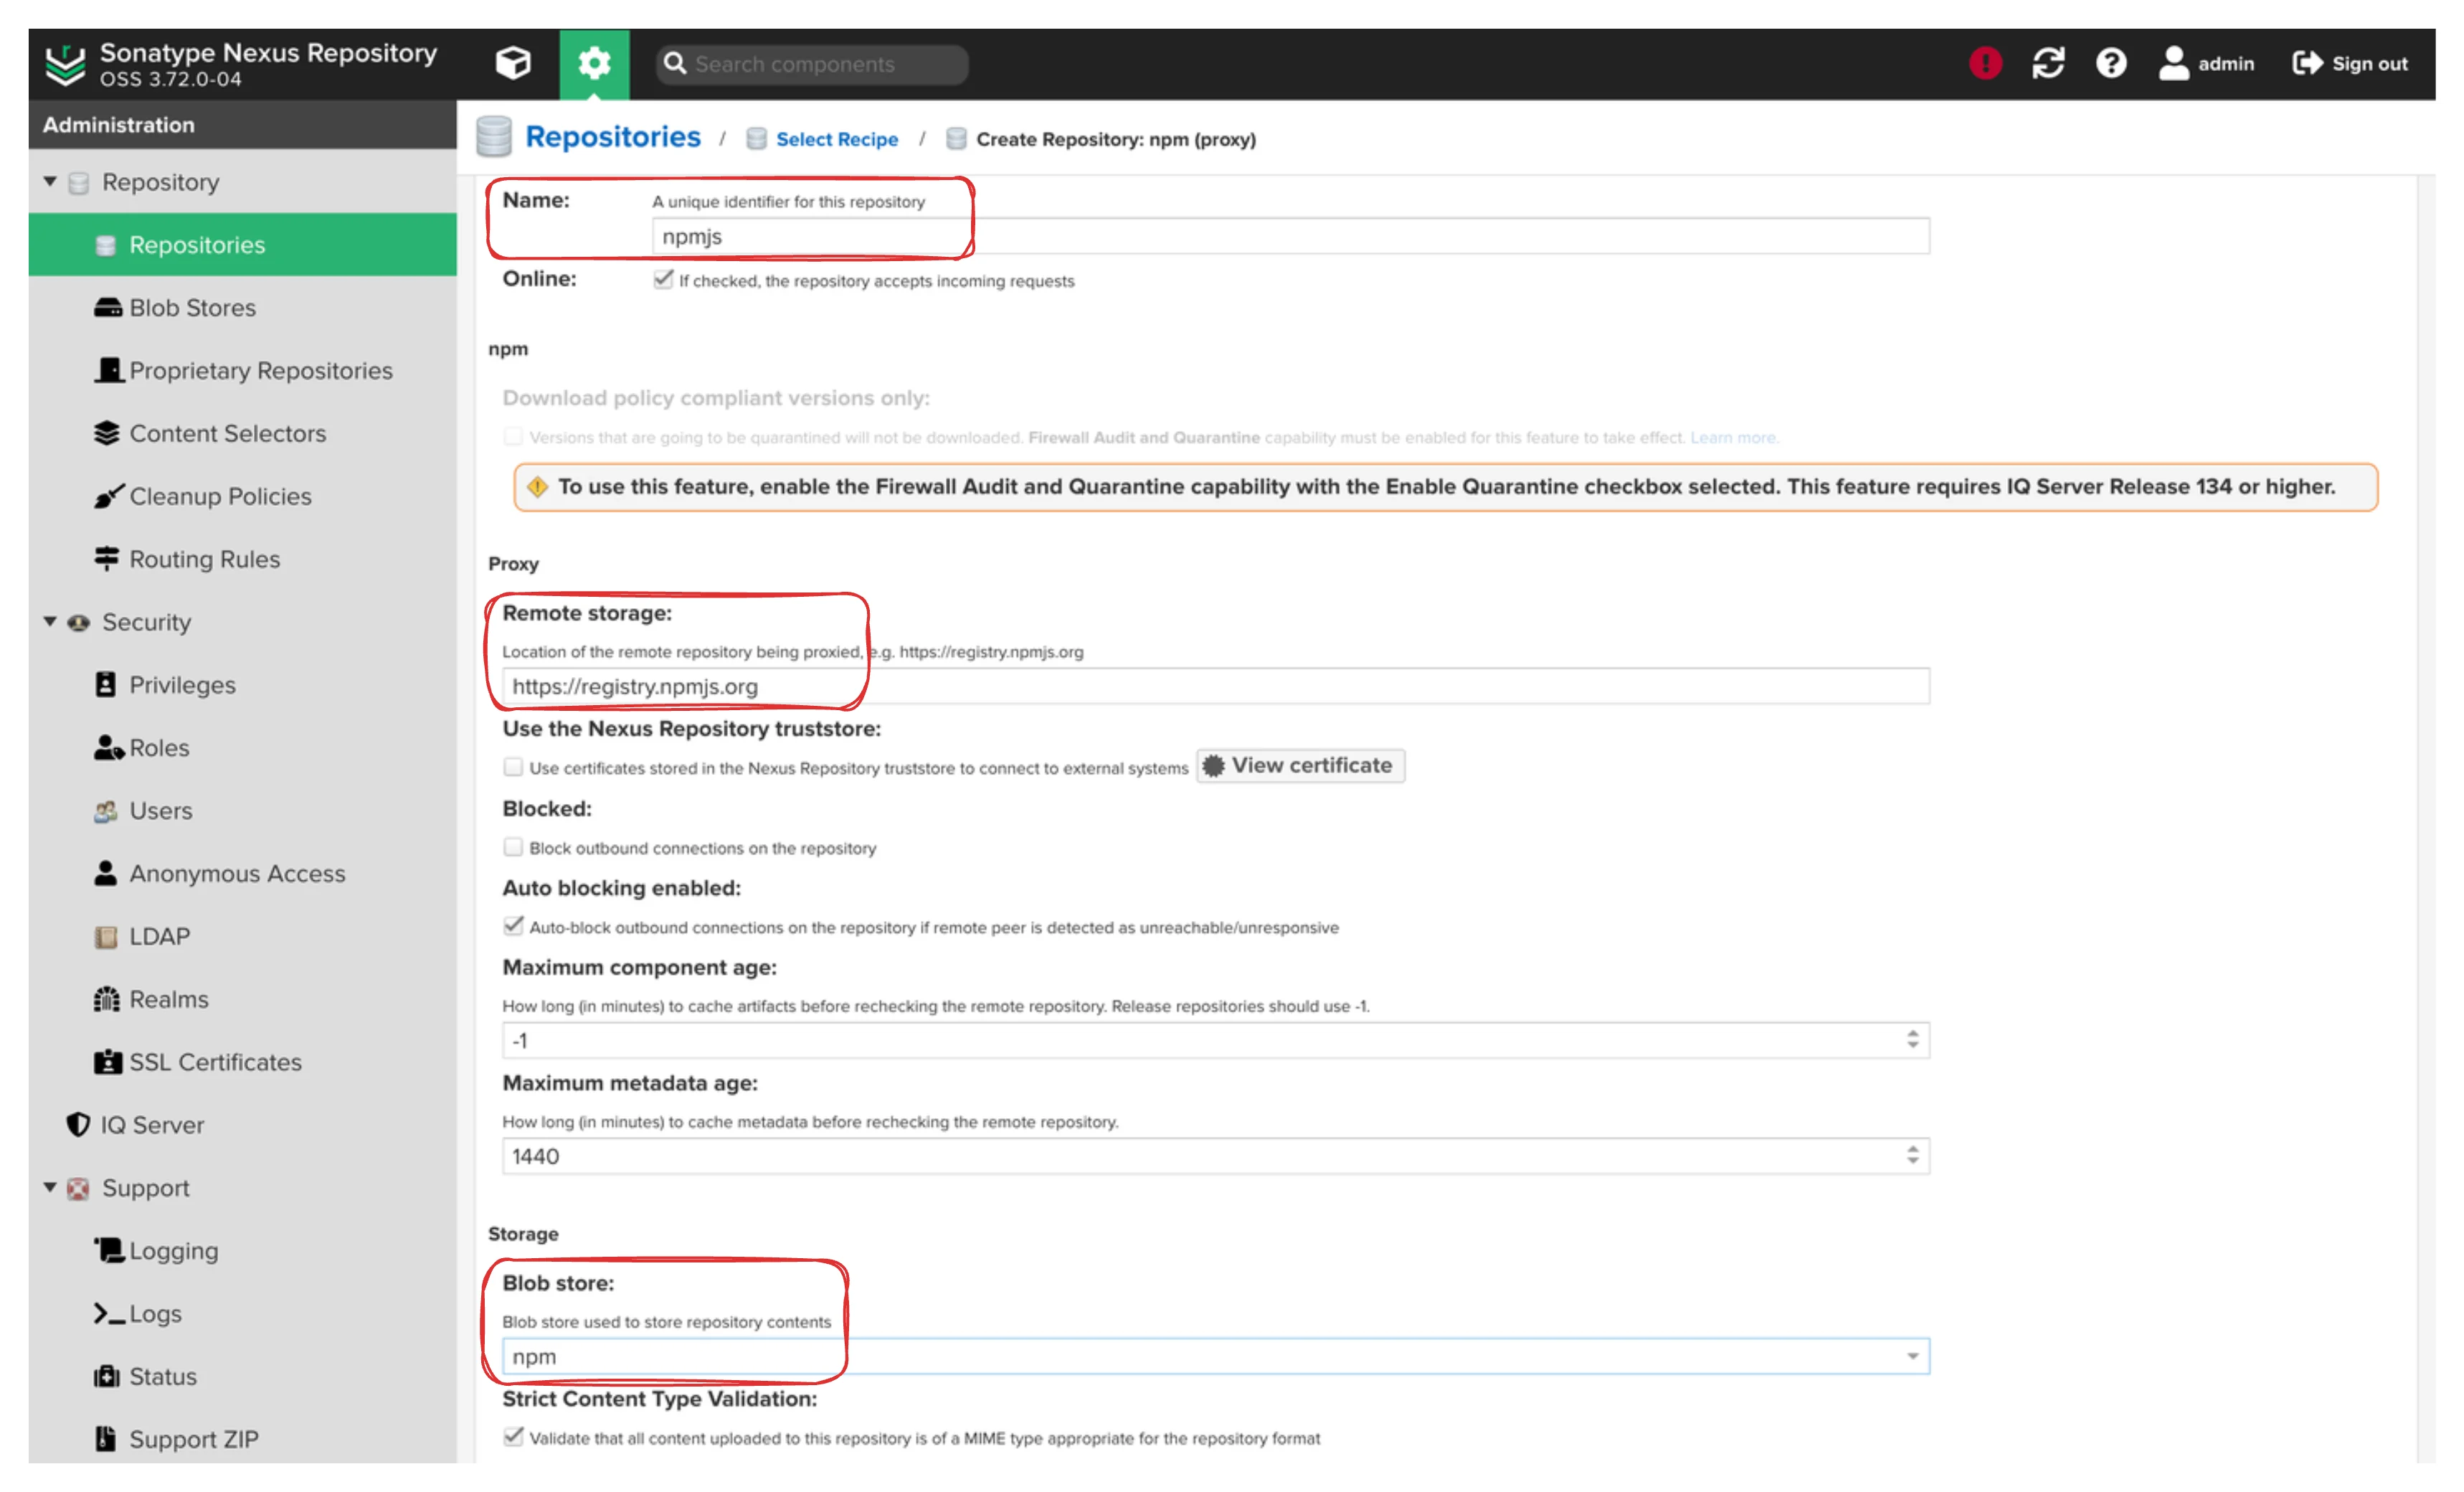
Hit “Create repository”.
Repeat the process for the Yarn registry:
Name: yarnpkgRemote Storage: https://registry.yarnpkg.comBlob: npmNPM Group Repository
Now, let’s group these repositories for easier management:
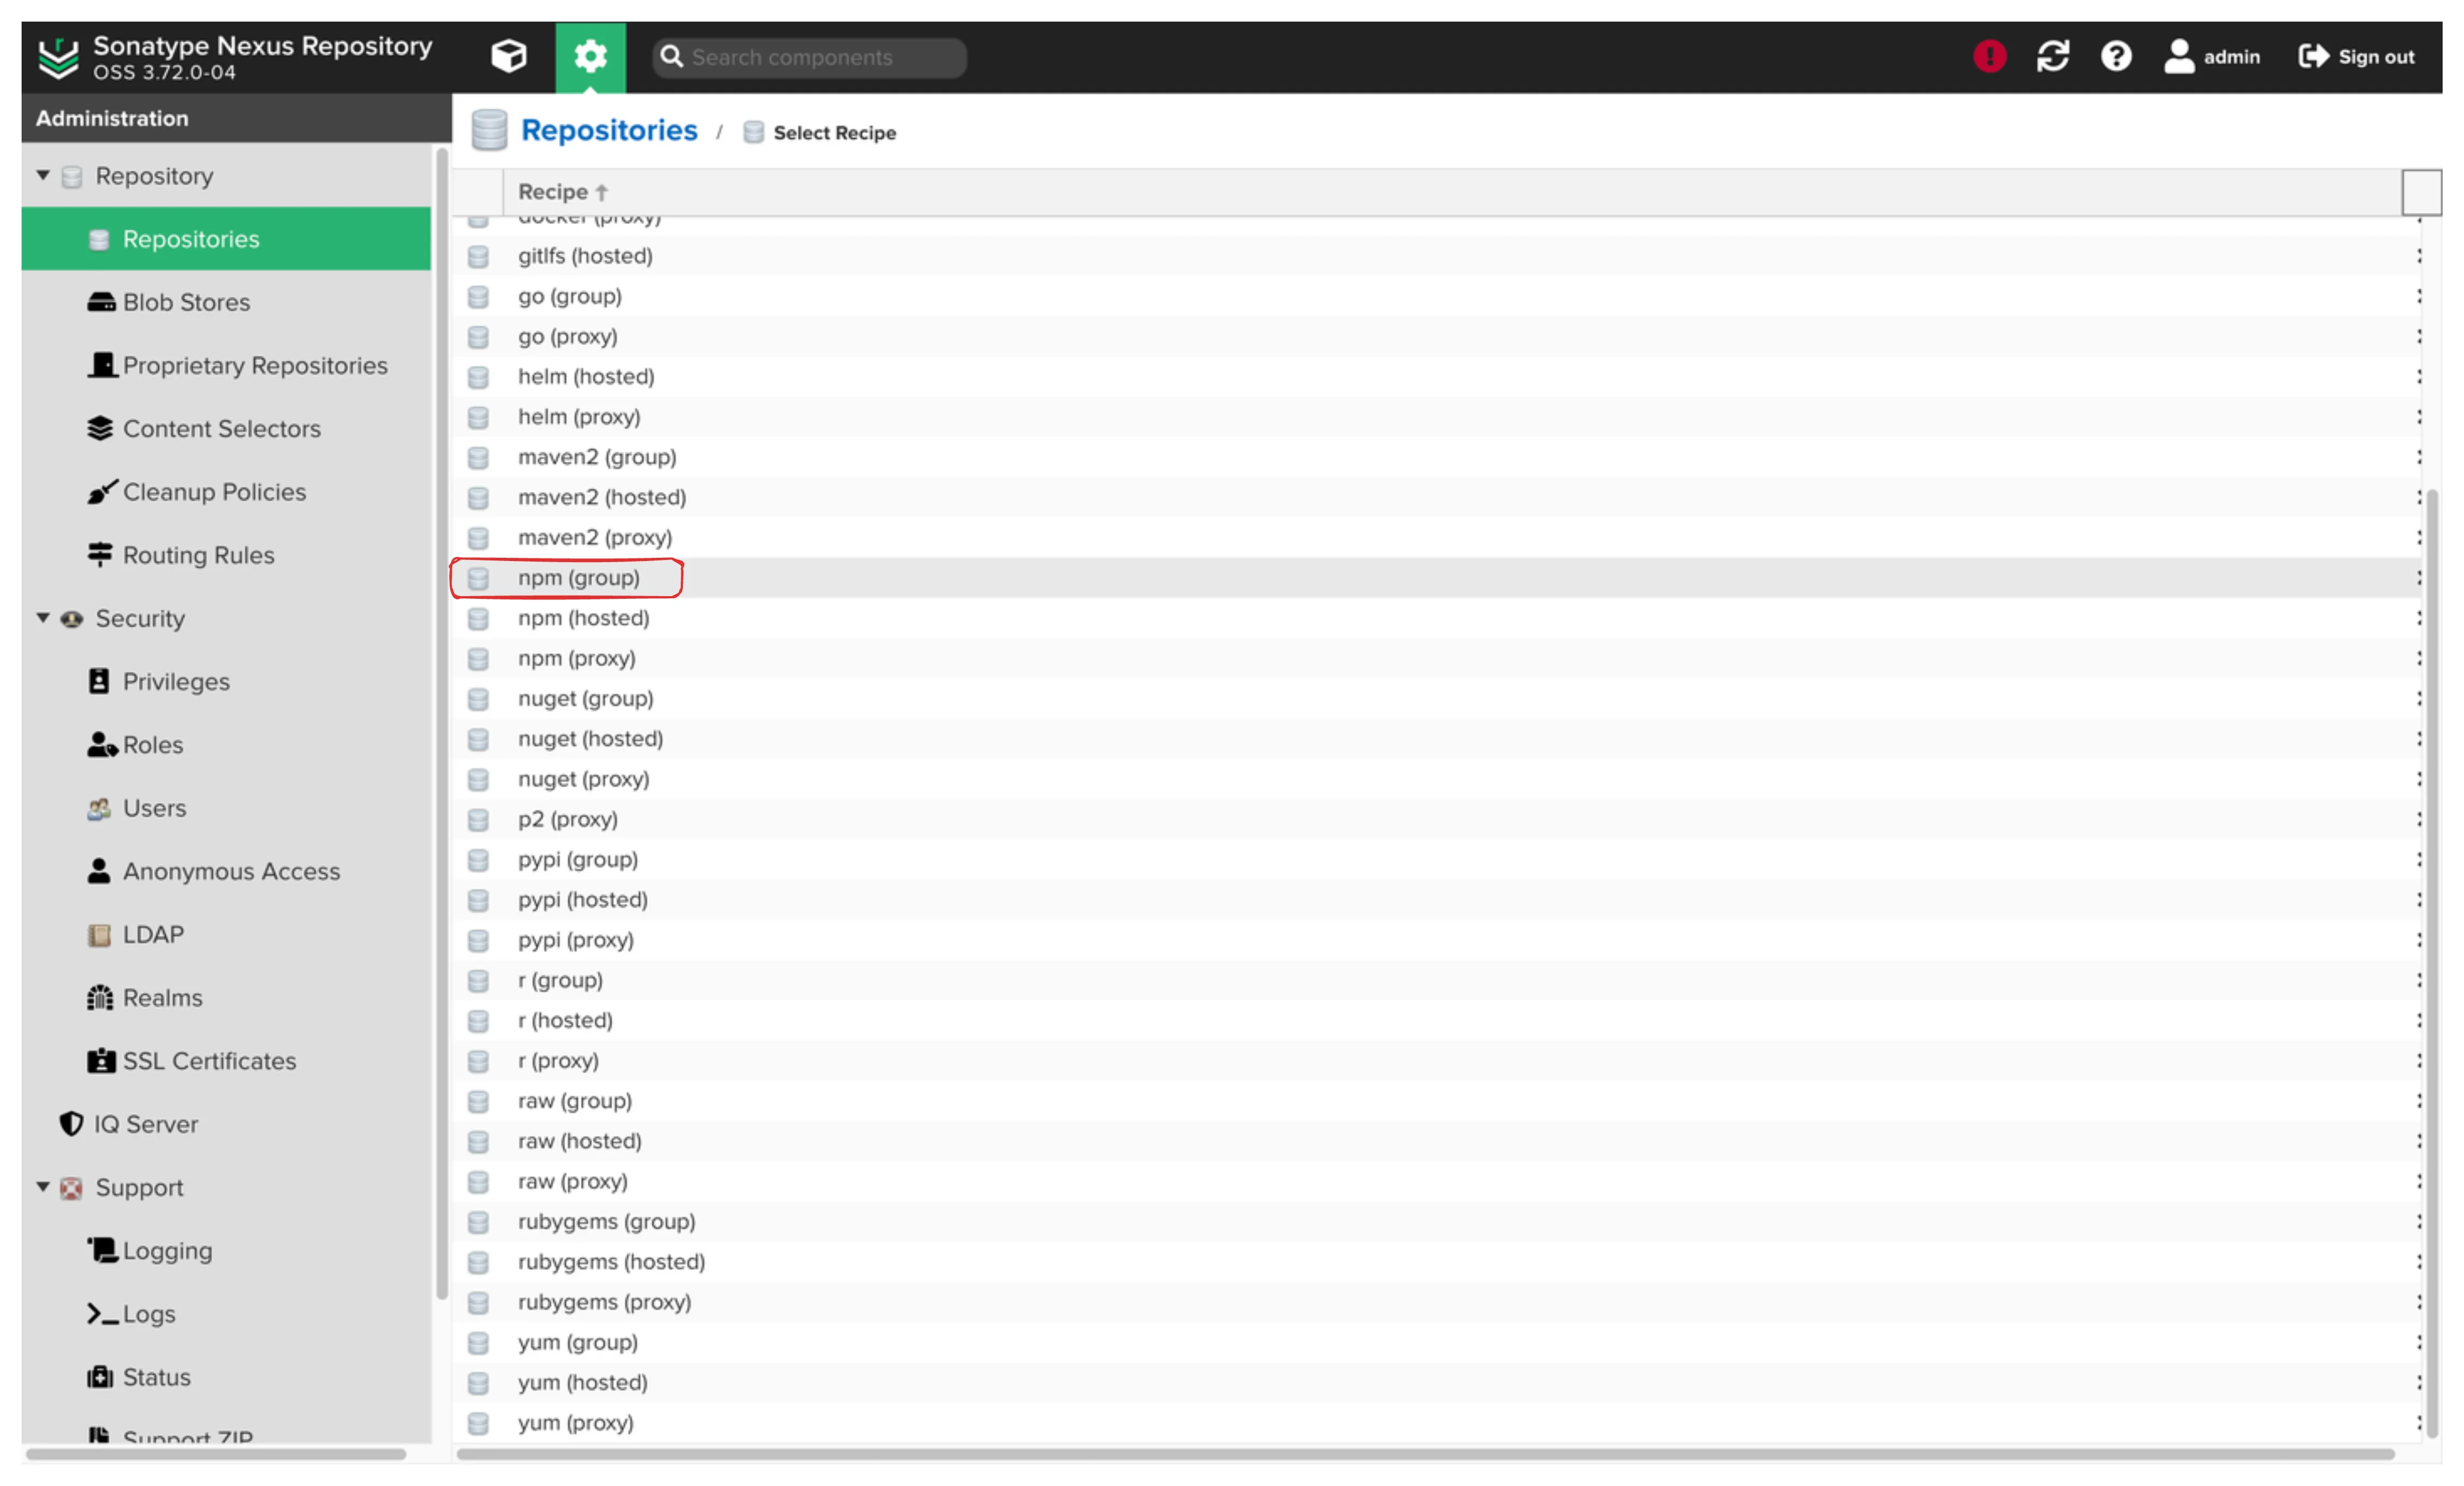
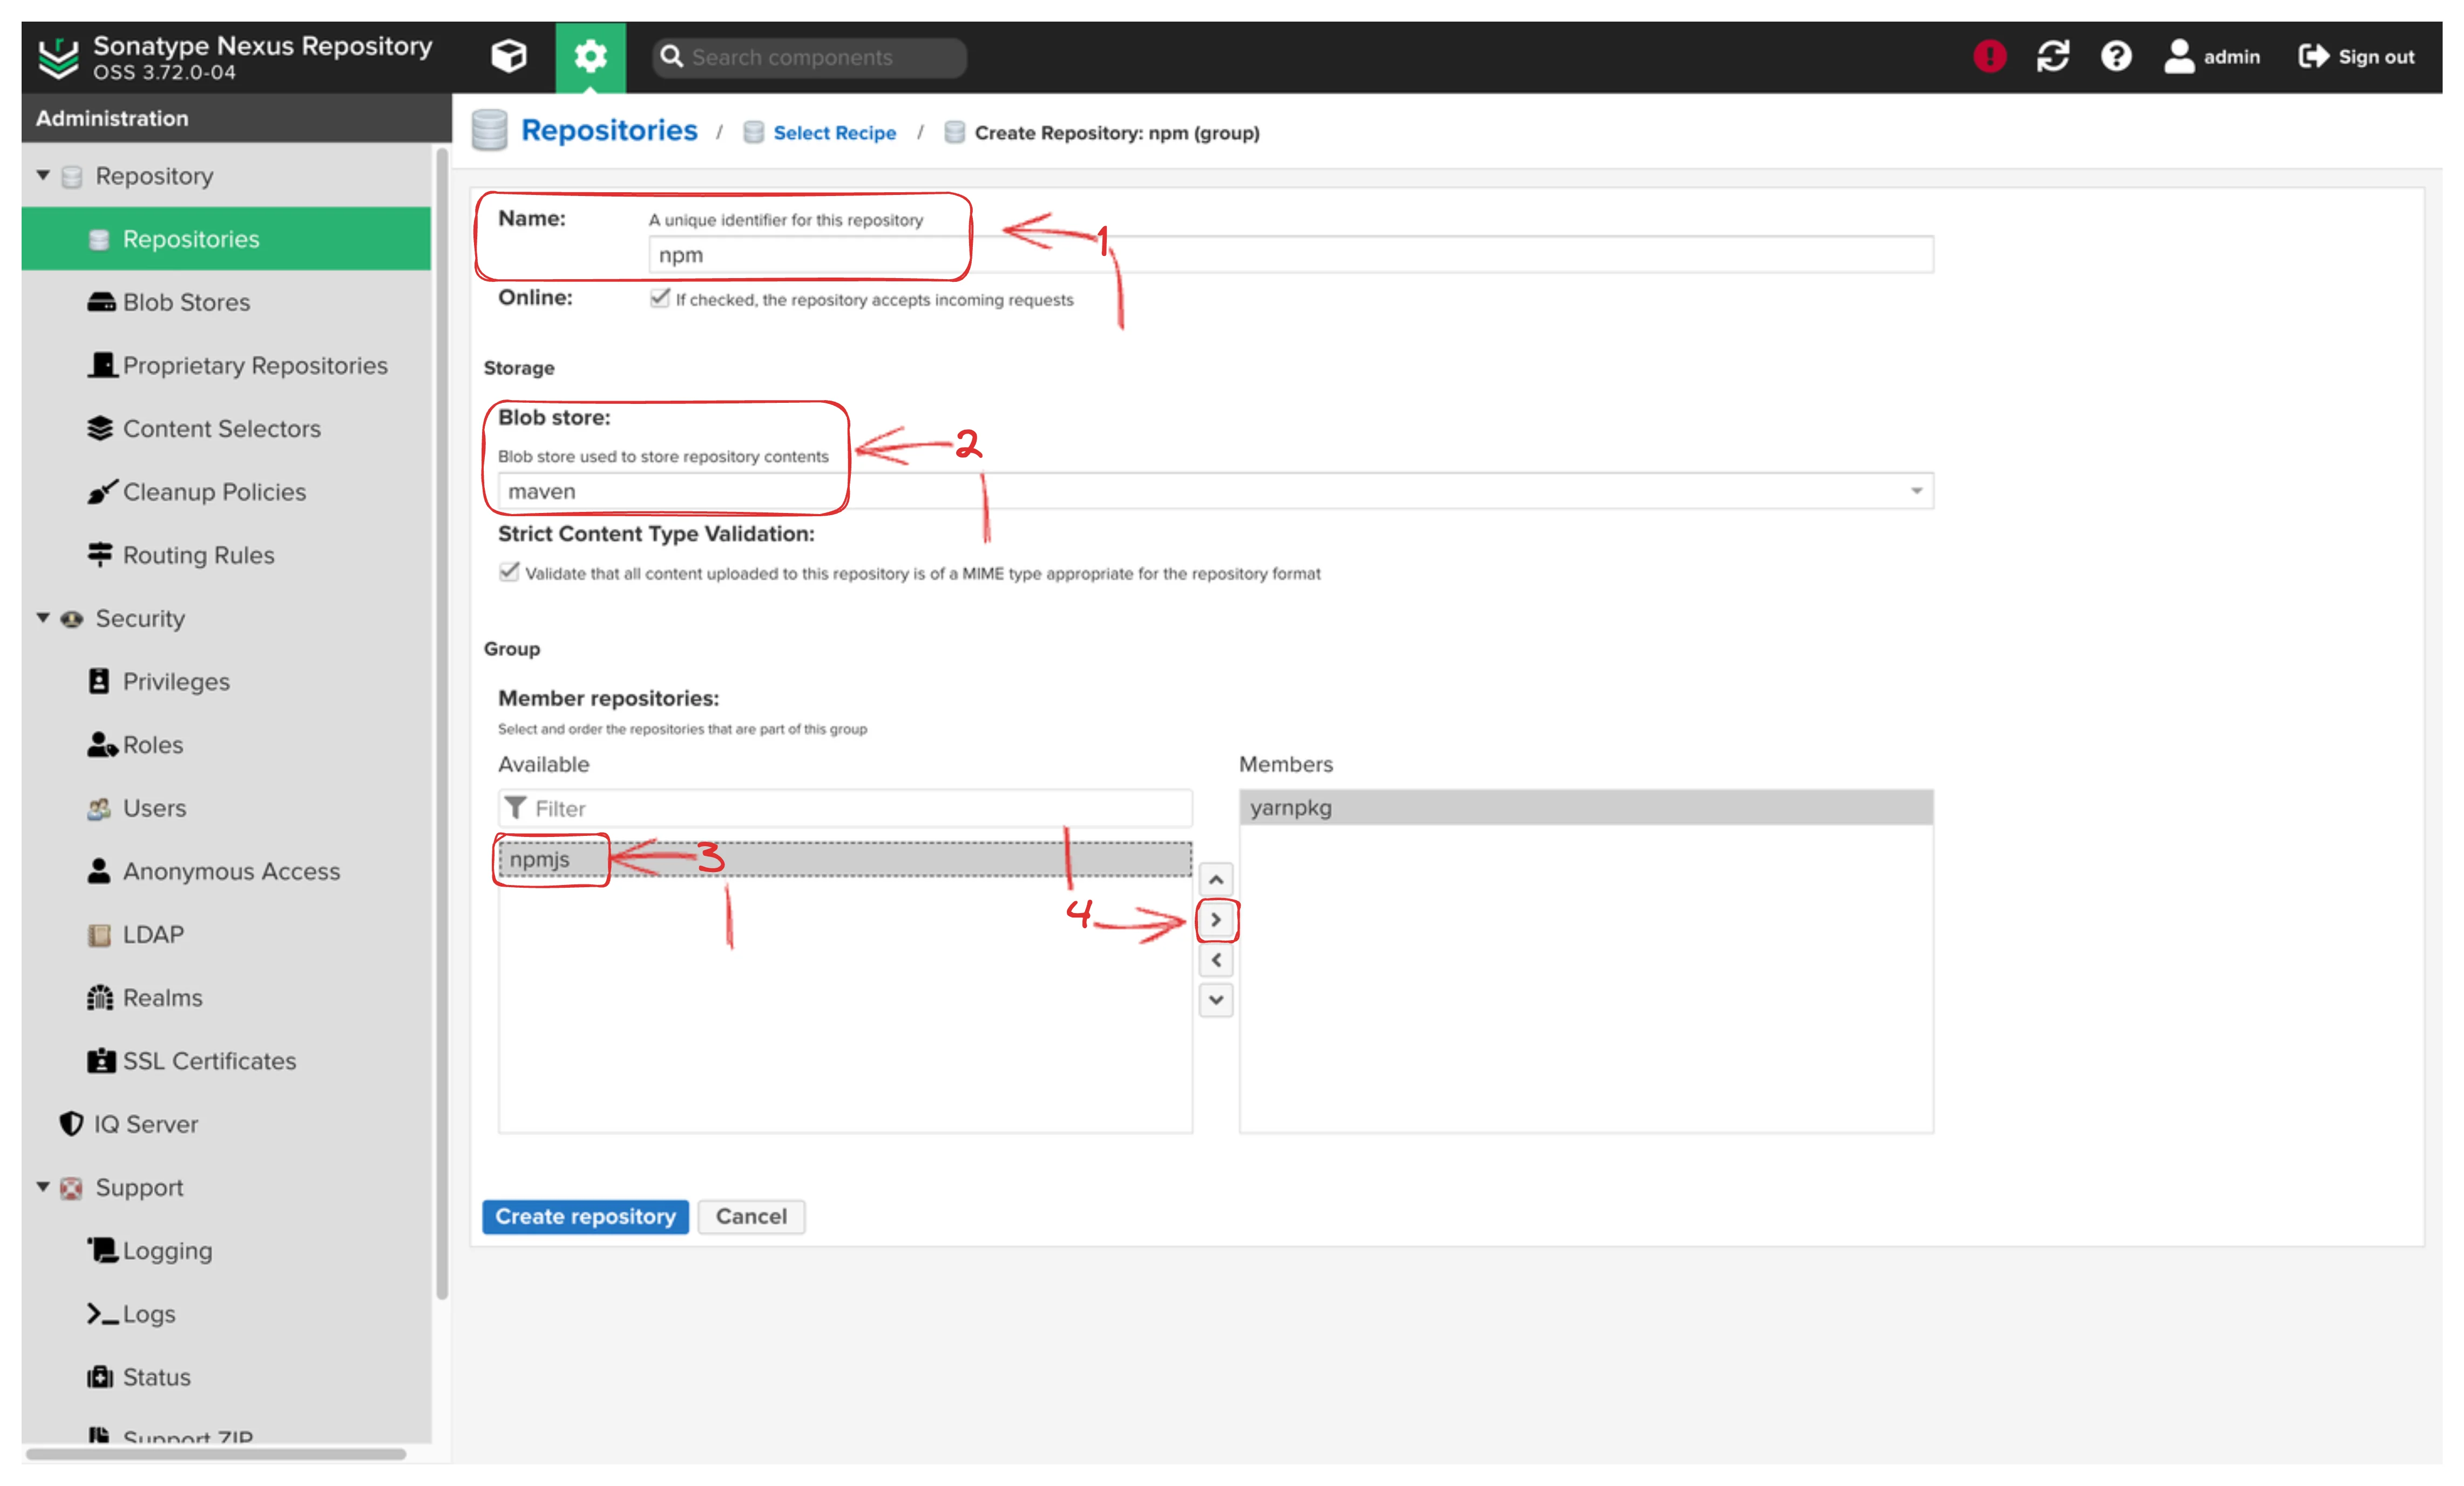
Now NPM repositories are ready to use. You can head to the [[#NPM Usage Examples]] if you want to skip other repository configuration examples.
Docker Repository
Last but not least, let’s set up Docker repositories to manage container images efficiently.
We’ll create proxy repositories for Docker Hub,
GitHub Container Registry, and Red Hat Registry.
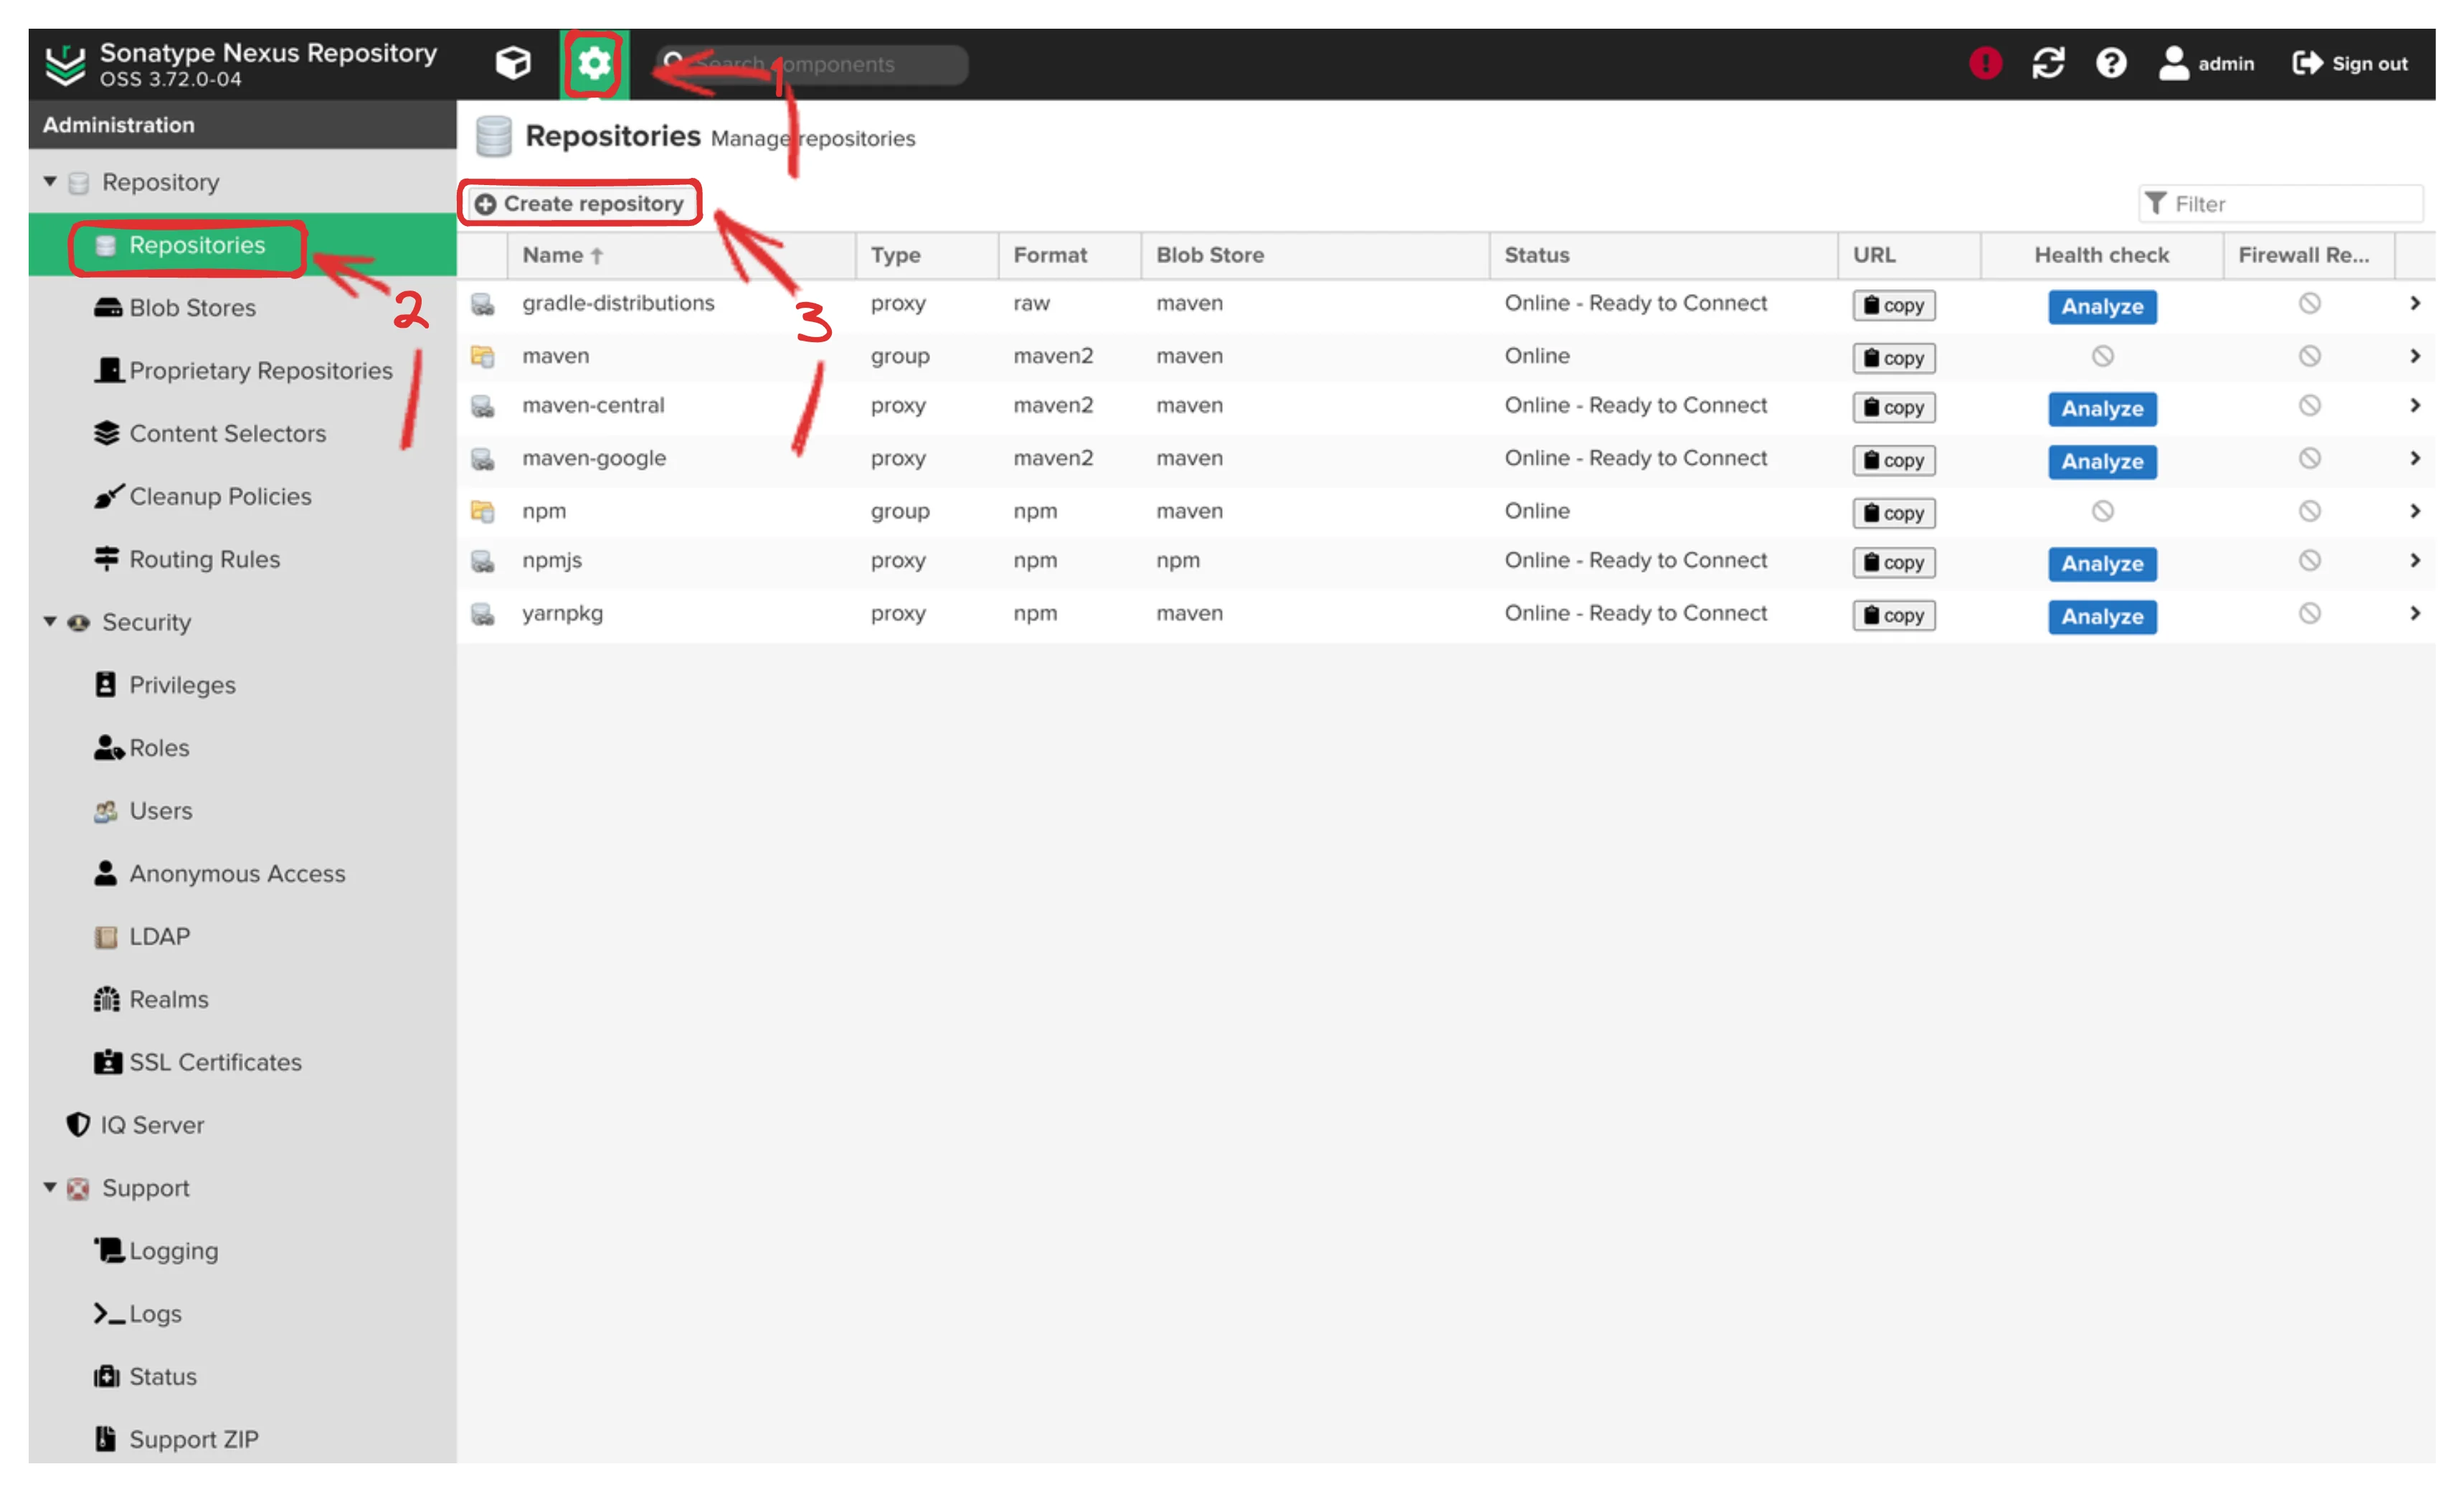
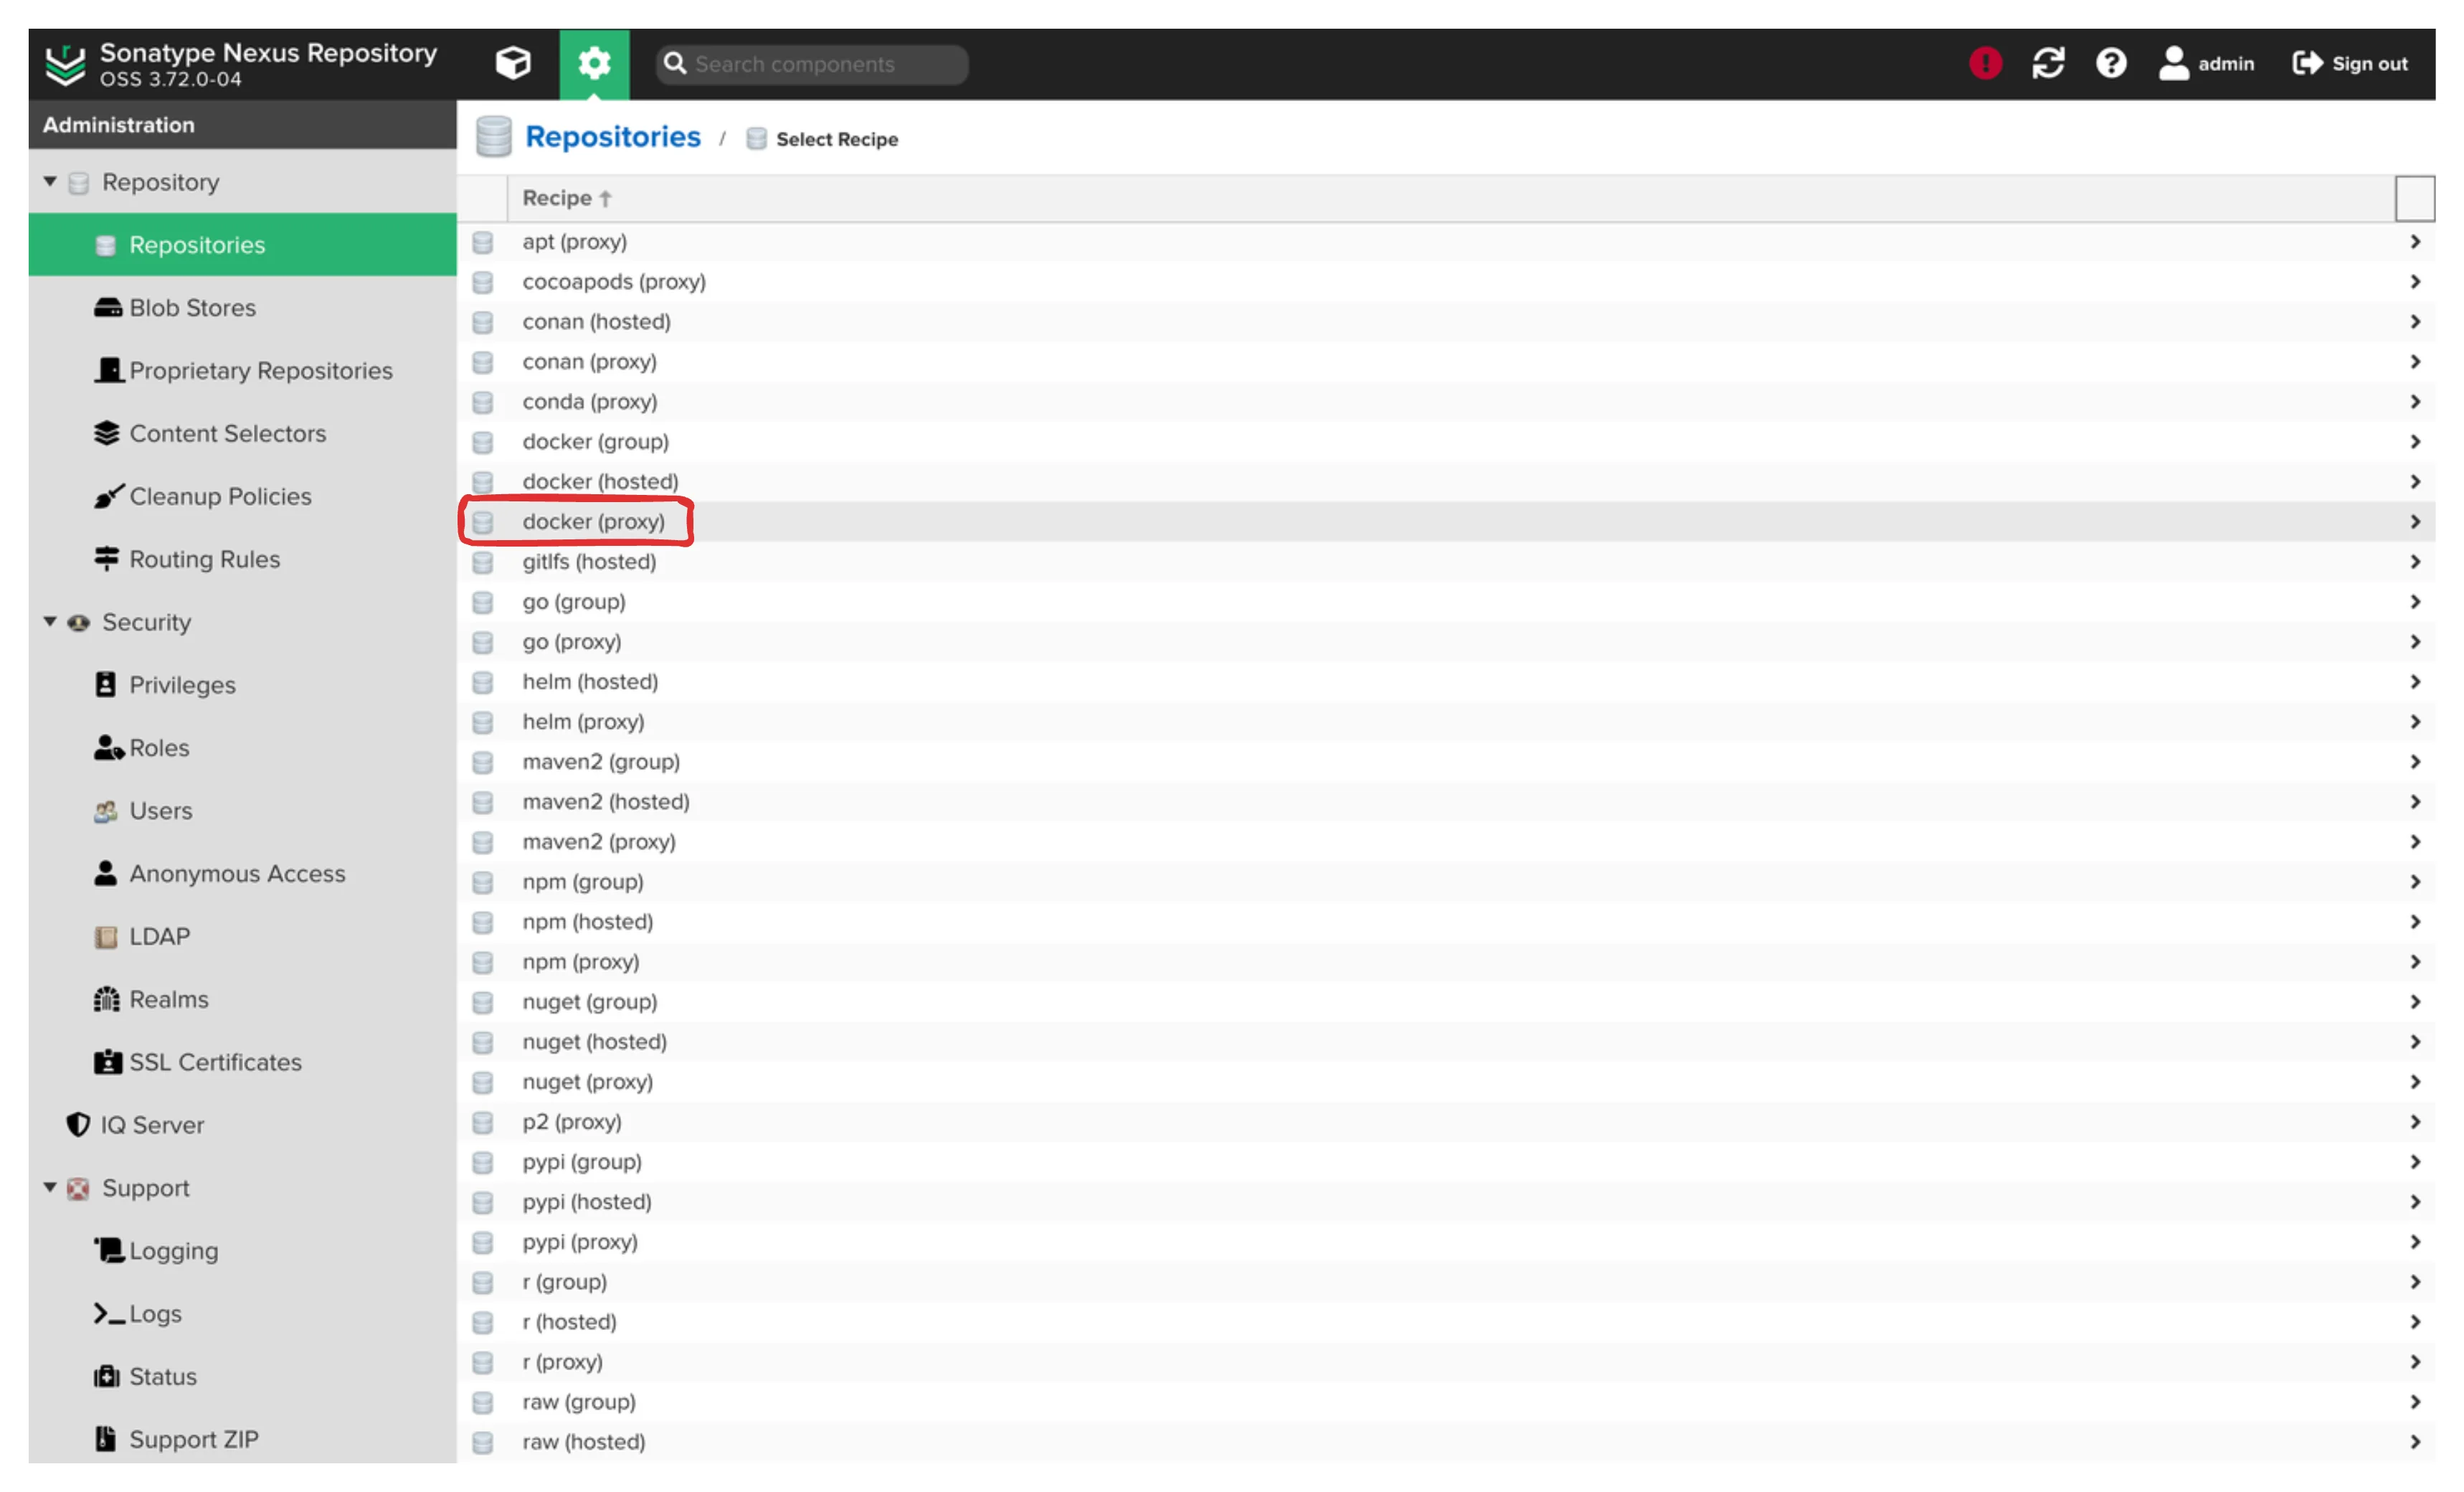
For Docker Hub:
Name: dockerhubAllow anonymous docker pull: trueRemote Storage: https://registry-1.docker.ioDocker Index: Use Docker HubBlob: docker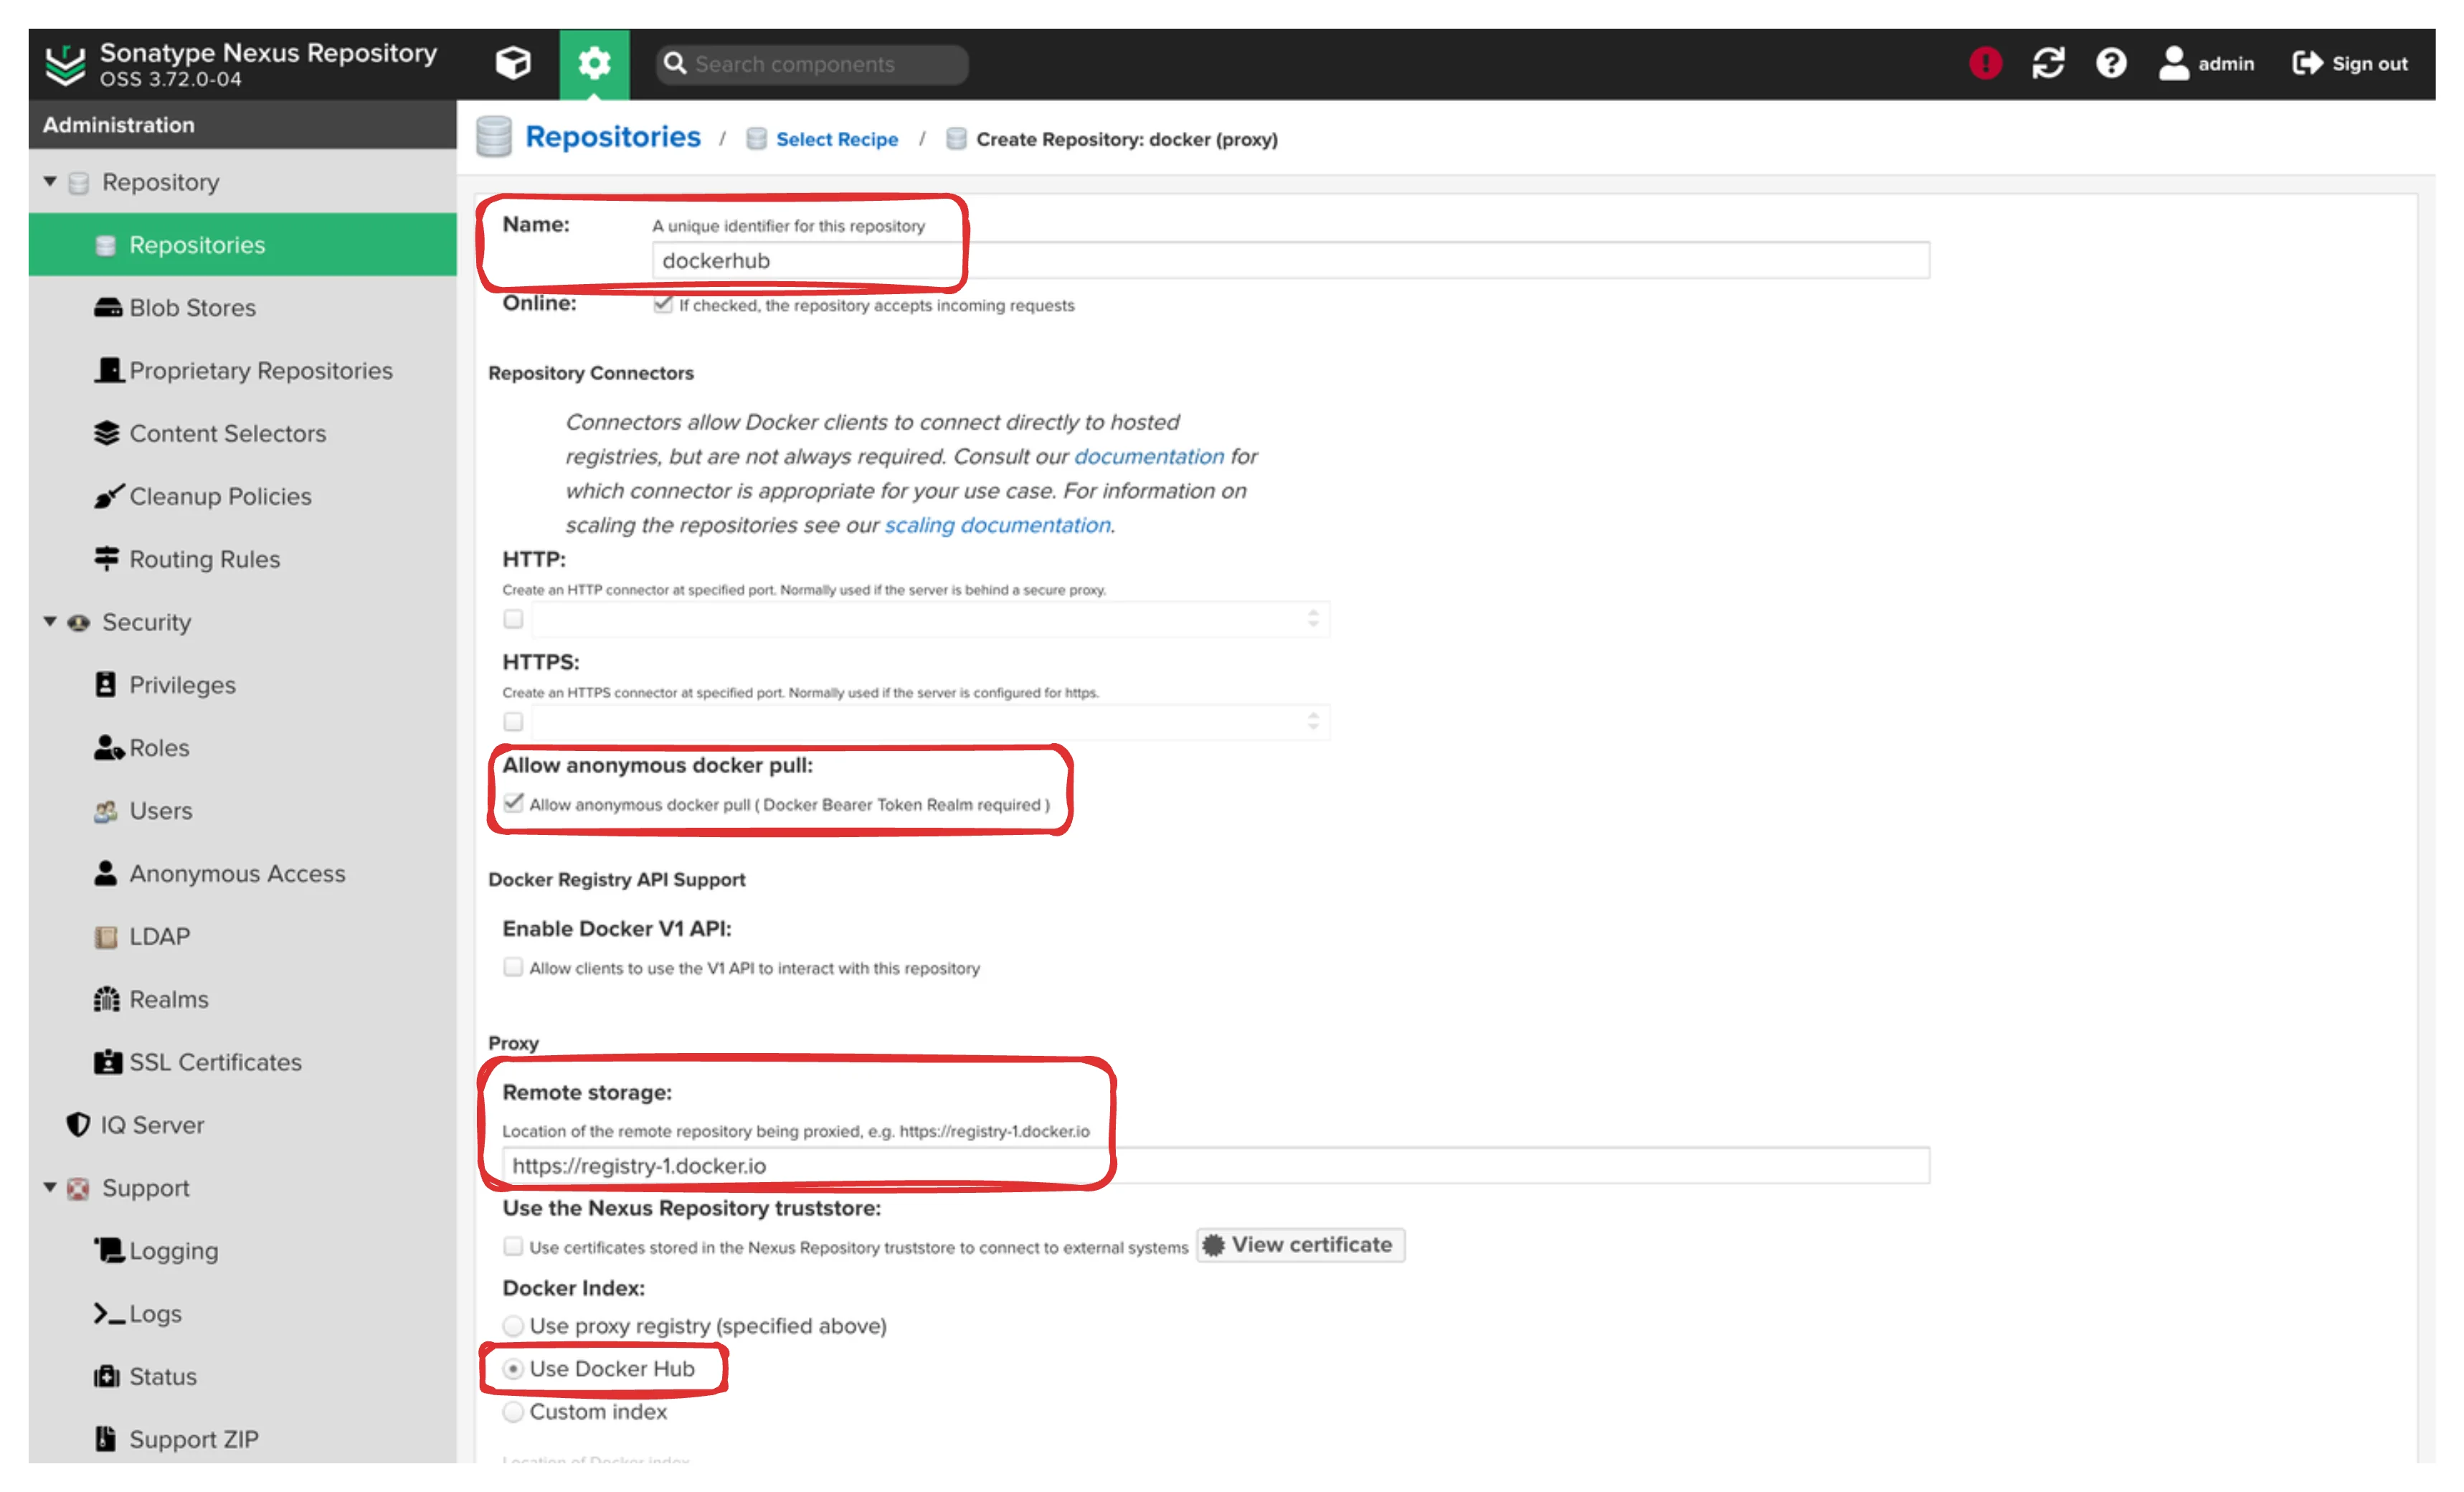
Hit Create repository button.
Repeat the same process for GitHub container registry
Name: github-container-registryAllow anonymous docker pull: trueRemote Storage: https://ghcr.ioDocker Index: Use proxy registryBlob: docker[!important]
We didn’t specify anyHTTPorHTTPSport for thedockerhubandgithub-container-registryrepository since we will group them and publish as groupped.
Now create another Docker proxy repository for Red Hat registry but with the values below:
Name: redhat-registryHTTP: Enable and enter `8083`Allow anonymous docker pull: trueRemote Storage: https://registry.access.redhat.comDocker Index: Use proxy registryBlob: docker[!important]
We are publishing the Red Hat registry directly, without a group. I am configuring the ports this way since my Nginx configuration is ready for that. You can check the previous blog for the configuration.
Container Registry Group Repository
We will group dockerhub and github-container-registry repositories.
Name: crHTTP: enabled on port `8082`Blob store: docker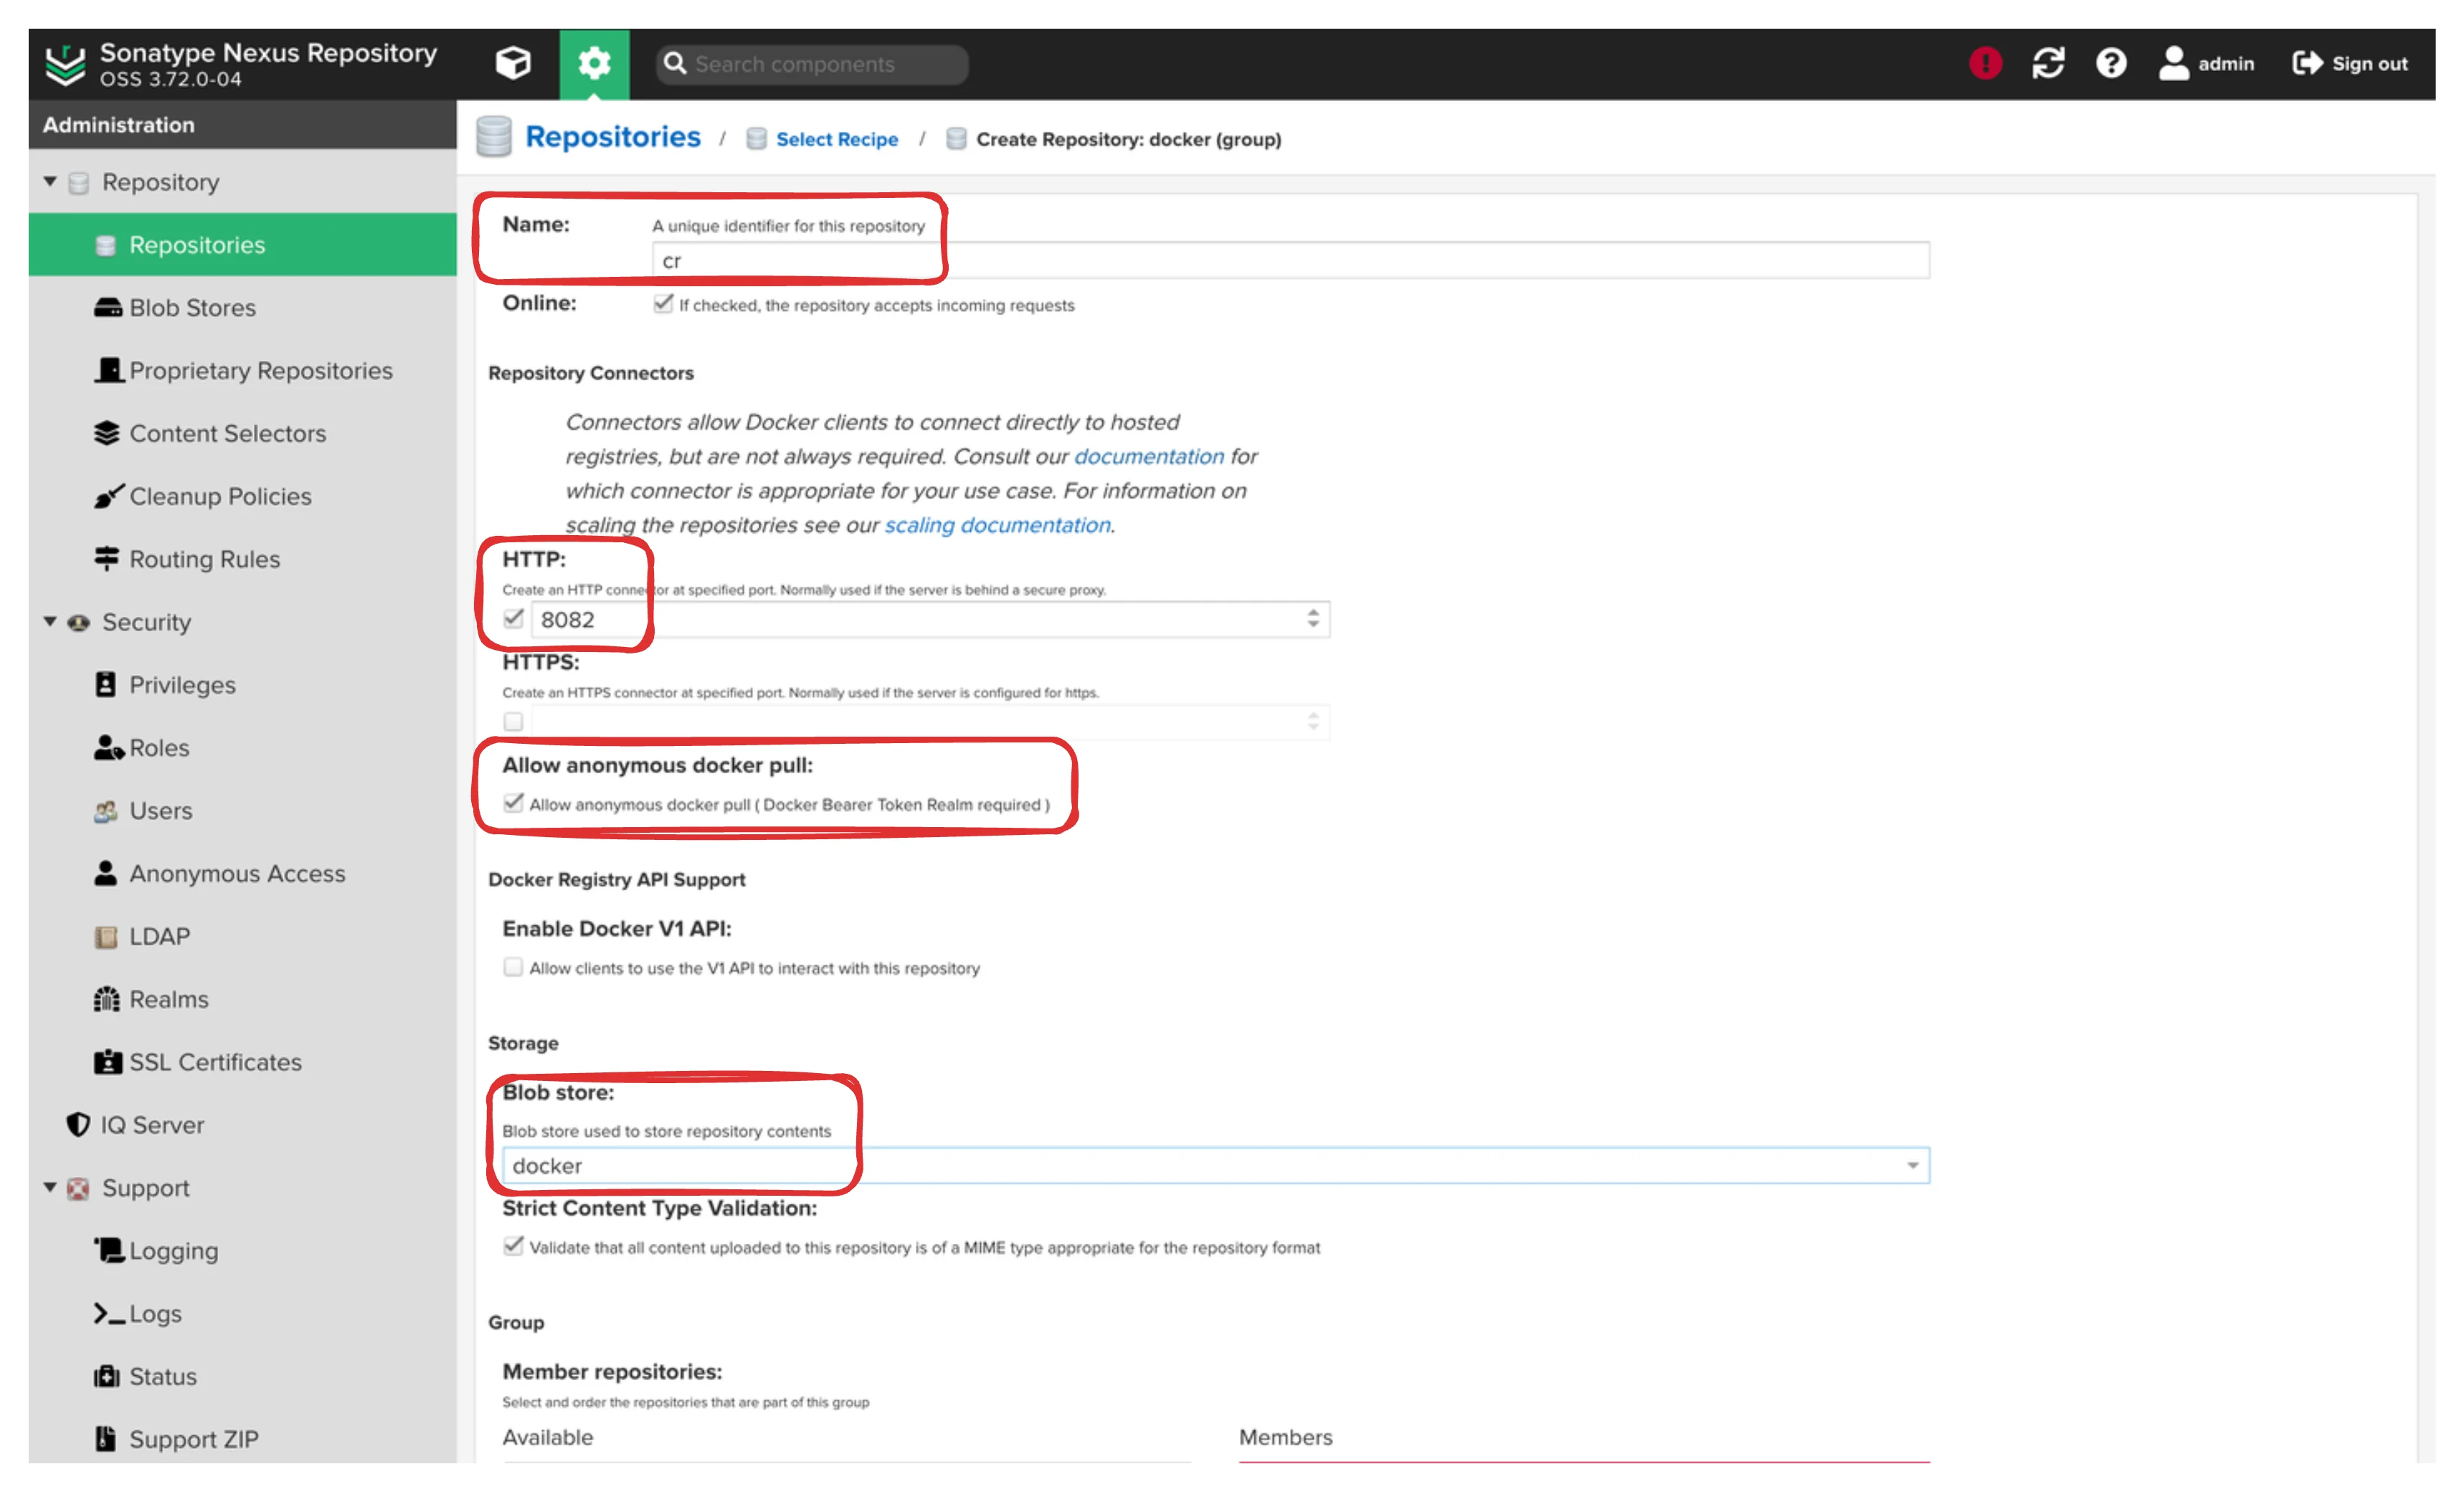
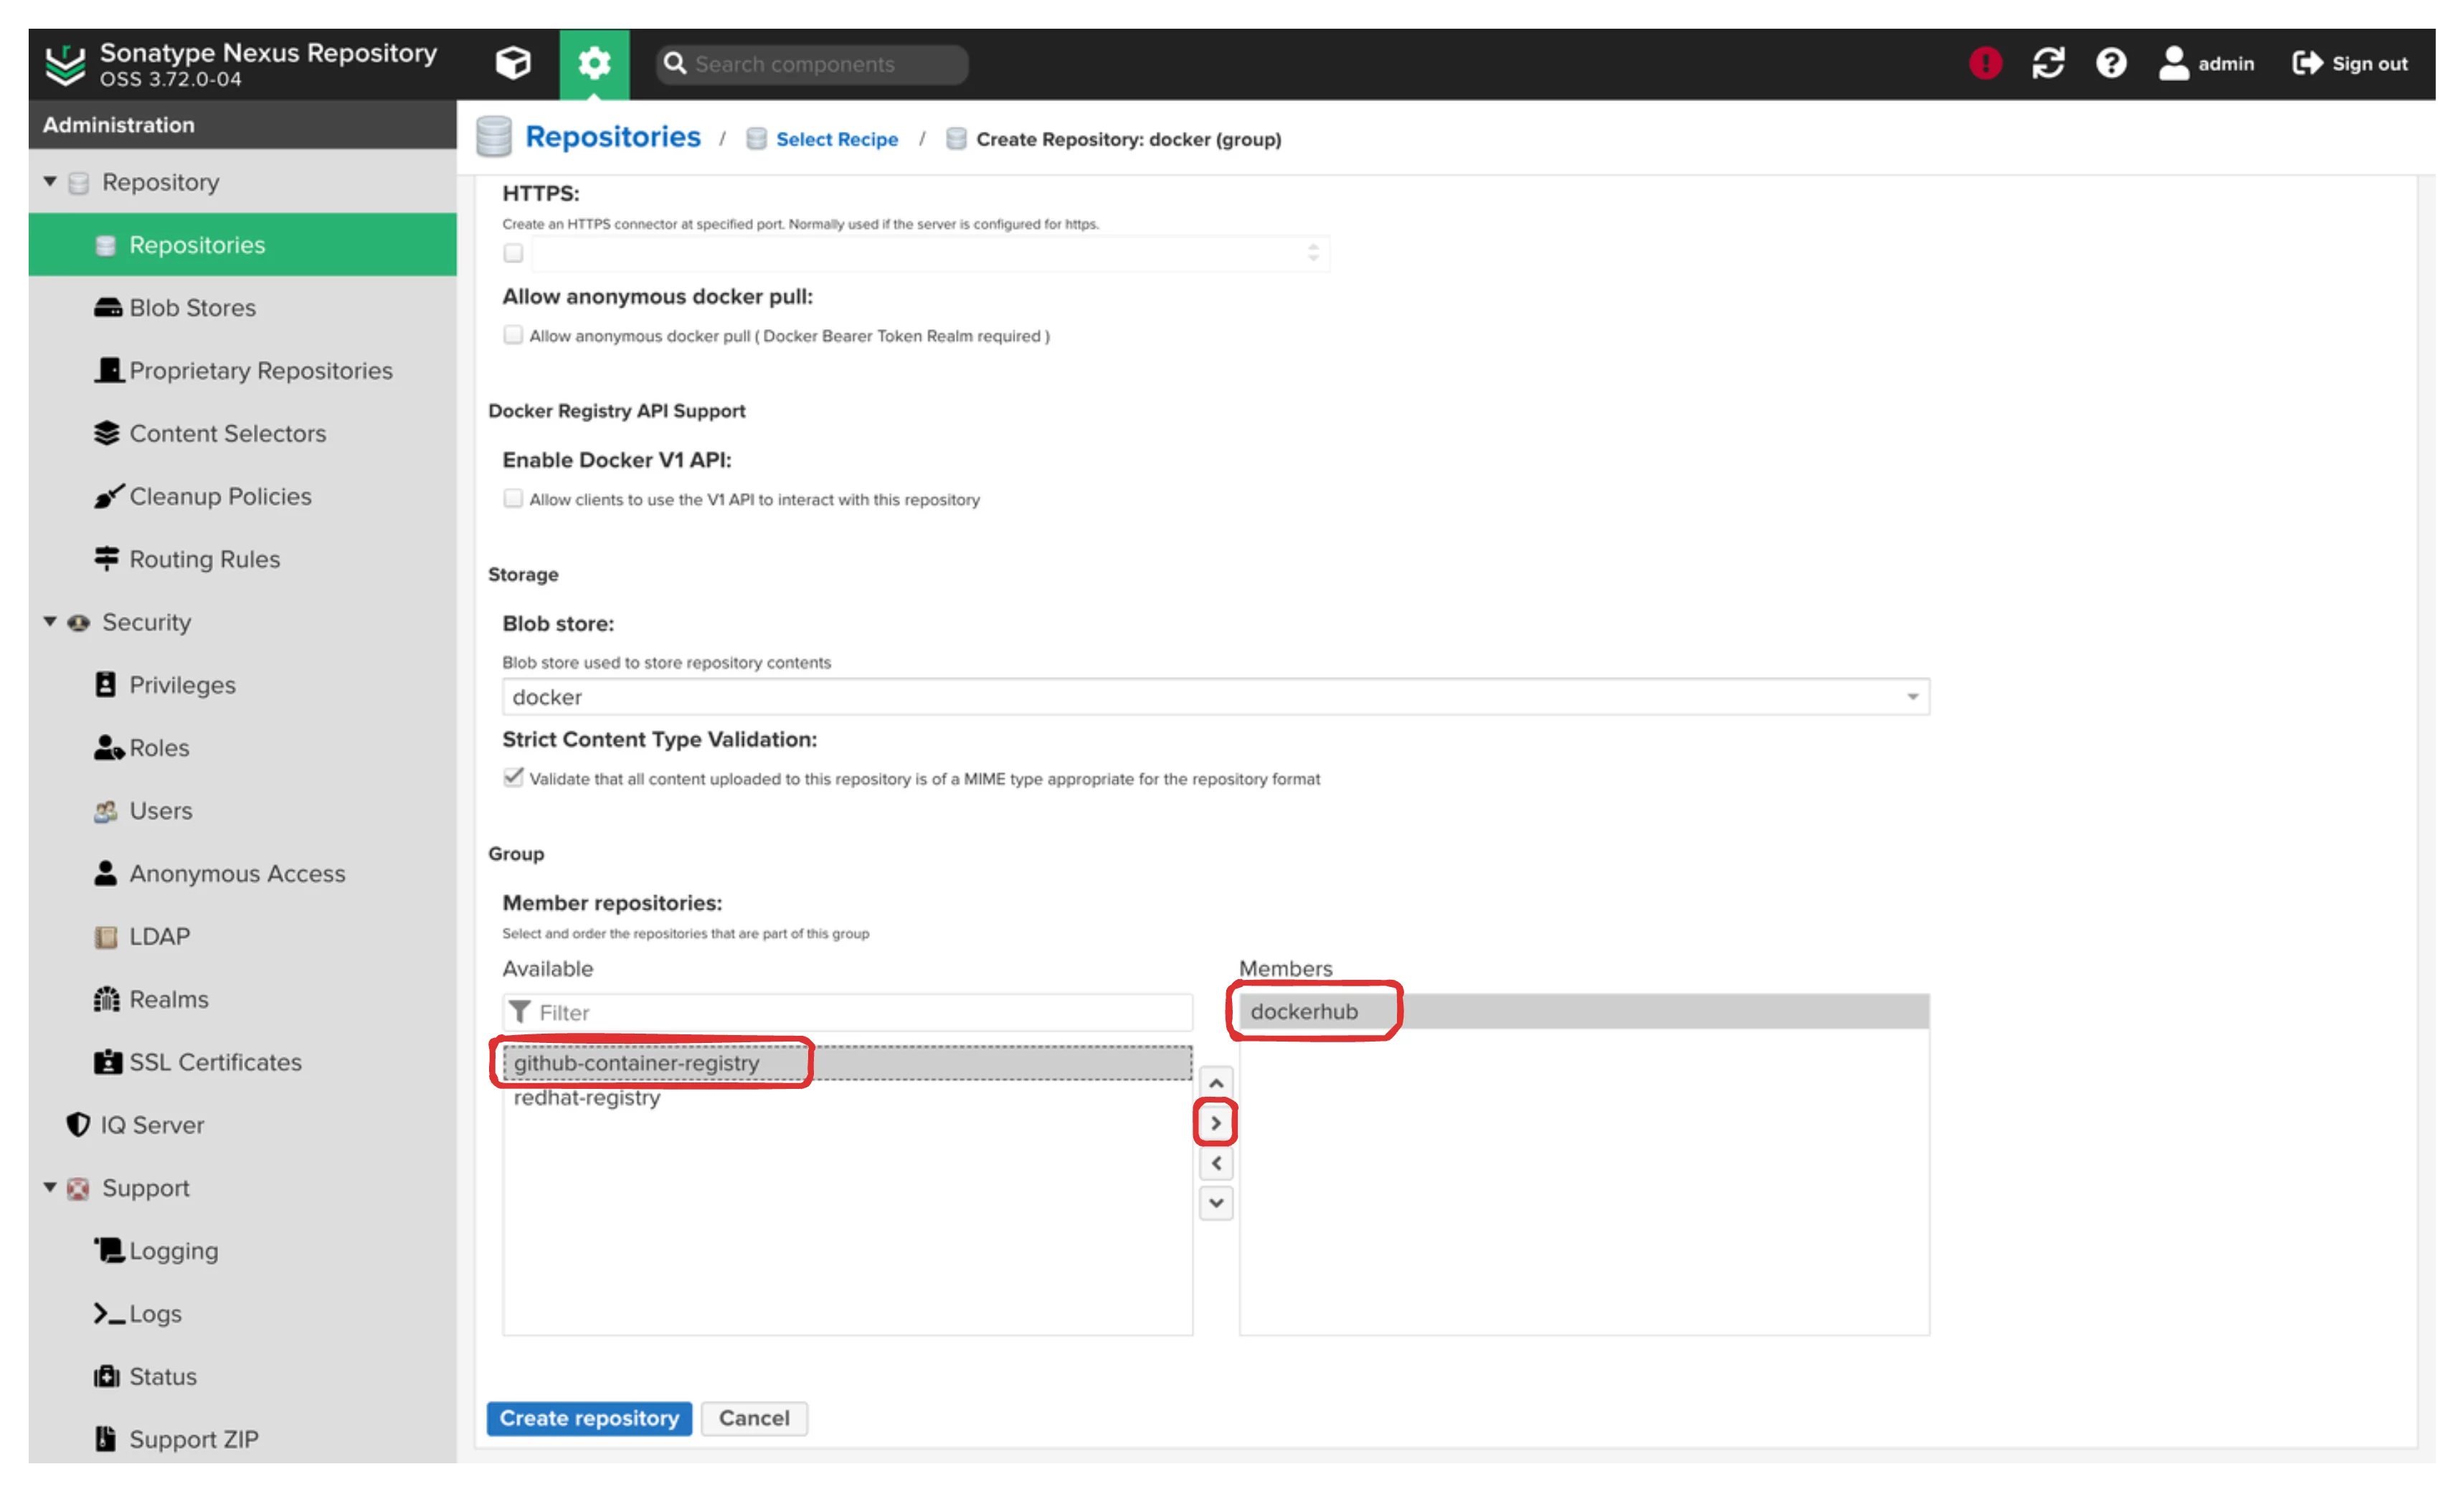
Hit create repository.
Maven Usage Examples
To use your Maven repository, update your build.gradle or pom.xml
files with the Nexus repository URL. For Android projects, also update
the Gradle wrapper properties.
Check the Repository URLs
Go to the repositories section and check the public URL of the maven
and gradle-distributions repositories.
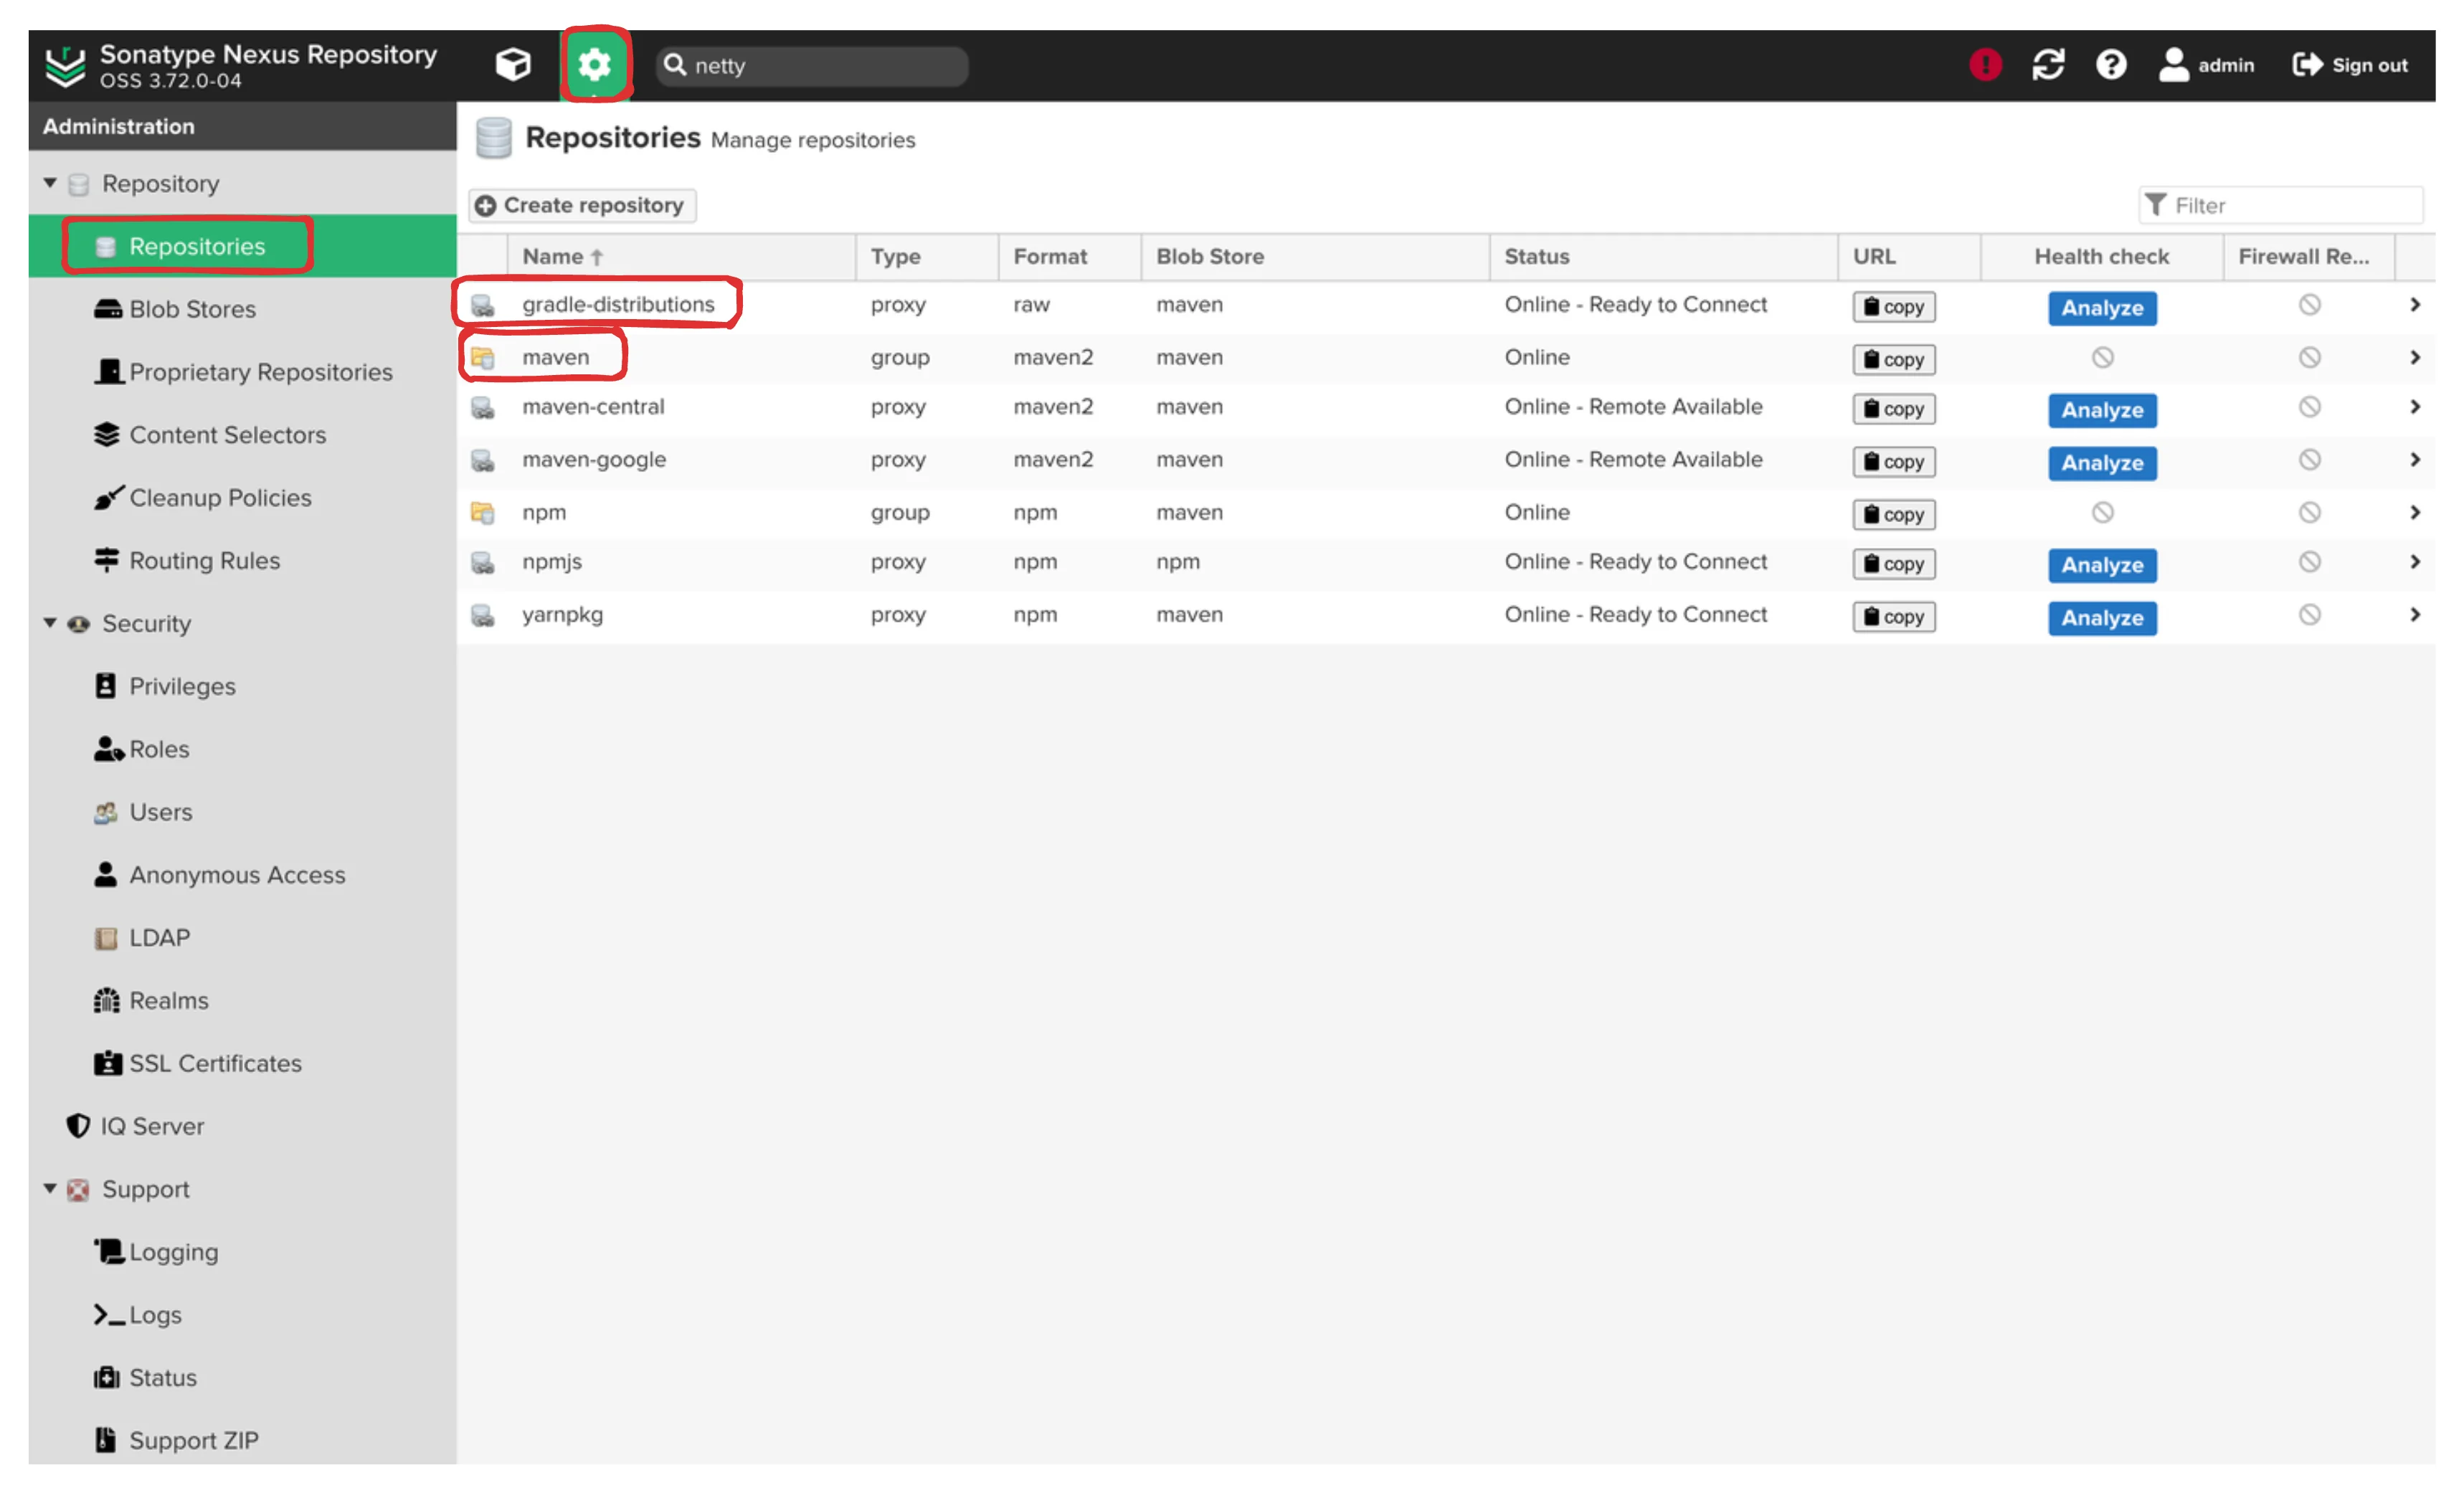
Copy the URL.
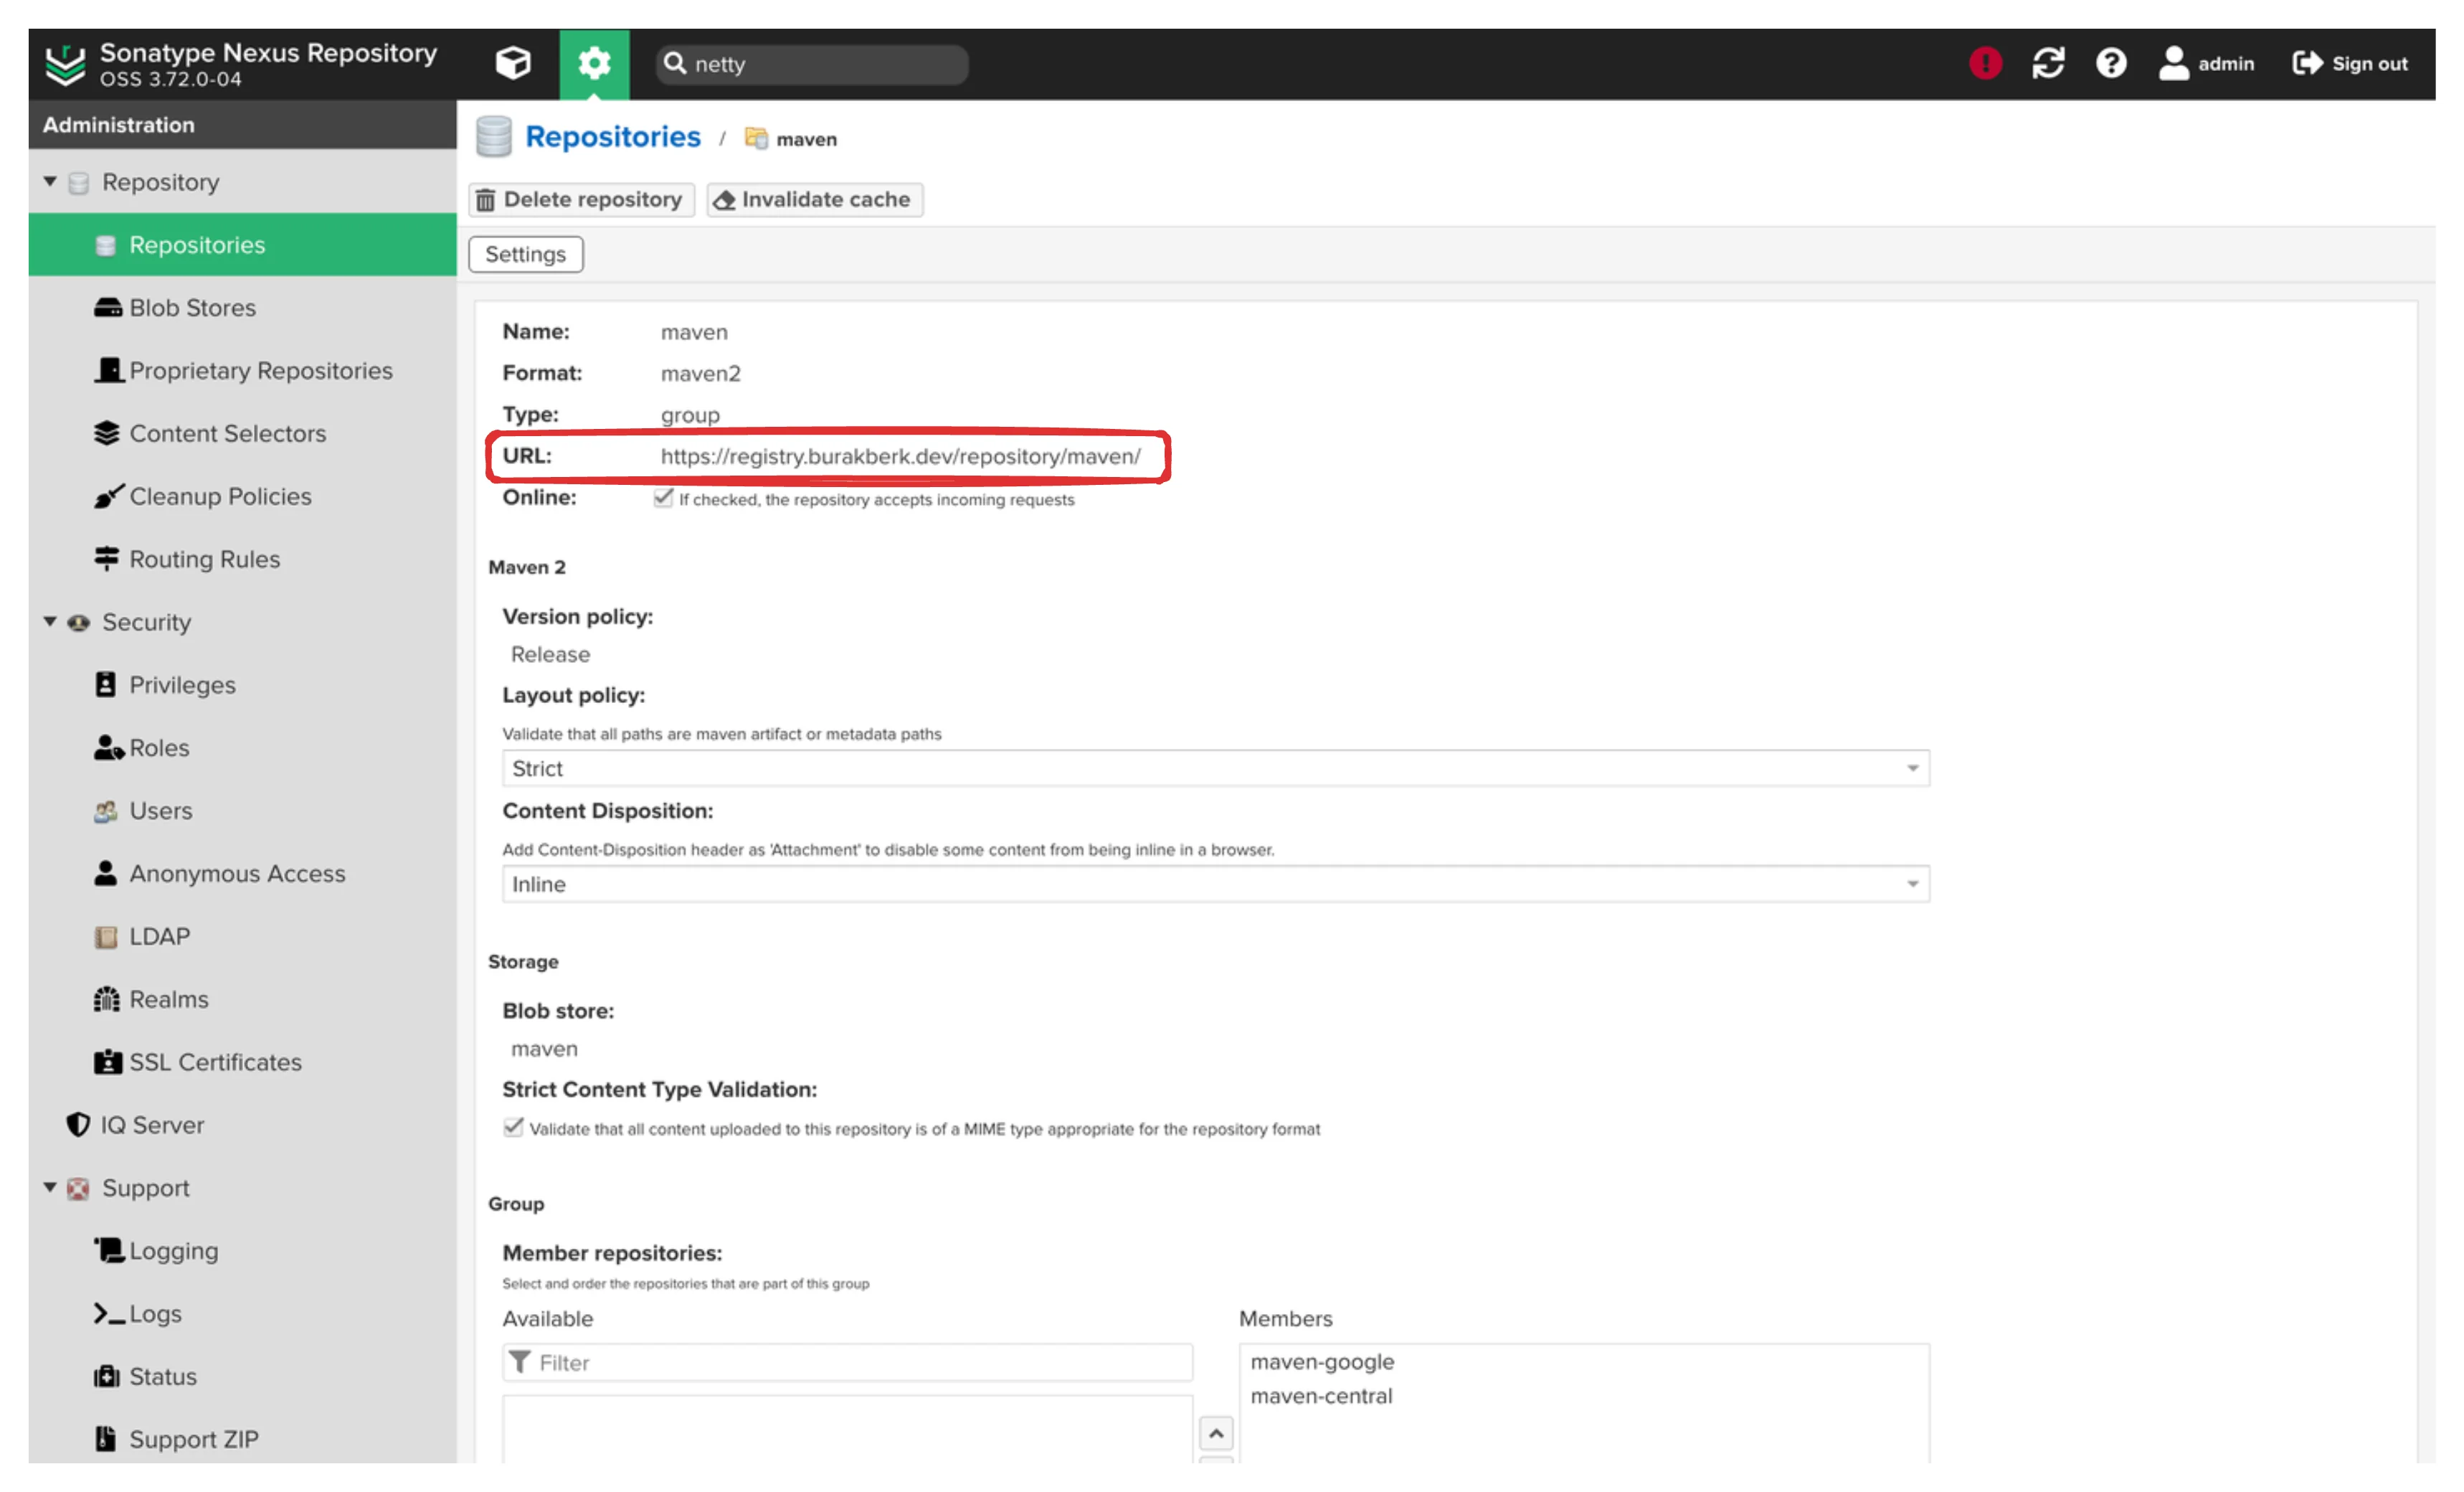
In my example, the repository URLs:
maven: https://registry.burakberk.dev/repository/maven/gradle distributions: https://registry.burakberk.dev/repository/gradle-distributions/Usage For an Android Gradle App
Create an react native application just to test android app.
npx @react-native-community/cli init myreactnativeapp && \cd myreactnativeapp/androidEdit the build.gradle file and add custom maven url. Remove
the google() and other maven repositories.
vim build.gradlebuildscript { ext { buildToolsVersion = "34.0.0" minSdkVersion = 23 compileSdkVersion = 34 targetSdkVersion = 34 ndkVersion = "26.1.10909125" kotlinVersion = "1.9.24" } repositories { maven { url 'https://registry.burakberk.dev/repository/maven' } } dependencies { classpath("com.android.tools.build:gradle") classpath("com.facebook.react:react-native-gradle-plugin") classpath("org.jetbrains.kotlin:kotlin-gradle-plugin") }}
apply plugin: "com.facebook.react.rootproject"Also edit the gradle wrapper properties file to download the zip from the Nexus raw repository. Also update the timeout to a higher rate.
vim gradle/wrapper/gradle-wrapper.propertiescat gradle/wrapper/gradle-wrapper.propertiesdistributionBase=GRADLE_USER_HOMEdistributionPath=wrapper/distsdistributionUrl=https\://registry.burakberk.dev/repository/gradle-distributions/gradle-8.8-all.zipnetworkTimeout=120000validateDistributionUrl=truezipStoreBase=GRADLE_USER_HOMEzipStorePath=wrapper/distsUsage for other Java Applications
Edit the pom.xml file of the project.
vim pom.xmlChange or edit the repositories section. Add the public URL you copied
from the nexus.
<repositories> <repository> <id>nexus-repo</id> <url>https://registry.burakberk.dev/repository/maven/</url> </repository></repositories>Browse the Maven Repository From Nexus UI
Check the maven repository if there are any downloaded and cached packages to make sure your configurations are correct and the packages are being downloaded from the Nexus.
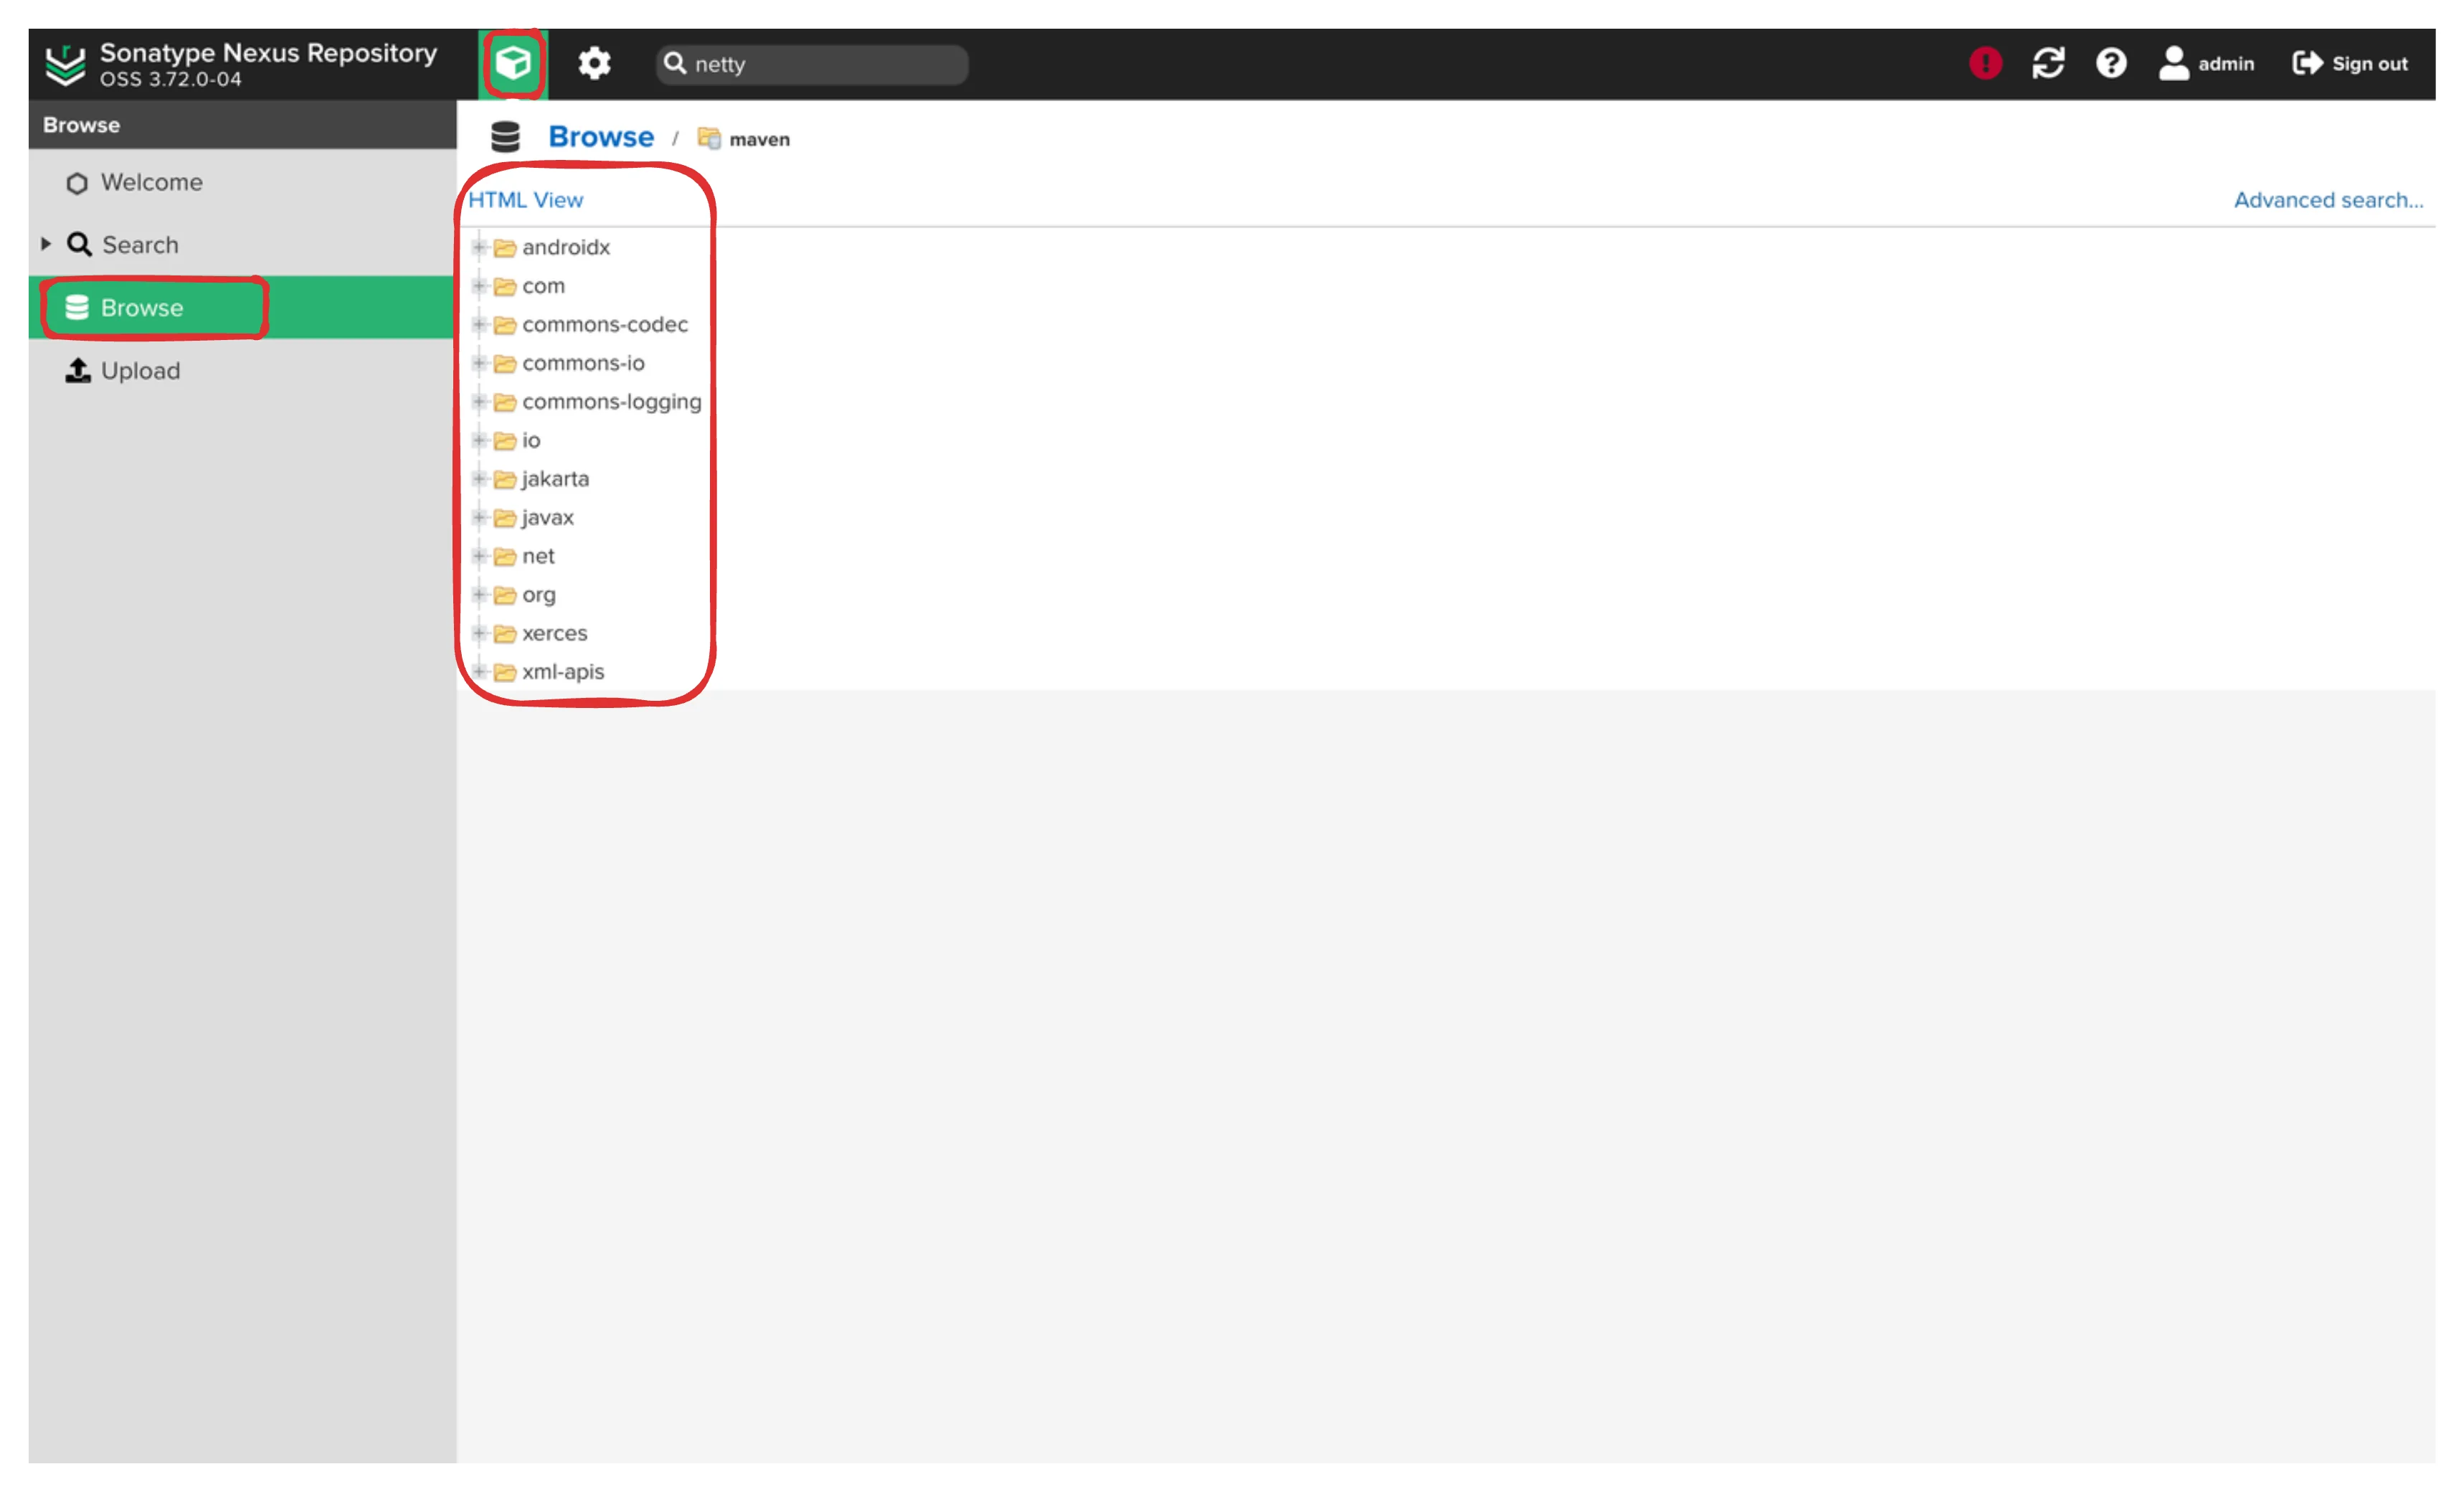
NPM Usage Examples
Update your package-lock.json or yarn.lock files to use the Nexus
NPM repository URL:
Head to the Nexus UI and NPM group repository named npm if you
followed the guides above.
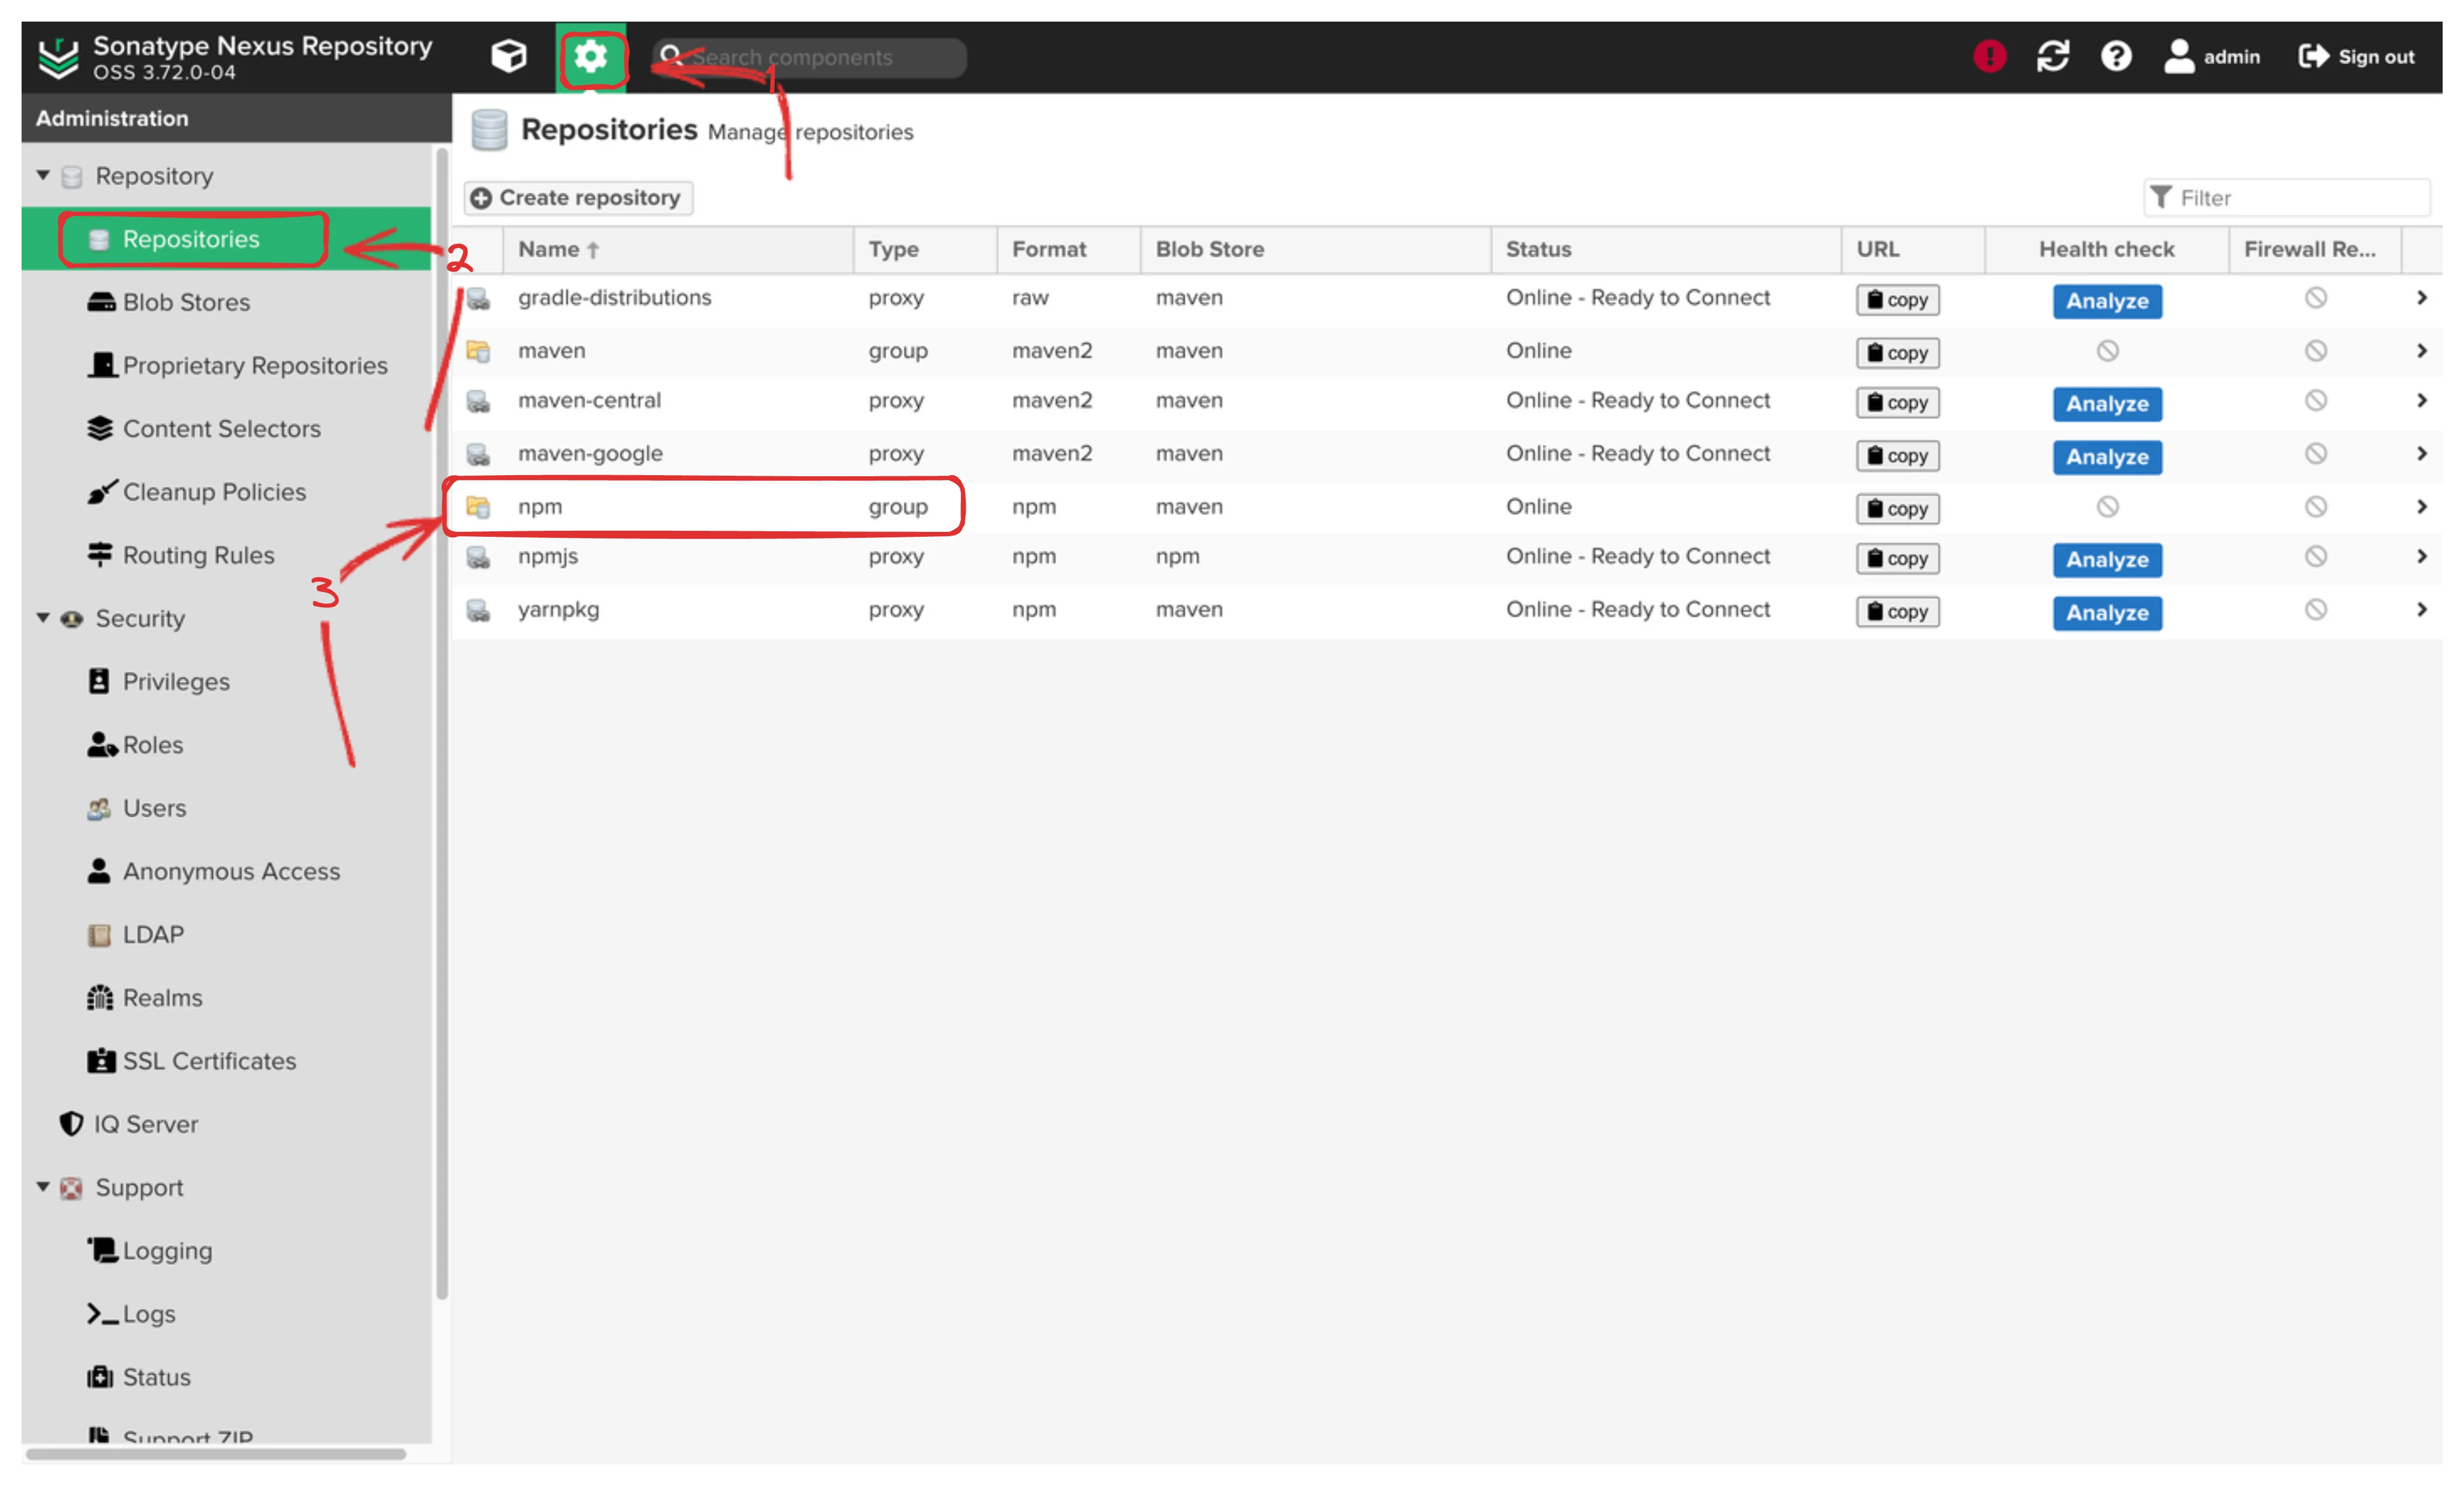
Note the repository URL
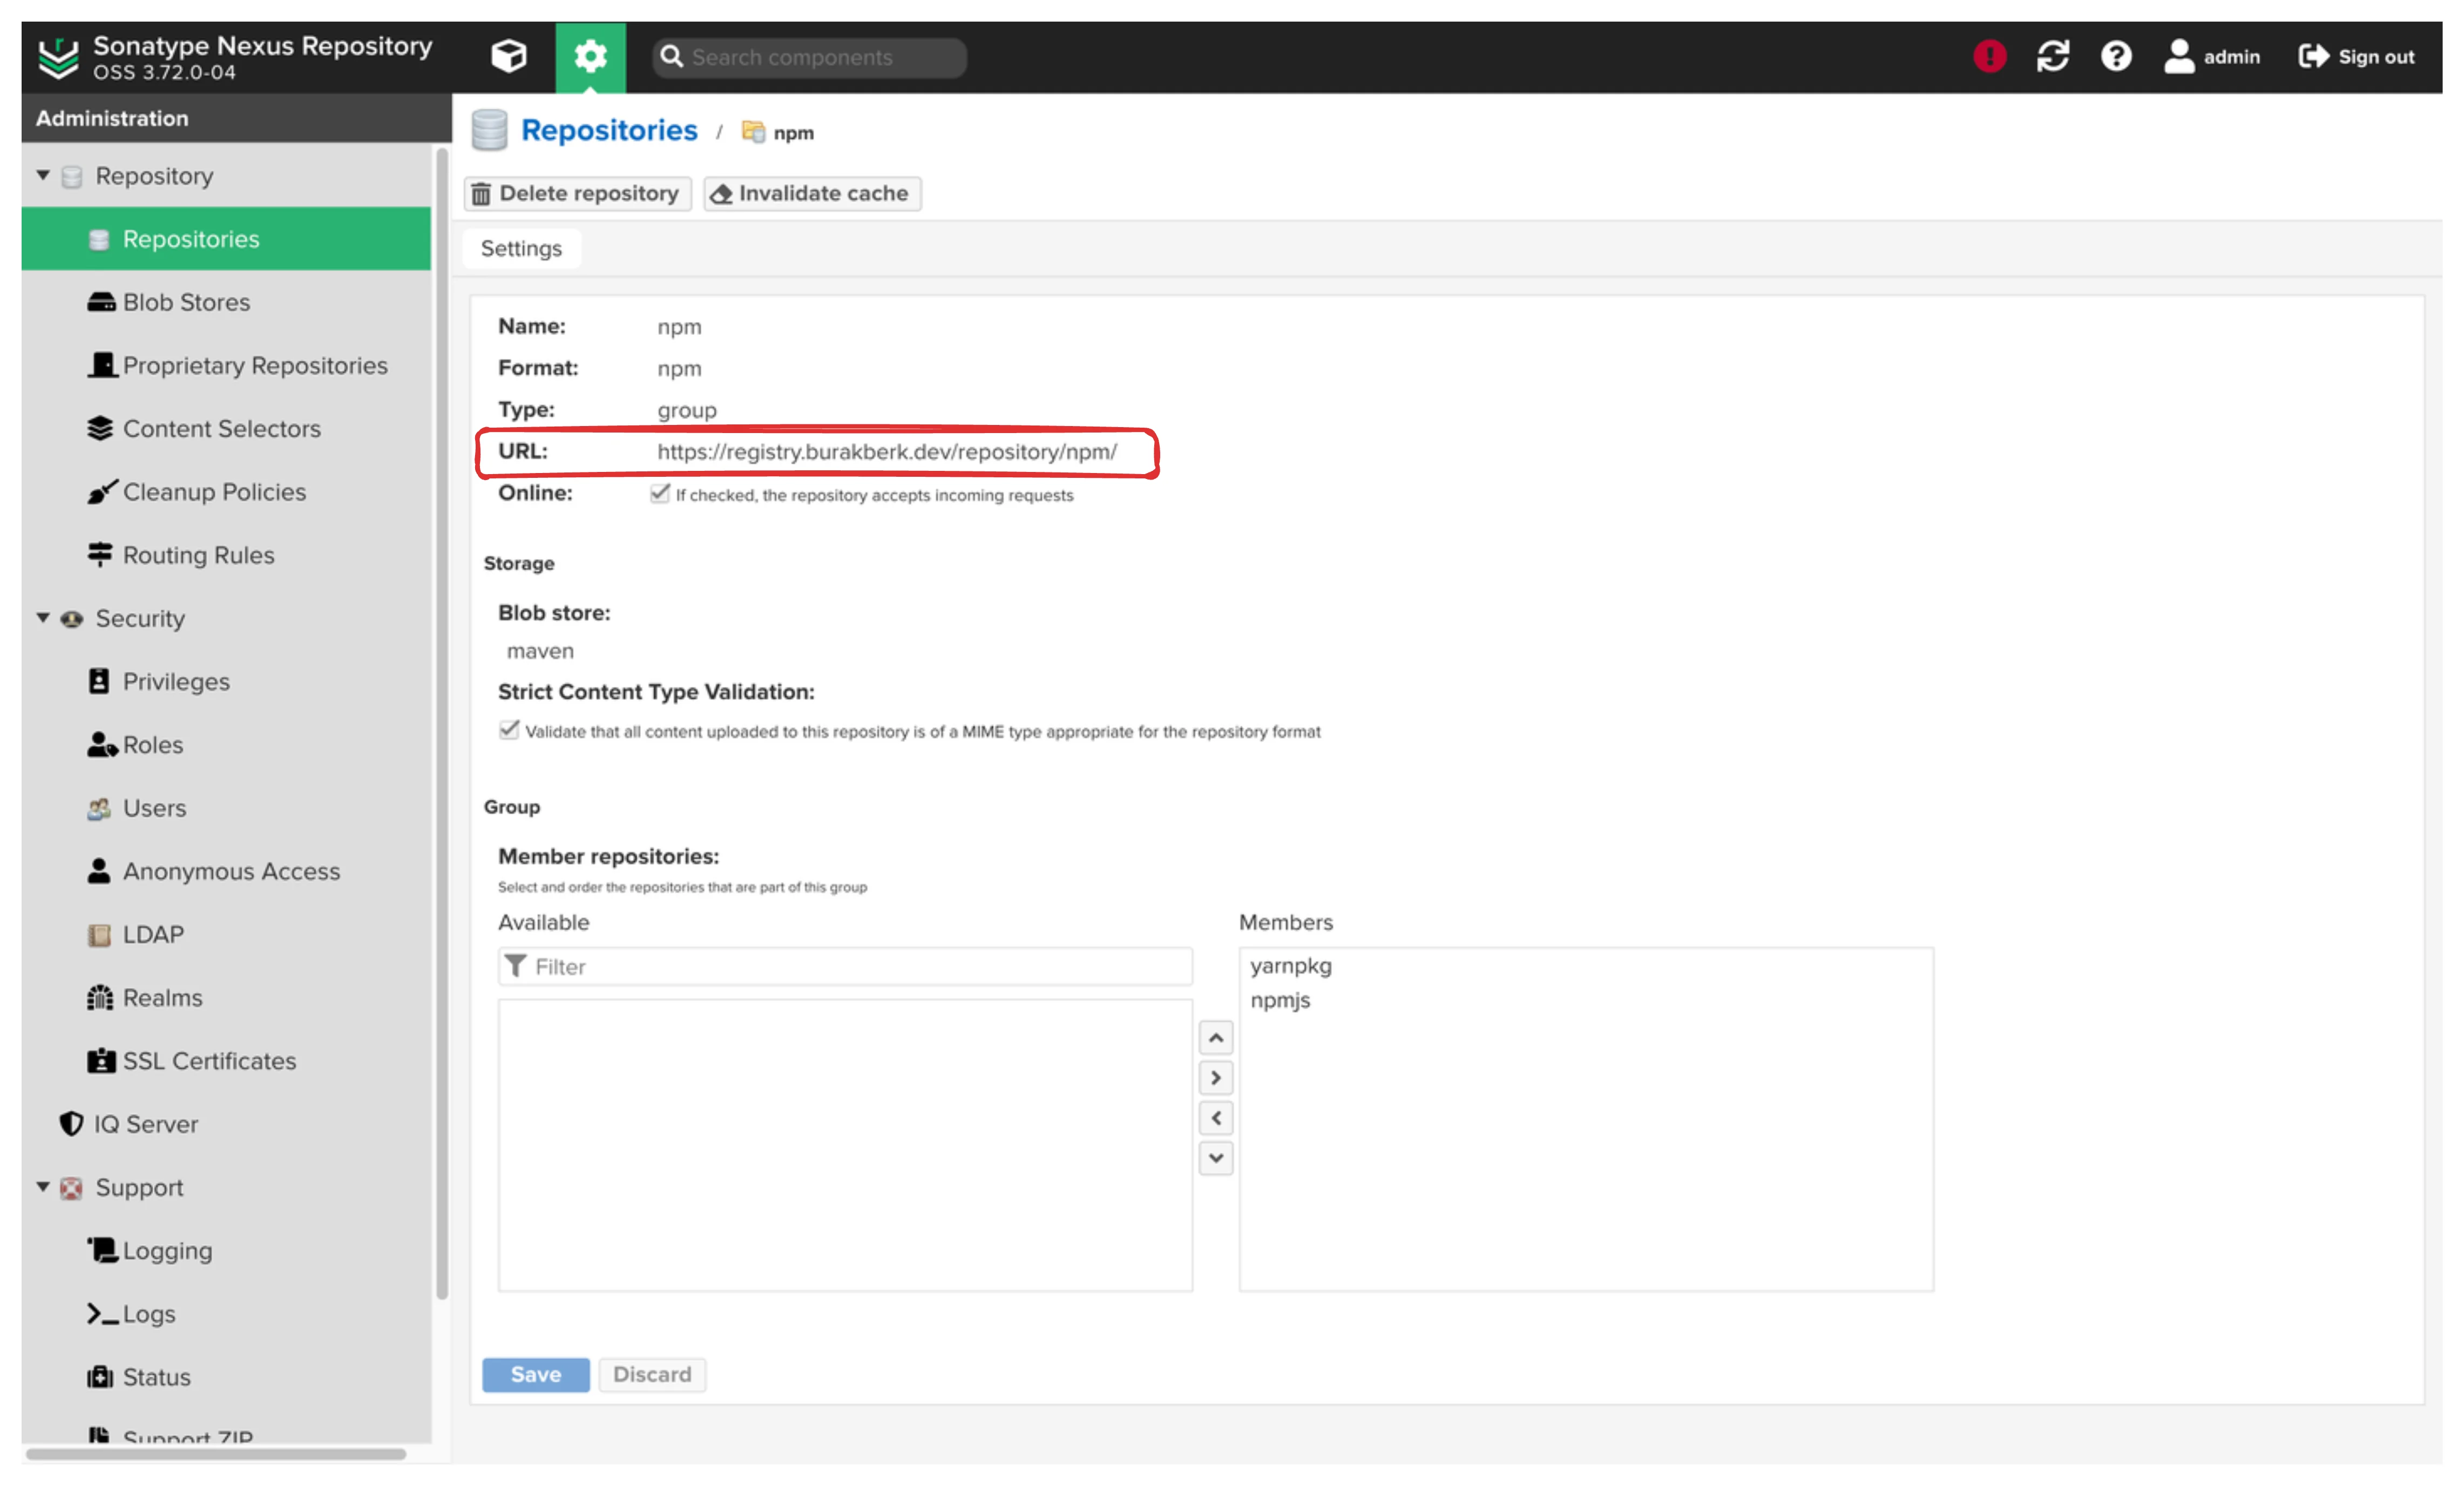
Sample NodeJS Application
Create a new react application to test the Nexus repository.
mkdir my-app && cd my-app/ && \npx create-react-app . my-app --template typescriptUsage for NPM
This command will replace all https://registry.npmjs.org URLs in your
package-lock.json file with your own Nexus repository URL. It will
also backup the original file before replacing the URLs.
NEXUS_NPM_REGISTRY_URL=https://registry.burakberk.dev/repository/npm && \DEFAULT_NPM_REGISTRY_URL=https://registry.npmjs.org && \echo "$NEXUS_NPM_REGISTRY_URL" >> ~/.npmrc && \sed -i '.backup' "s#${DEFAULT_NPM_REGISTRY_URL}#${NEXUS_NPM_REGISTRY_URL}#g" package-lock.jsonInstall packages.
npm installIf you want to be sure about the downloaded packages are being
downloaded from the Nexus URL, you can add --verbose flag to the
npm install command.
npm install --verboseUsage for Yarn
This command will replace all https://registry.npmjs.org URLs in your
yarn.lock file with your own Nexus repository URL. It will also backup
the original file before replacing the URLs.
NEXUS_NPM_REGISTRY_URL=https://registry.burakberk.dev/repository/npm && \DEFAULT_NPM_REGISTRY_URL=https://registry.yarnpkg.com && \echo "$NEXUS_NPM_REGISTRY_URL" >> ~/.npmrc && \sed -i '.backup' "s#${DEFAULT_NPM_REGISTRY_URL}#${NEXUS_NPM_REGISTRY_URL}#g" yarn.lockInstall packages.
yarn installIf you want to be sure about the downloaded packages are being
downloaded from the Nexus URL, you can add --verbose flag to the
npm install command.
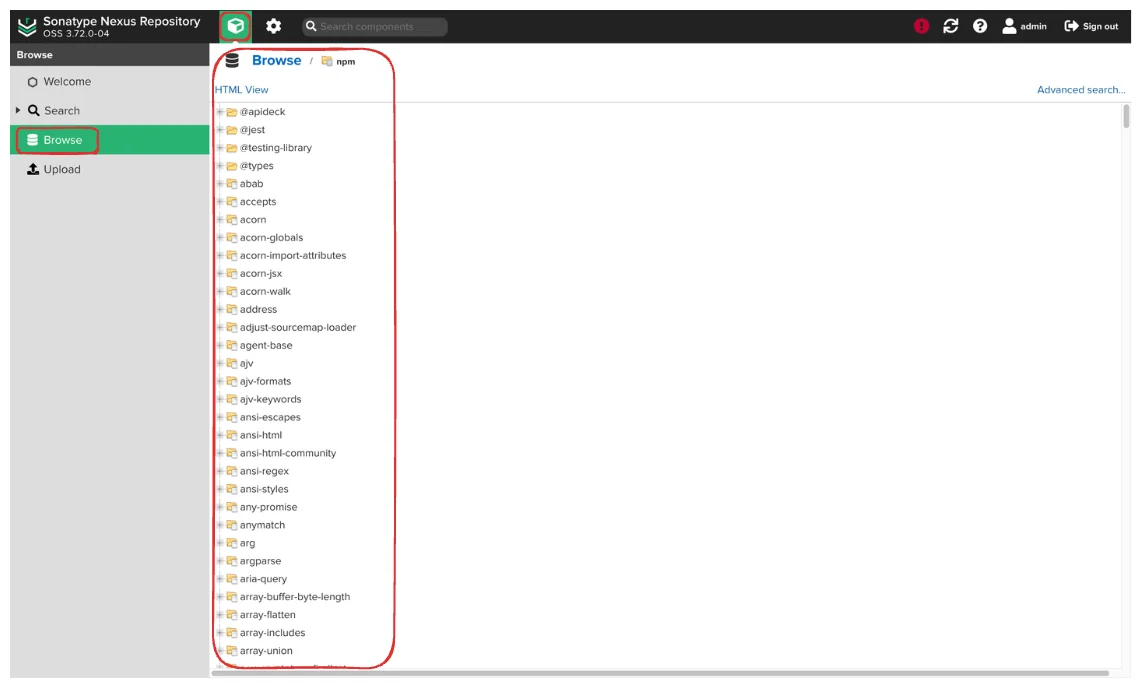
yarn install --verboseBrowse the NPM Repository From Nexus UI
Check the NPM repository if there are any downloaded and cached packages to make sure your configurations are correct and the packages are being downloaded from the Nexus.
Docker Usage Examples
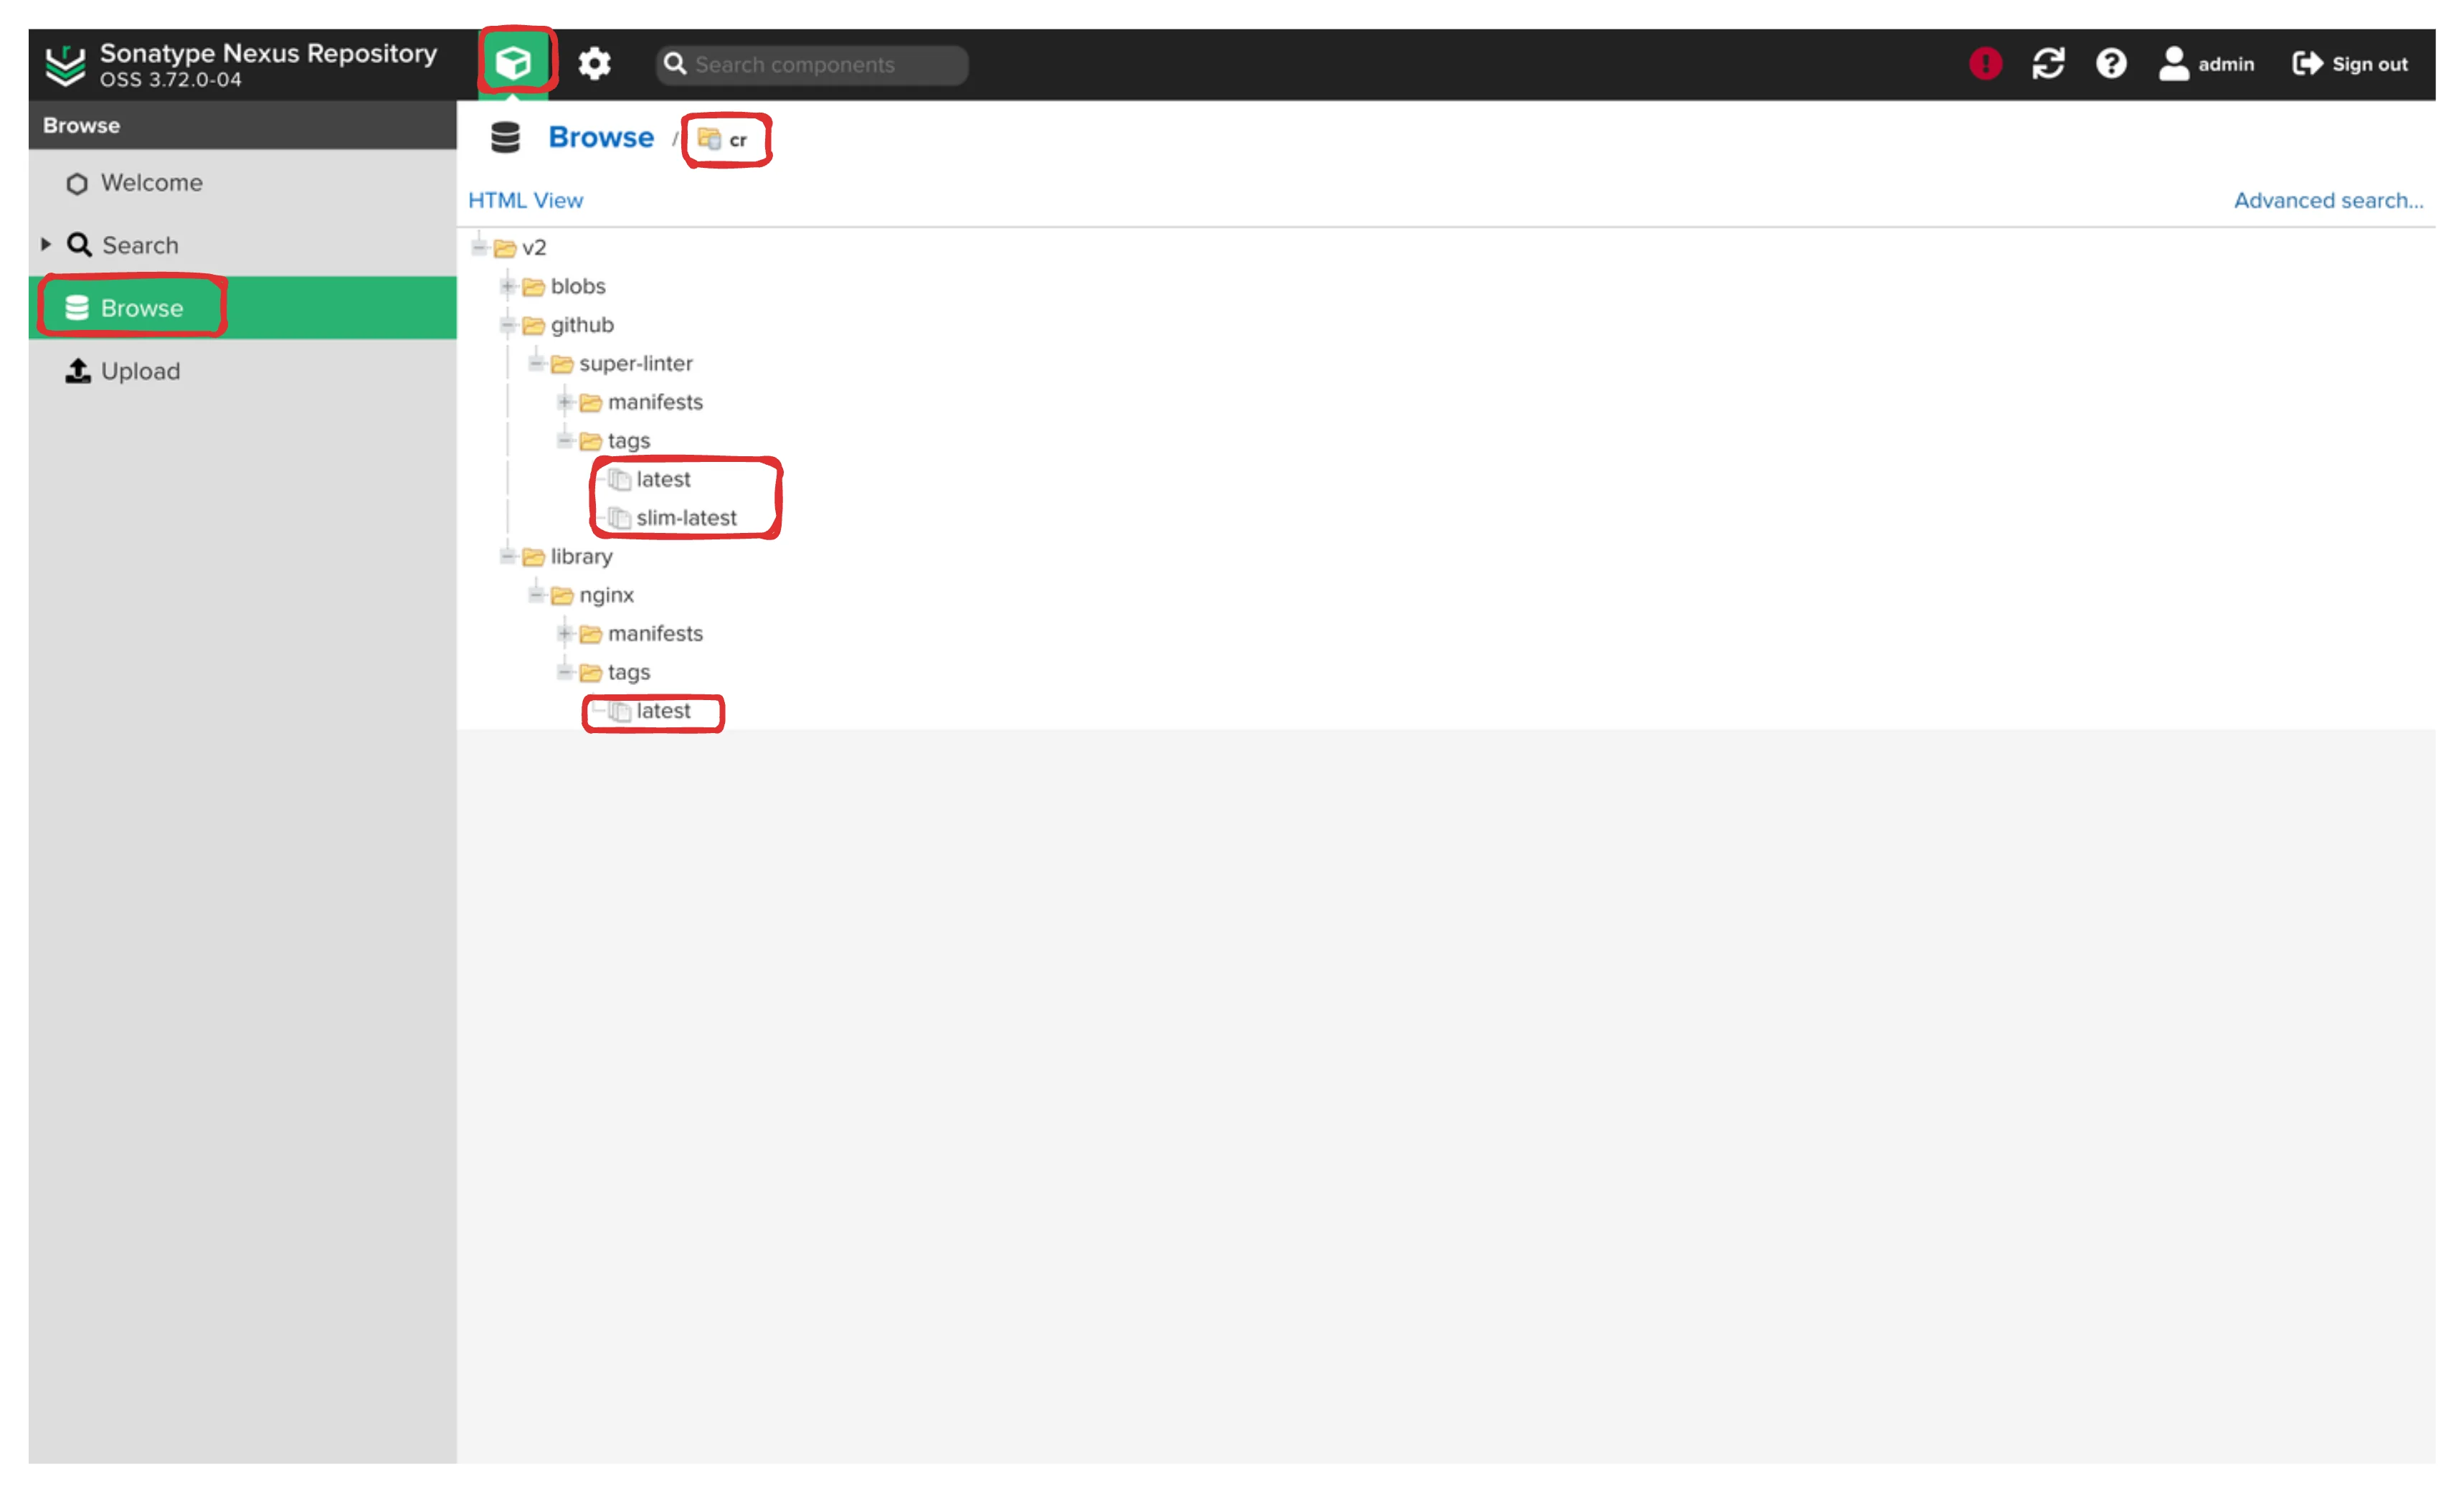
CR registry: Group of Docker Hub and Github Container Registry
Try to pull a standart image like nginx or ubuntu.
$ docker pull cr.burakberk.dev/nginxUsing default tag: latestlatest: Pulling from nginx302e3ee49805: Pull completed07412f52e9d: Pull complete9ab66c386e9c: Pull complete4b563e5e980a: Pull complete55af3c8febf2: Pull complete5b8e768fb22d: Pull complete85177e2c6f39: Pull completeDigest: sha256:d2eb56950b84efe34f966a2b92efb1a1a2ea53e7e93b94cdf45a27cf3cd47fc0Status: Downloaded newer image for cr.burakberk.dev/nginx:latestcr.burakberk.dev/nginx:latestSuccessfully pulled the image from the Nexus repository. The image is downloaded from the Docker Hub proxy registry.
Now lets try to pull a Github container registry specific image.
docker pull cr.burakberk.dev/github/super-linter:latestSuccessfully pulled ✅
Red Hat Registry
Run the docker pull command on two different registries and see if you
can pull the images from the Nexus installation.
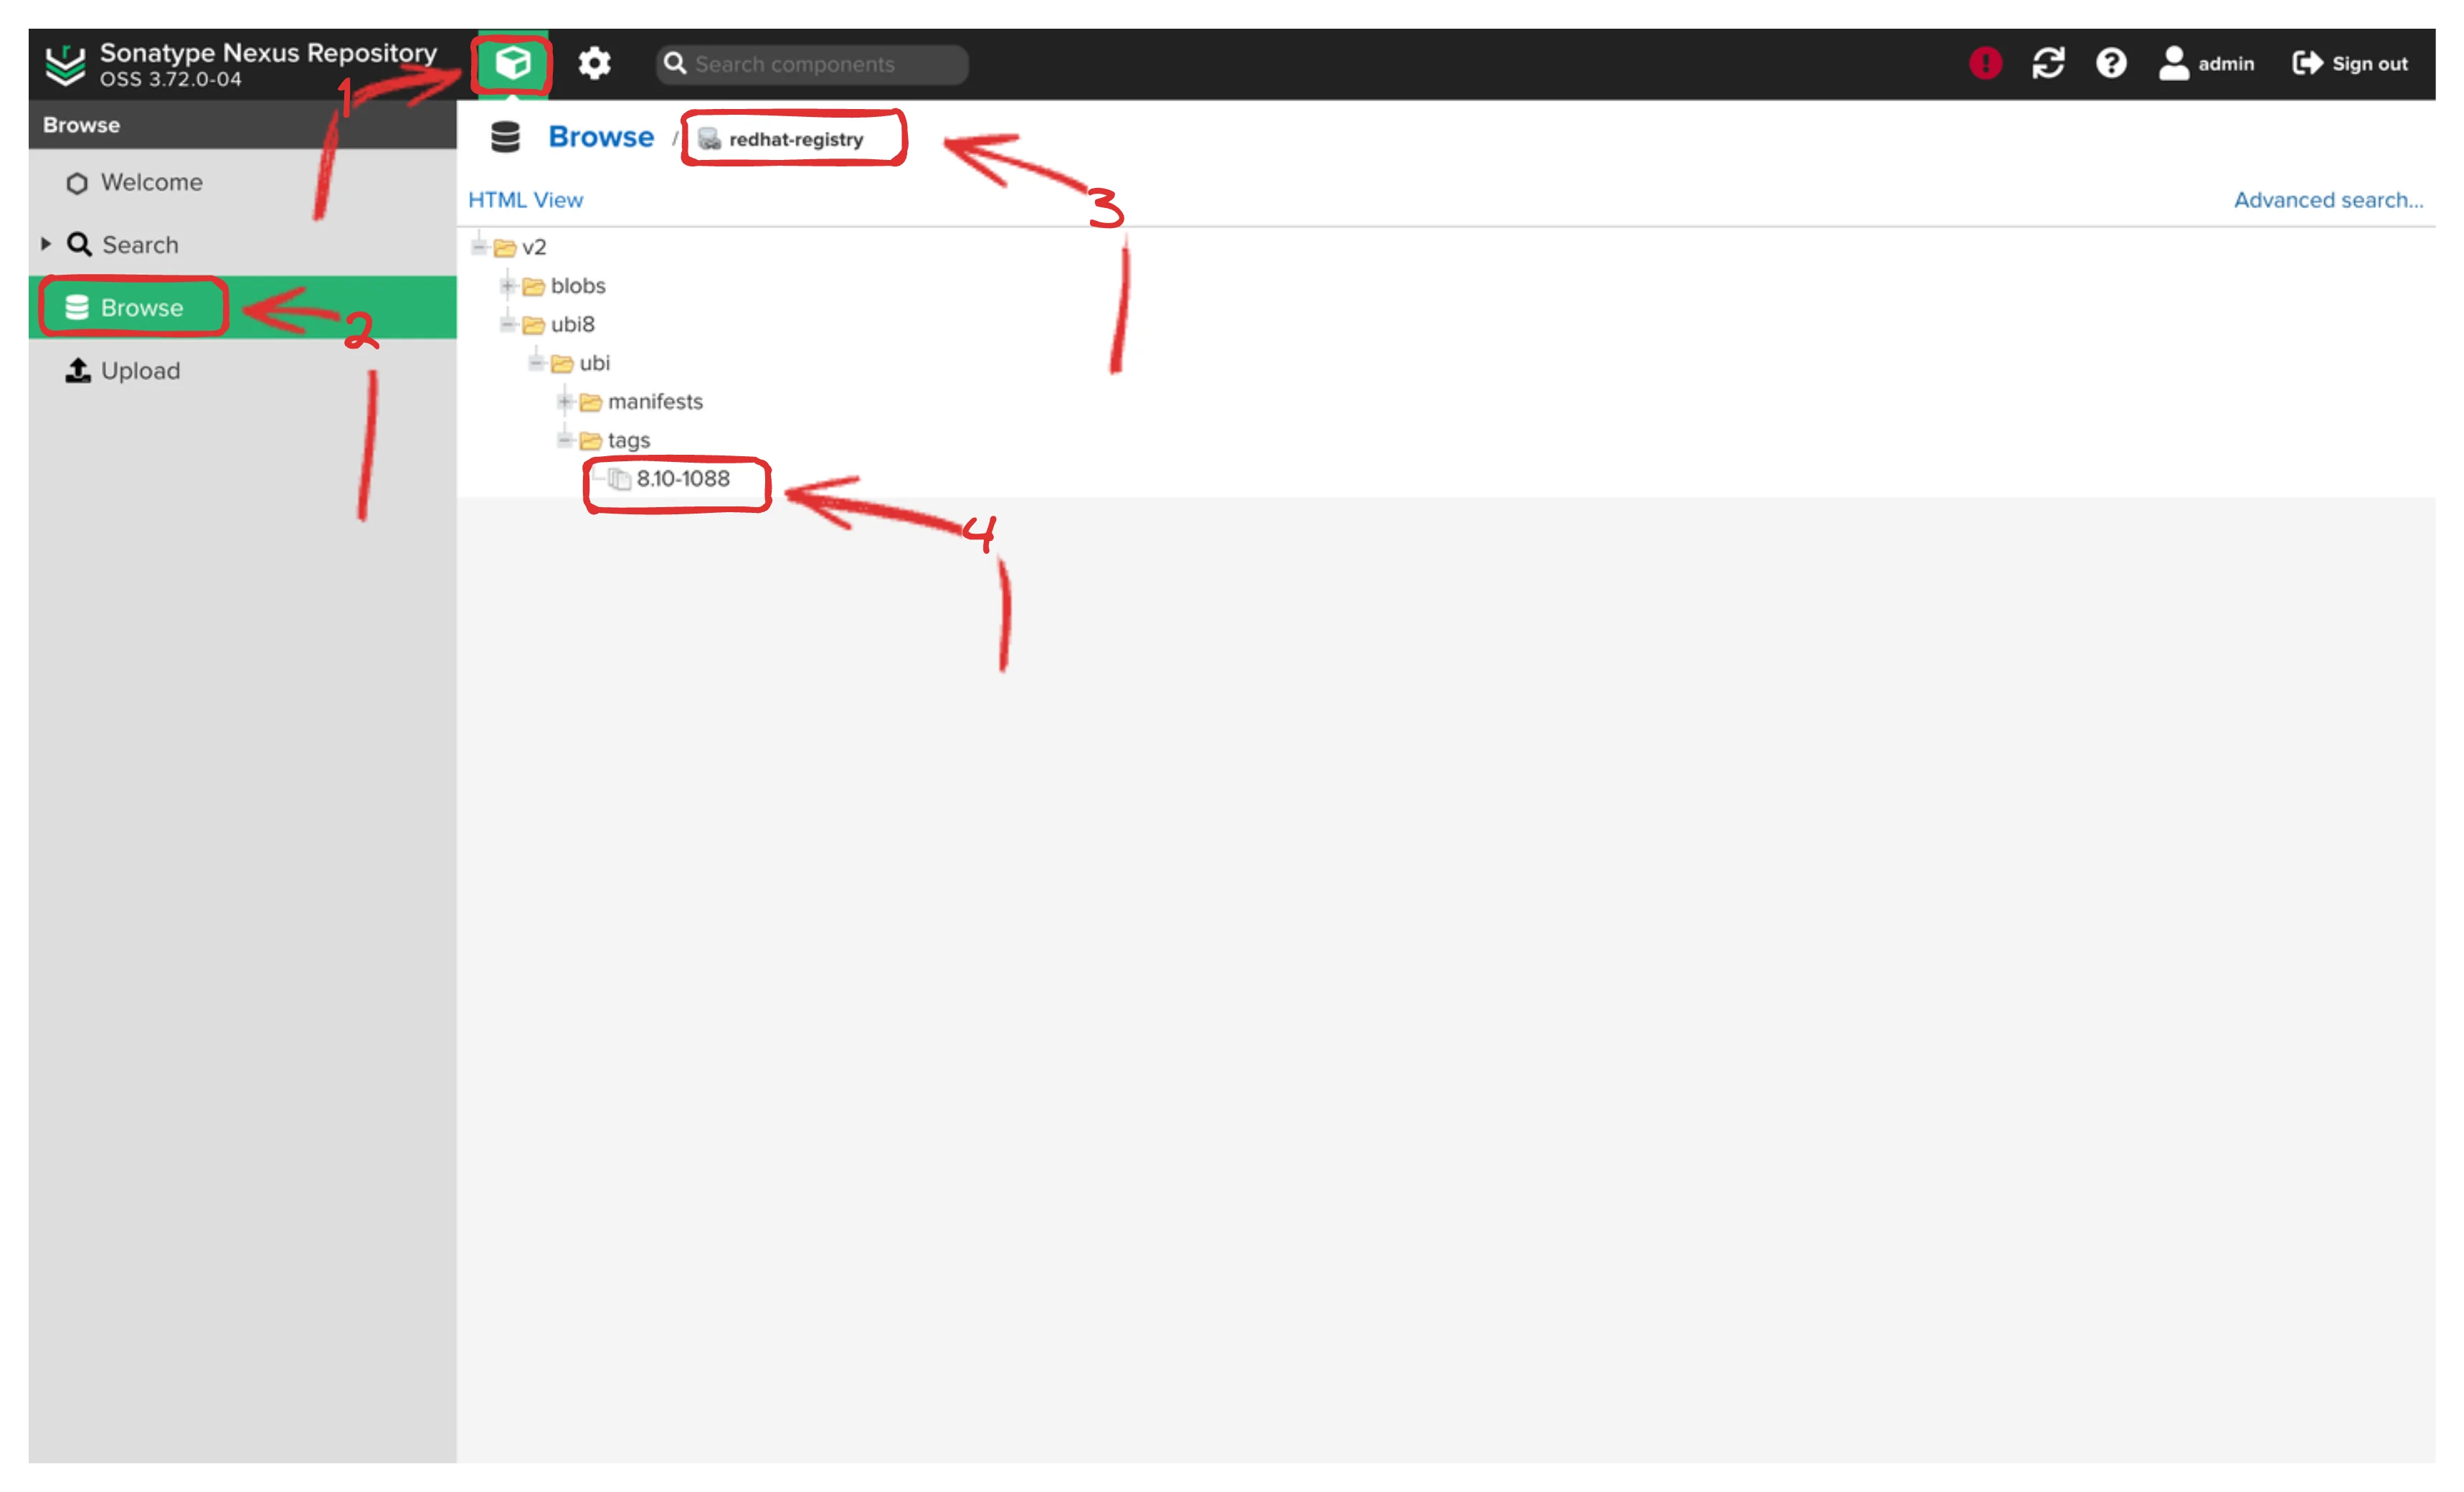
For example, pulling the ubi:8.10-1088 image from the
redhat-registry.
$ docker pull redhat-registry.burakberk.dev/ubi8/ubi:8.10-10888.10-1088: Pulling from ubi8/ubi148a3ed2f70e: Pull completeDigest: sha256:a965f33ee4ee57dc8e40a1f9350ddf28ed0727b6cf80db46cdad0486a7580f9dStatus: Downloaded newer image for redhat-registry.burakberk.dev/ubi8/ubi:8.10-1088redhat-registry.burakberk.dev/ubi8/ubi:8.10-1088Successfully pulled ✅
Also browse the Nexus repository and check if the image exists.
Conclusion
Congratulations! You’ve now set up a comprehensive Nexus repository manager capable of handling Maven, NPM, and Docker packages. This setup will provide faster access to packages and greater control over your dependencies.
Remember to regularly maintain your Nexus instance, keeping an eye on storage usage and updating proxy repositories as needed.